2. Basic operation
Estimated reading time: 42 minutes
This section describes the basic displayed contents and operations of Operation web application.
Overview of this application
Operation web application is composed of the following:
(A) Top of screen
- BRAVIA Signage Server Version: The BRAVIA Signage Server version is displayed in the upper left of screen.
- i Icon: When you mouse over the i icon on the upper right of the screen, the network adapter name and IP address (only for IPv4) of the server PC are displayed. The information of multiple servers is displayed if multiple IP addresses are allocated, such as when using both wired LAN and wireless LAN.
- Help: This documentation is displayed when you click the [Help] link on upper right of screen.
(B) Center of screen
- Menu Tab: The menu tab is displayed on the left of the screen.
- Operation Area: The operation screen is displayed on the right of the screen in accordance with the menu selected from the menu tab.
(C) Bottom of screen
- Server Time: The PC time that BRAVIA Signage Server runs on is displayed. BRAVIA Signage Player runs based on this time, such as schedule delivery, power schedule, etc.
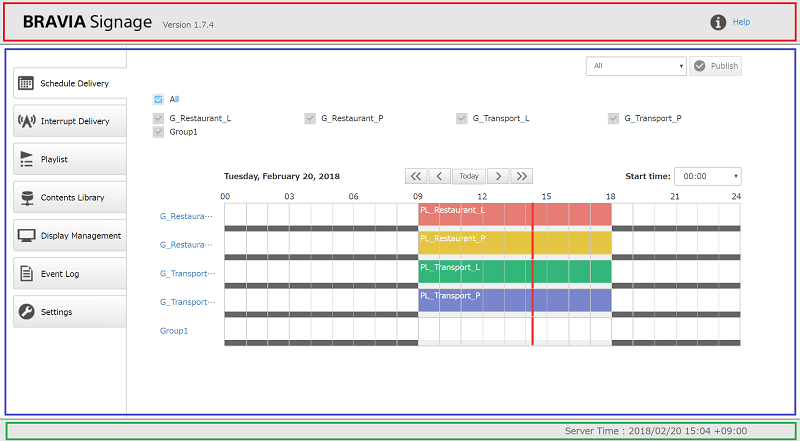
The following description mainly describes how to operate in “Operation area”. The captured screen images in the following descriptions may be older than your current version, but the procedures and operations are the same.
Schedule delivery
On this page, delivery schedules and power schedules can be managed. This section describes how to operate on this page. Not only schedules that specify “day of week” but also schedules that specify “date” can be registered, and end times after 24:00, such as 25:00, can be specified. Refer to Advanced schedule management about these advanced uses.
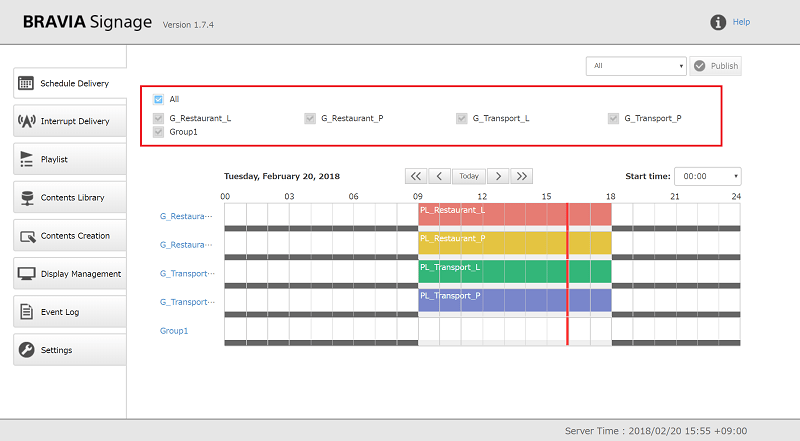
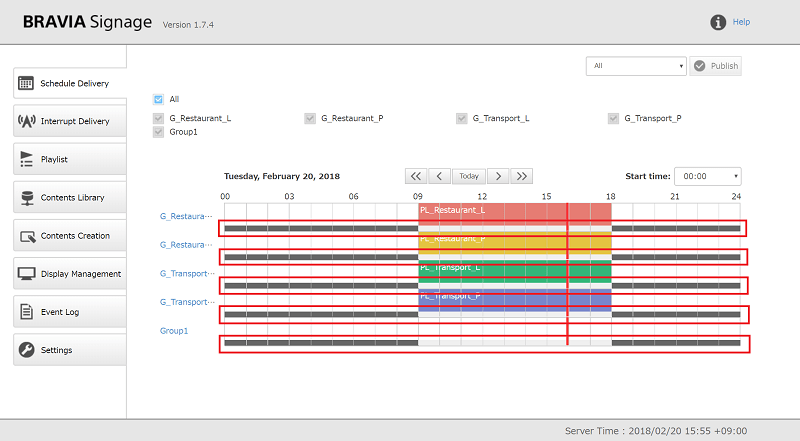
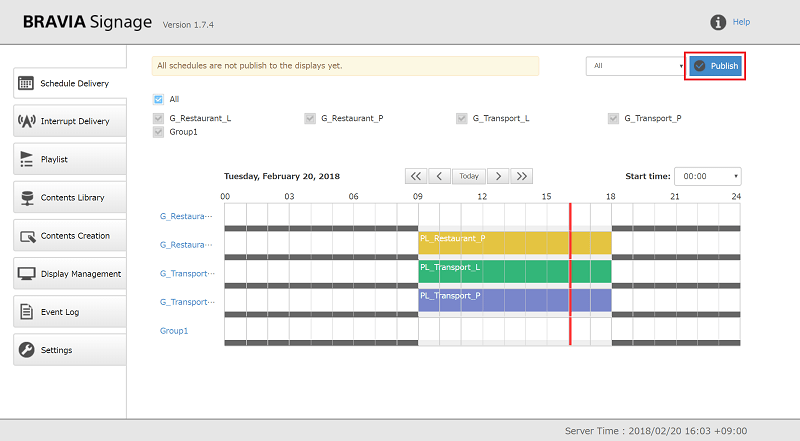
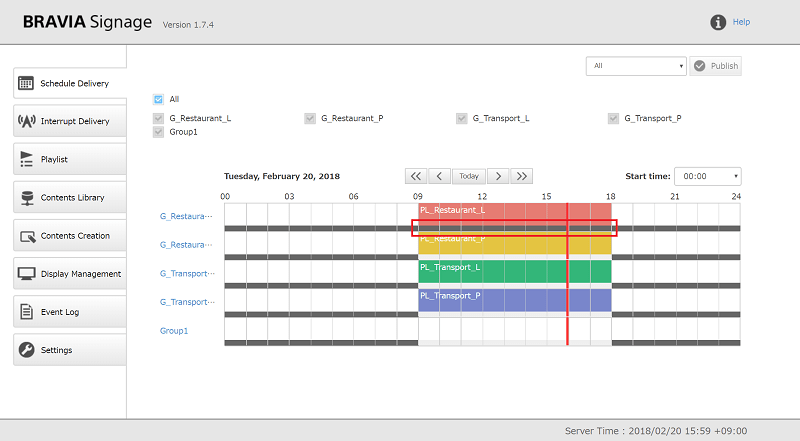
Appearance of [Schedule Delivery] page
- Group names registered on the [Display Management] page are displayed at the top of the screen. Delivery schedules and power schedules of the checked groups are displayed on the screen.
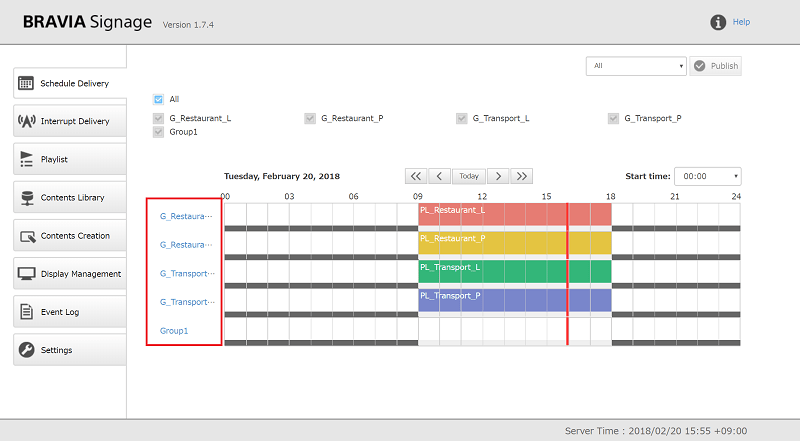
- Schedule information is displayed for each group. Each group name is displayed at the left of the scheduler.
- The registered schedule information is displayed with playlist names and 24 colors. When you mouse over the registered schedule, the details of the schedule information are displayed.
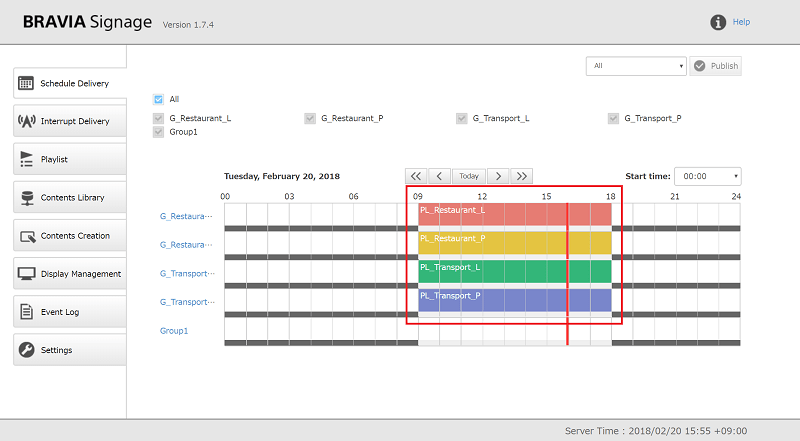
- In addition, the power schedule is displayed with the delivery schedule on the bottom of scheduler. Light gray indicates “period of power on” and dark gray is “period of power off”.
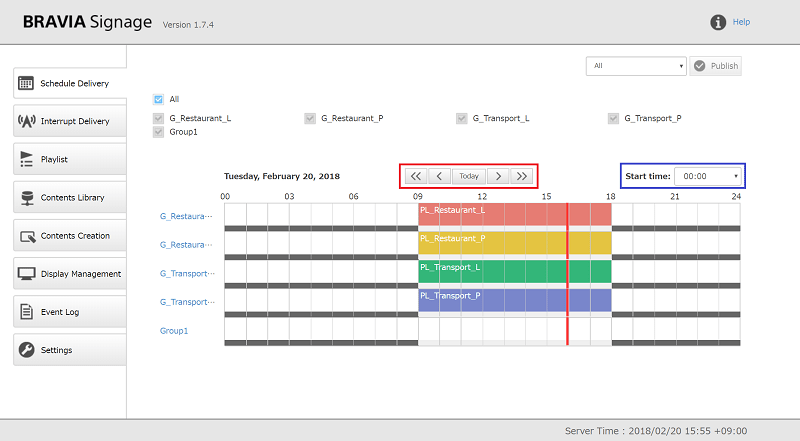
How to operate scheduler
-
The current date can be changed by pushing [Today] button, [<] button, [>] button, [<<] button, [>>] button. When you push each button, the display switches between the schedules of the current date, the previous day, the following day, 1 week before, and 1 week later.
-
Times from 00:00 to 21:00 can be selected at 3 hour intervals in the [Start time] box. The start time on the scheduler can be changed in accordance with the user’s operation time zone. For example, [Start time] can be used to switch the display from “15:00” if your store opens at 18:00.
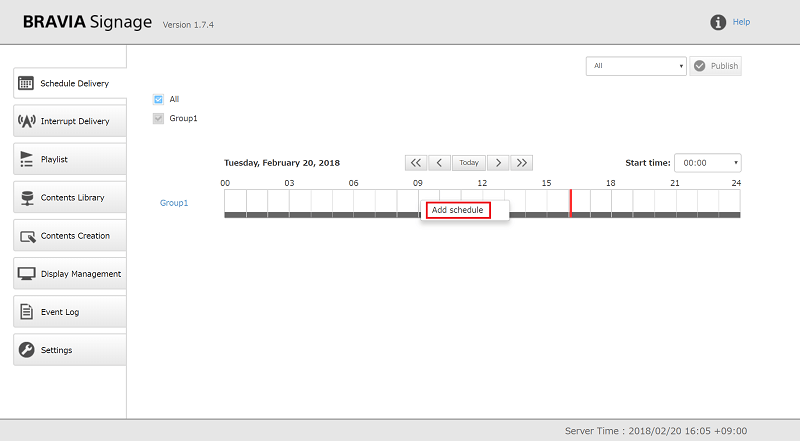
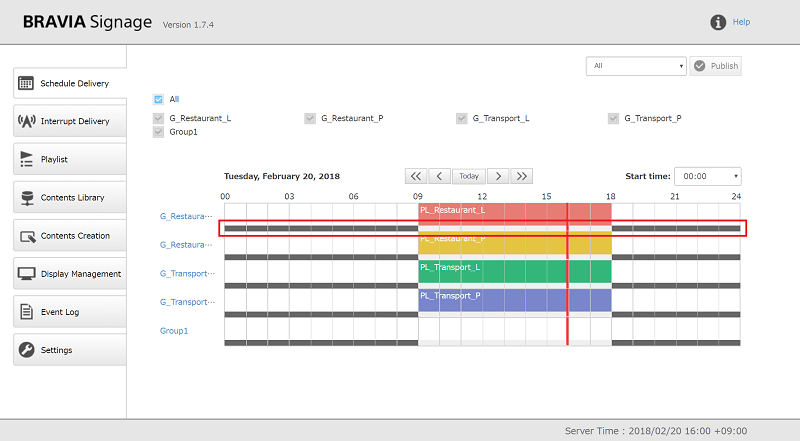
How to register new schedule
[1] Click on the scheduler of the target group and select [Add schedule].
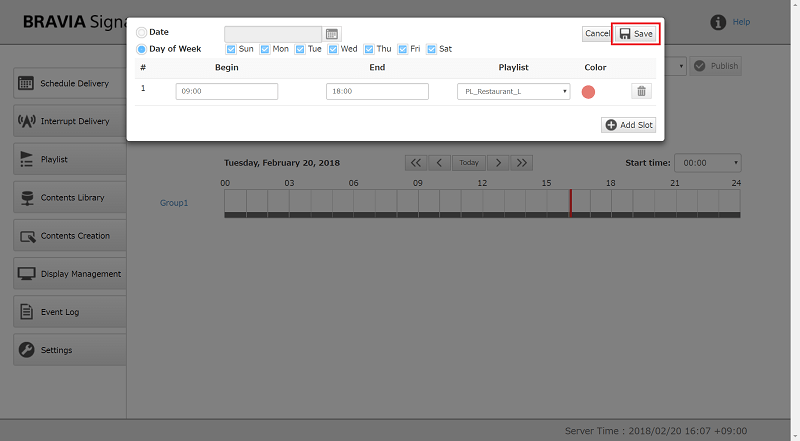
[2] Input the required items on the dialog in accordance with the message displayed on the top of the screen. Schedule information consists of the following items. Multiple combinations of start times and end times, playlists and background colors can be specified. If specifying multiple combinations, more input fields can be added by pushing the [Add slot] button.
- “Day of week” or “date” of playback
- Begin time and end time
- Played back playlist
- Background color on scheduler
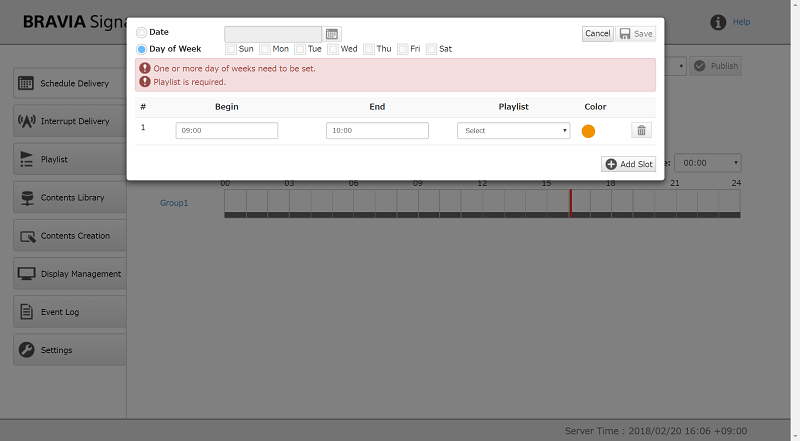
[3] When you enter the required items, the [Save] button is enabled. After you push this button, the registered schedule is displayed on this page.
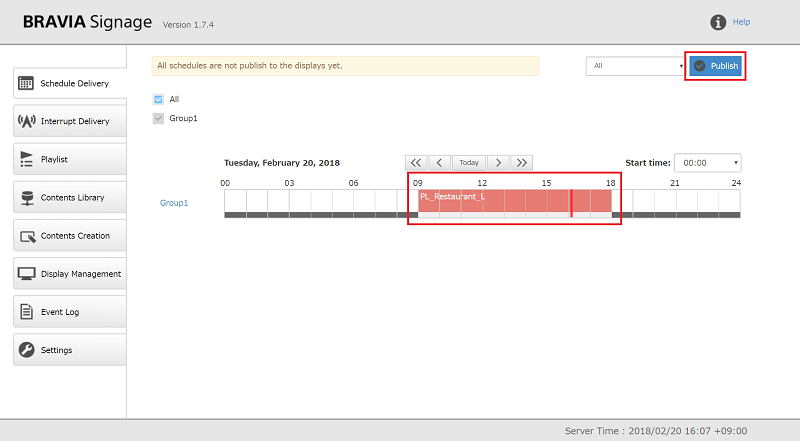
[4] The registered data must be published to play the playlist on the display (BRAVIA Signage Player). Push the [Publish] button after selecting a group name from the select box in the top of the screen. It should be noted that BRAVIA Signage Player gets the time and time zone from the server BRAVIA Signage Server runs on and the BRAVIA Signage Player does not use the time and time zone set on display.
How to change schedule
[1] Click on the registered schedule, and select [Edit schedule].

[2] Execute steps [2] to [4] of “How to register new schedule”.
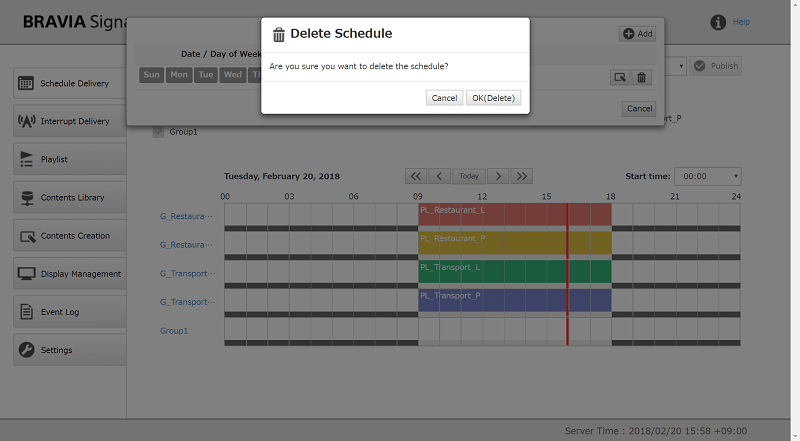
How to delete schedule
[1] Click on the registered schedule, and select [Delete schedule].
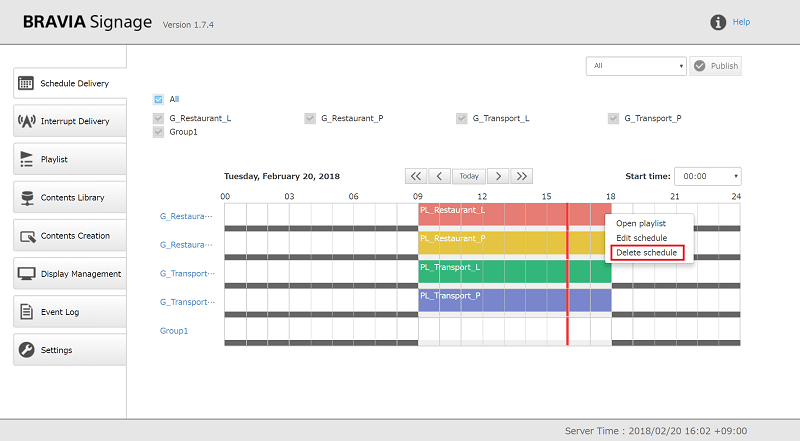
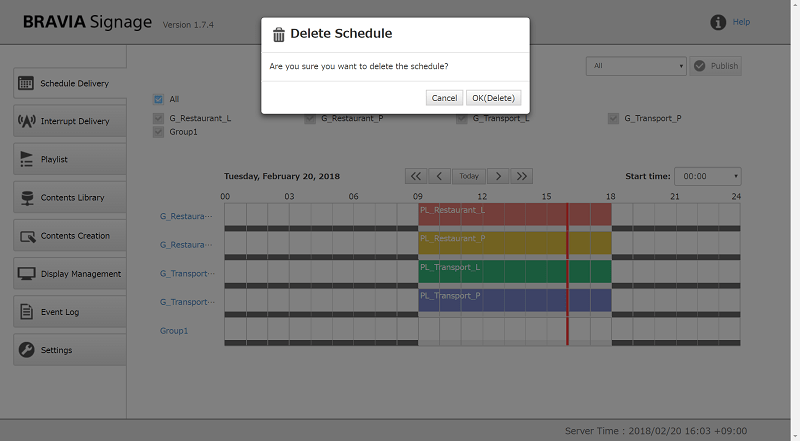
[2] When selecting “OK(Delete)” on the dialog, the schedule is deleted from this page.
[3] To update the published schedule data to display, publish again to the display. Push the [Publish] button after selecting a group name from select box in the top of the screen.
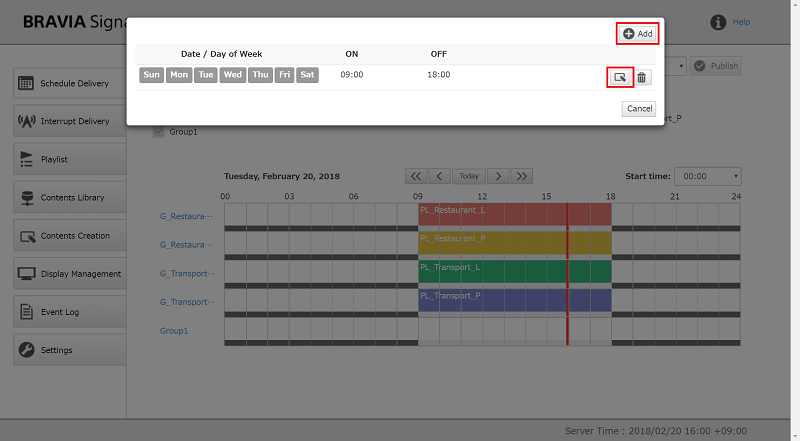
How to register and edit power schedule
If selecting “Specified power schedule” on the [Settings] page, the power schedule can also be registered. When adding a new group on the [Display Management] page, the power schedule of the new group is also registered as power on from “09:00” to “18:00” on all days of the week.
[1] When you click on the power schedule area, the dialog appears.
[2] After you push the [Add] button or edit button on the dialog, the power schedule can be edited. The power schedule consists of the following items. If using “Time-based”, multiple combinations of ON and OFF time can be specified. If specifying multiple combinations, more input fields can be added by pushing the [Add slot] button.
- “Day of week” or “date”
- “All-day Power-off” or “Time-based”
- ON and OFF time if using “Time-based”
[3] When you enter the required items, the [Save] button is enabled. After you push this button, the registered power schedule is displayed on this page.

How to delete power schedule
[1] When you click the registered power schedule on the scheduler, the dialog appears.
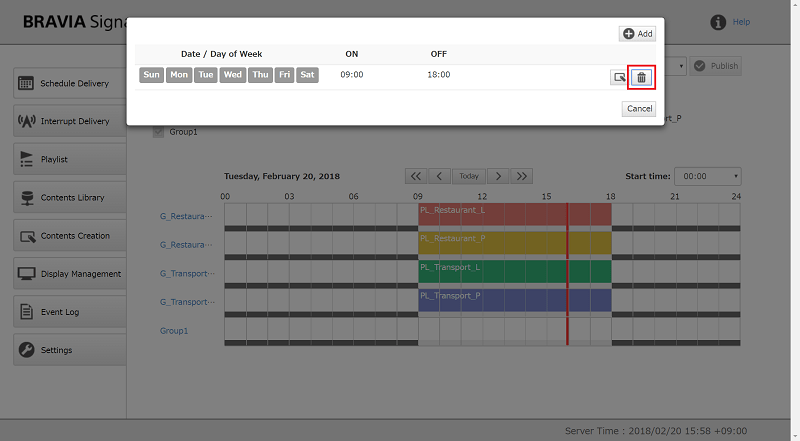
[2] When you push the delete button on the dialog and select “OK(Delete)” on the next dialog displayed, the power schedule is deleted from this page.
Interrupt delivery
In addition to schedule delivery, also provides support to publish interrupt delivery in emergencies and irregularities. On this page, the interrupt delivery information can be registered and managed. This section describes how to operate on this page.
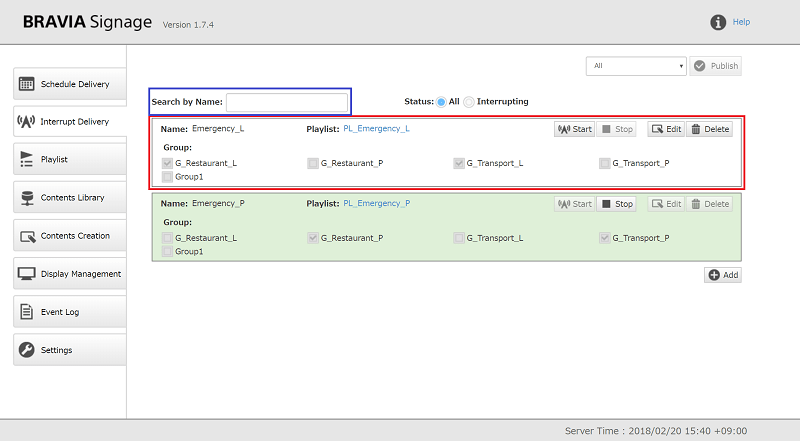
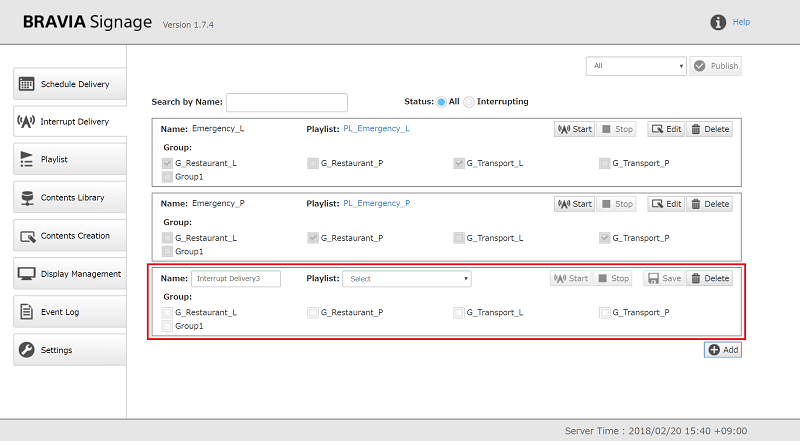
Appearance of [Interrupt Delivery] page
-
The registered interrupt delivery information is a combination that consists of name to identify, a published playlist name, a published group name, and operation buttons.
-
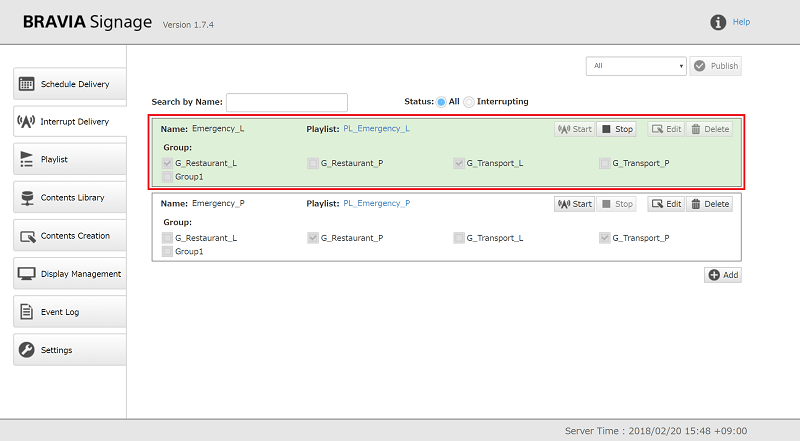
The background of the running interrupt delivery information is displayed in green.
-
The registered interrupt delivery information can be filtered by the [Search by Name:] box and [Status] buttons.
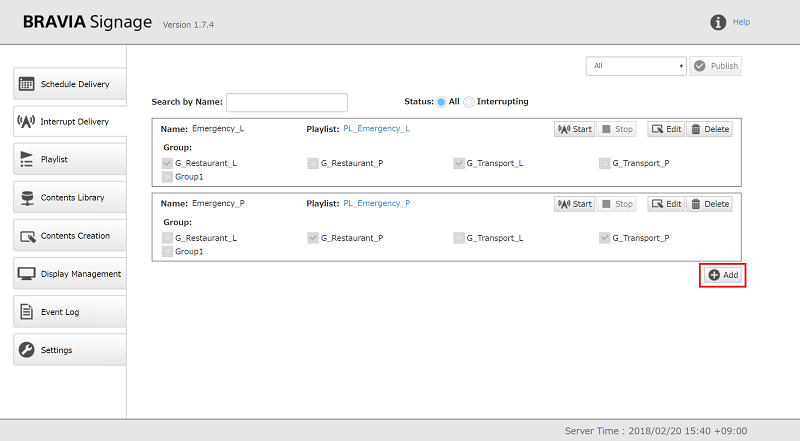
How to register and edit the interrupt delivery
[1] New interrupt delivery information is added when you push the [Add] button on the right of the screen or the lower right.
[2] Input [Name], [Playlist], and [Group] in accordance with the message displayed on the top of the screen. When you input the required items, the [Save] button is enabled. When you push this button, the interrupt delivery can be registered.
[3] To edit the registered interrupt delivery information, push the [Edit] button, edit the input items, and push the [Save] button.
How to start the interrupt delivery
[1] Push the [Start] button of the interrupt delivery.
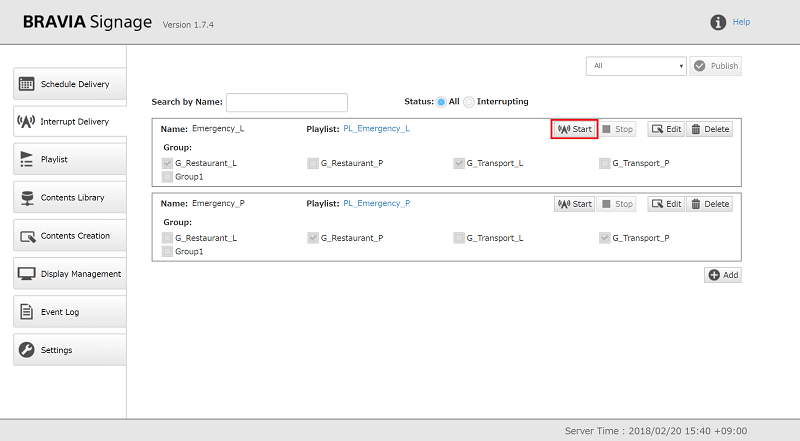
[2] After pushing the button, the background of the interrupt delivery information is displayed in green. When you start the delivery, the playlist is played back on the displays regardless of the status of schedule delivery.
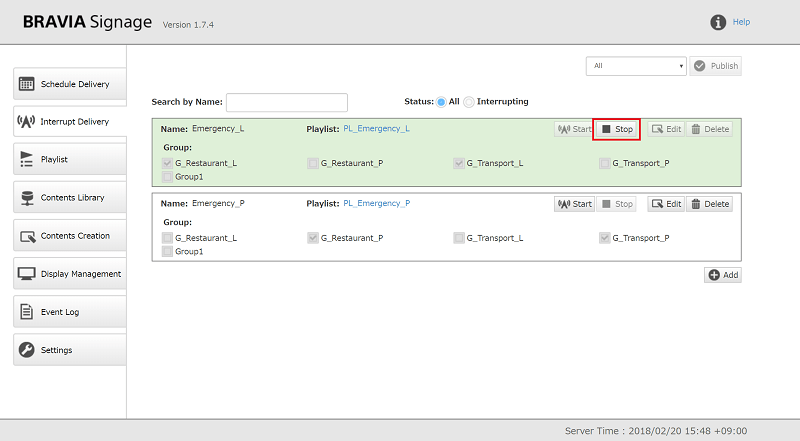
[3] To stop the currently running interrupt delivery, push the [Stop] button.
How to delete the interrupt delivery
[1] Push the [Delete] button of the interrupt delivery.
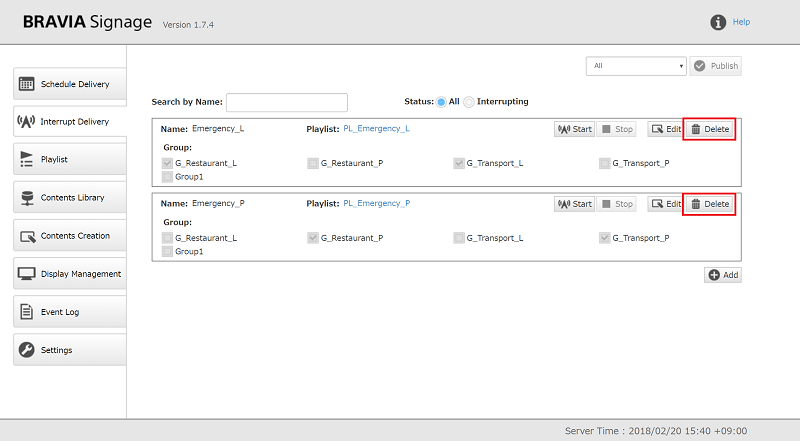
[2] When you select “OK(Delete)” on the next dialog displayed, the interrupt delivery information on this page is deleted.
Playlist
On this page, playlists can be registered and managed. Playlists are lists that include the playback order of content such as videos, still images, and HTML. For example, if you want to play back content in the order of video A, still image B, and video C, the playlist is a list in the order of video A, still image B, and video C. This section describes playlist specifications and how to operate on this page.
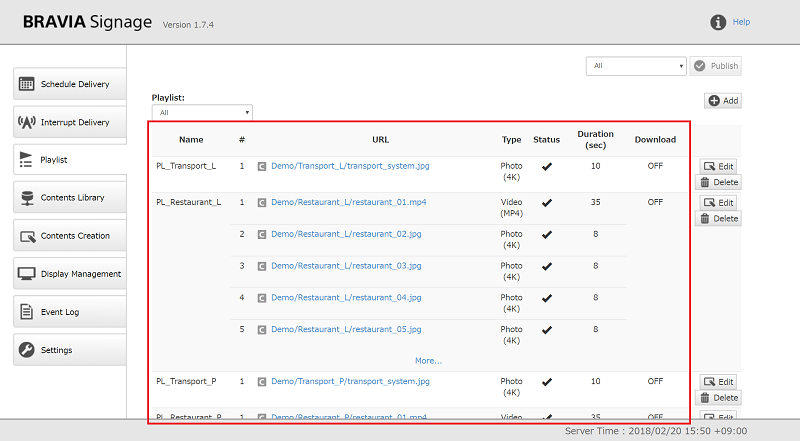
Appearance of [Playlist] page
- A playlist consists of the name to identify URL of content, content type of URL, accessible status of URL, duration to play content of URL, and download settings.
-
Under [URL], a URL that starts with “http://” or a URL string of content registered on the [Content Library] page is displayed. If the former is displayed, a “U” icon is displayed at the beginning of the URL string. If the later, a “C” icon is displayed.
-
The content type of content specified in [URL] is displayed in [Type].
| Type | Descriptions |
|---|---|
| Photo | Still image (JPEG, BMP, GIF, PNG formatted image) |
| Photo (4K) | Still image with 4K resolution (JPEG formatted image) |
| Video (MP4) | MP4 formatted video |
| Video (MPEG2TS) | MPEG2TS formatted video |
| Video (4K) | MP4 formatted video with 4K resolution |
| Video (M3U8) | m3u8 formatted file for HTTP Live Streaming. Refer to "Appendix V. m3u8 file". |
| HTML | All types other than those listed above |
- The status displayed in [Status] shows whether the content specified in [URL] can be accessed or not.
| Descriptions | |
|---|---|
 |
It has succeeded to access the content's URL. |
 |
It has failed to access the content's URL. Confirm the content's URL if this icon appears. |
 |
Checking to access the content's URL. |
- The duration of content specified in [URL] is displayed in [Duration]. If multiple URLs are included in a playlist, each URL plays and switches to the next content in order. The played time (sec) of each URL is displayed as the duration. Settings other than numbers are as follows:
| Duration | Descriptions |
|---|---|
| Video Length | Indicates to use the length of the video content. If a number is specified instead of video length, the video length is not used and it switches to the next URL after the specified duration. |
| Endless | Indicates to continue playing without switching. If there is one URL and the type is "Photo", "Photo(4K)", or "HTML", this value is displayed as [Duration]. |
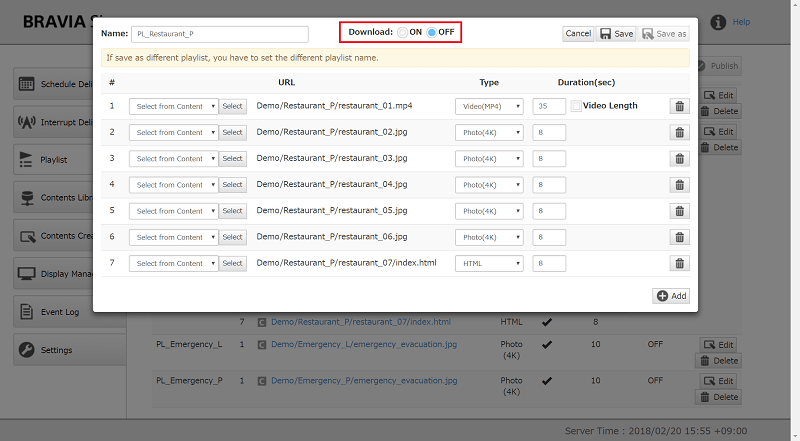
- “ON” or “OFF” are displayed in [Download] as download settings of the playlist. If you select “enable”, instead of network streaming, content will be downloaded to the USB flash memory connected to the display via the USB port, and that file is played.
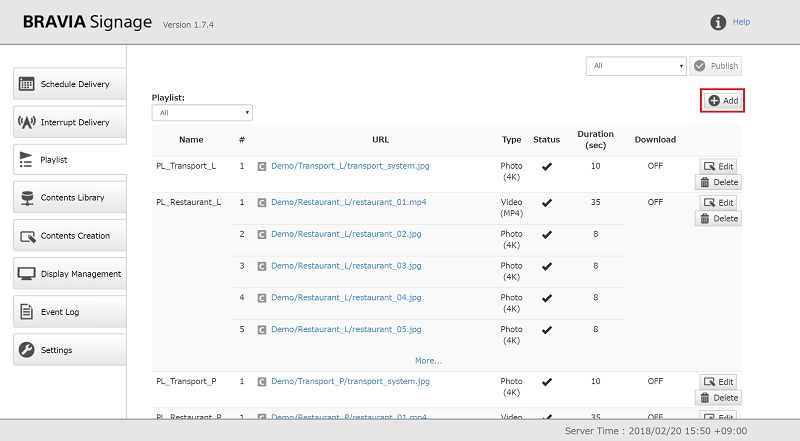
How to register new playlist
[1] When you push the [Add] button on the upper right, the dialog appears. Input the required items in accordance with the message displayed on the top. A playlist consists of the following items, and multiple combinations of [URL], [Type], and [Duration] can be specified. If specifying multiple, more input fields can be added by pushing the [Add] button.
- Playlist name
- URL of playback content
- Content type of content specified in URL
- Duration of content specified in URL
- Download setting
When inputting these, refer to the descriptions on “Appearance of [Playlist] page” and the following:
-
Content registered on the [Content Library] page can also be specified as [URL].
- The following items are not supported as the hostname of a URL string input to [URL]. In addition, specify not the folder name but the file name in [URL].
- localhost
- 127.0.0.1
- NETBIOS name
- IP address in IPv6
- The following limitations exist for URL strings input to [URL].
- No support for websites with X-Frame-Option headers as published HTML content.
- No support for any HTTP authentication, but if you are using Playlist download, there is support for only basic authentication.
- If you specify “Auto” as [Type], the type is automatically selected based on the extension of the file in [URL]. If you specify an image with 4K resolution or a video with 4K resolution, this automatic feature selects “Photo” or “Video(MP4)”. [Type] must be manually selected if using an image or video with 4K resolution.
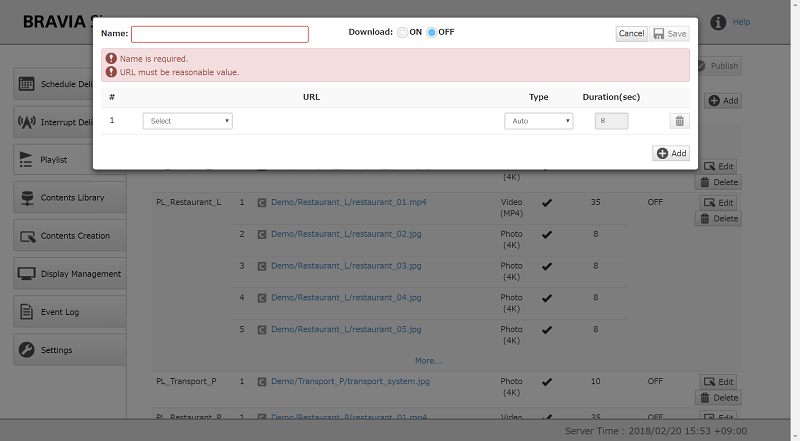
[2] When you input the required items, the [Save] button is enabled. When you push this button, the playlist is registered and displayed on this page.
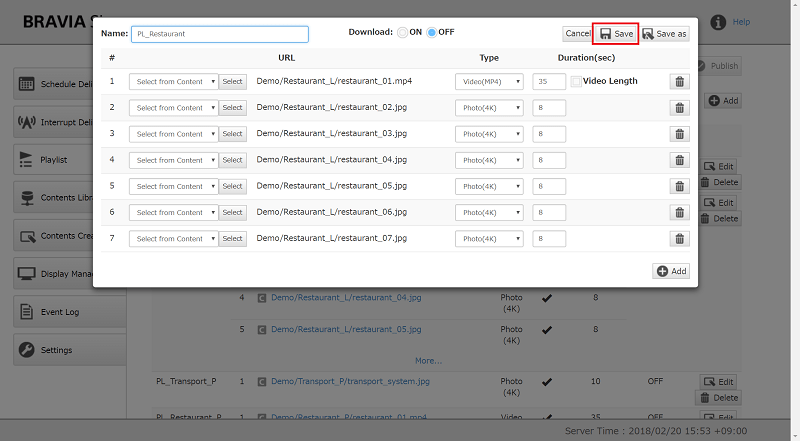
How to edit playlist
[1] Push the [Edit] button on the right of the target playlist information.

[2] The dialog appears next, and you operate in accordance with steps [1] and [2] of “How to register new playlist”. In addition URL order can be changed by drag and drop.
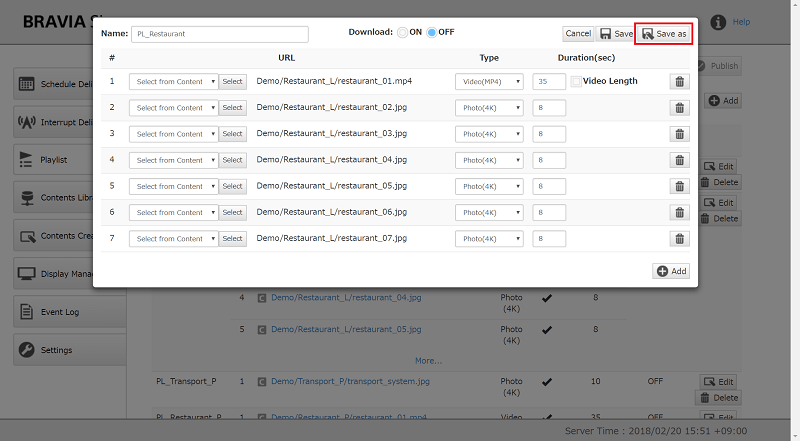
How to copy registered playlist
[1] Push the [Edit] button on the right of the target playlist information.

[2] The dialog appears next, and you operate in accordance with step [2] of “How to edit playlist”.
[3] After changing the playlist name to a not previously registered name, the [Save as] button is enabled. When you push this button, the playlist is copied with the changed name.
How to delete playlist
[1] Push the [Delete] button on the right of the target playlist information.
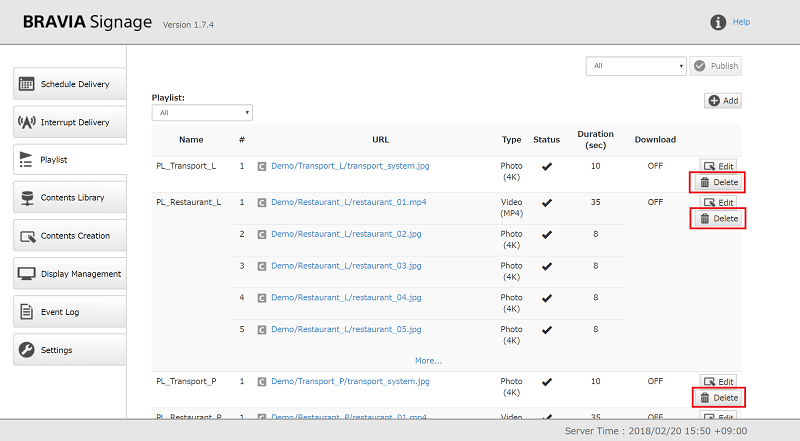
[2] When you select “OK(Delete)” on the next dialog that appears, the playlist information is deleted from this page.
Use playlist download
When you specify [Download] as “ON” when registering and editing a playlist, playlist and the playback contents can be downloaded to a USB flash memory connected via the display’s USB port and instead of network streaming these downloaded files can be played. Refer to Playlist download for details on download trigger and other notices.
Contents library
This page provides content management features such as managing contents with folders, changing content names, etc. The contents registered on this page can be referred to from the [Playlist] page. This section describes how to operate on this page.
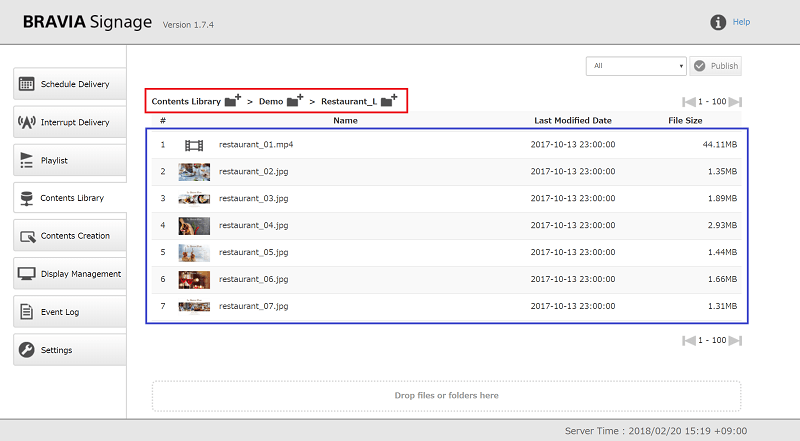
Appearance of [Contents Library] page
- The folder path for contents management is displayed on the top of the screen.
- When you register contents, the icon indicating content type, the folder name or file name as content name, the last modified date, and the file size are displayed in the center of this page.
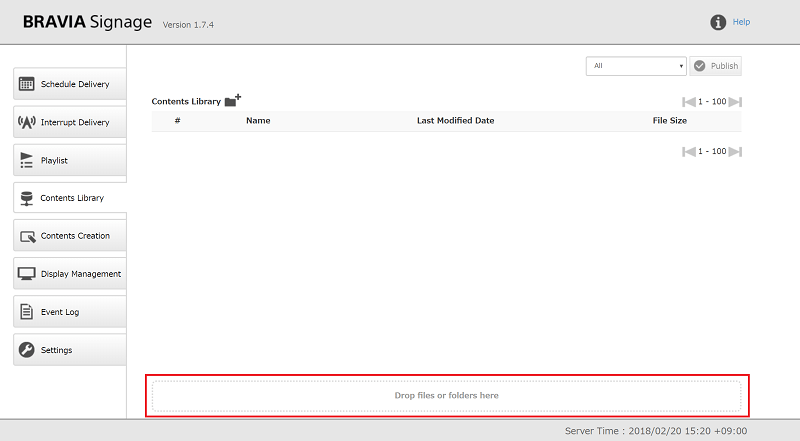
How to add new content
[1] Open the [Contents Library] page with the Chrome browser. There is no support for operation with IE.
[2] Drag and drop the files or folders to [Drop files or folders here] displayed on the bottom of the screen to add contents. It should be noted that the following contents are not supported:
- Files with a size of 4 GB and over.
- Files and folders with names that includes multi-byte characters.
- Files and folders with names that are 50 characters long or more, including extensions.
[3] Registering of contents starts and the status is displayed at the top of the screen. After registration is complete, the contents are displayed in the center of the screen. After registration is complete, the content can be previewed in another tab of the browser when you double-click the content.
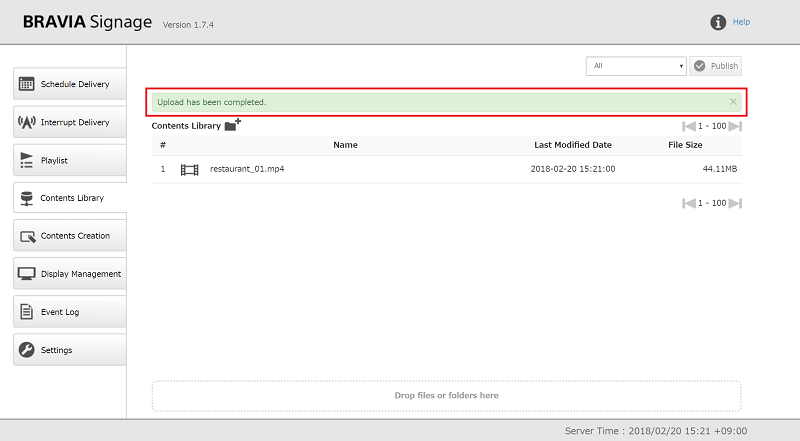
If a preview of the content cannot be displayed, check whether the IP address included in the URL in the address bar of the browser is correct. For example, the IP address of the content library may not be properly configured as in the following situations. In that case, correctly configure the IP address of the content server in accordance with how to configure “CONTENTS_SERVER_URL” in 1.3. of “BRAVIA Signage Advanced User Guide” and restart BRAVIA Signage Server.
- There are multiple network interfaces with the same IP address.
- After setup of BRAVIA Signage Server and registering the contents with the content library feature with the network offline, the server PC was connected to the network and an IP address was assigned, etc.
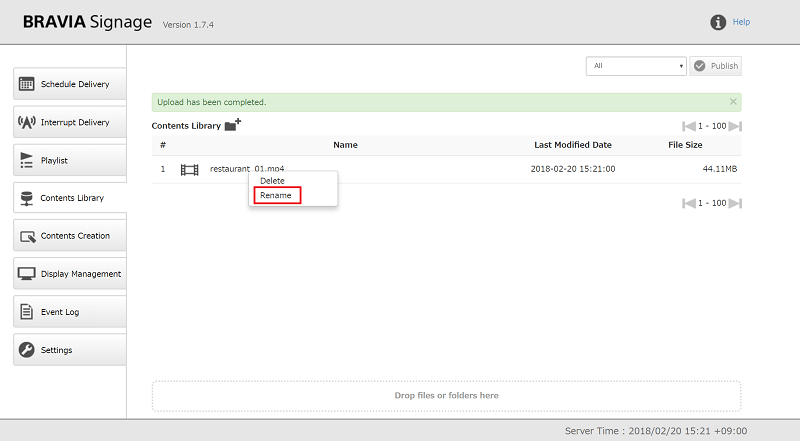
[4] After being registered, you can change the content name by selecting the content, right-clicking, and selecting [Rename].
How to update content
- To update registered content, delete content and register it again, or add content with the same name to overwrite the old content. If the updated contents are used in playlists, the contents are required to be downloaded again to display them. In that case, refer to Playlist download for operation details.
How to delete content
[1] Select the content, right-click, and select [Delete].
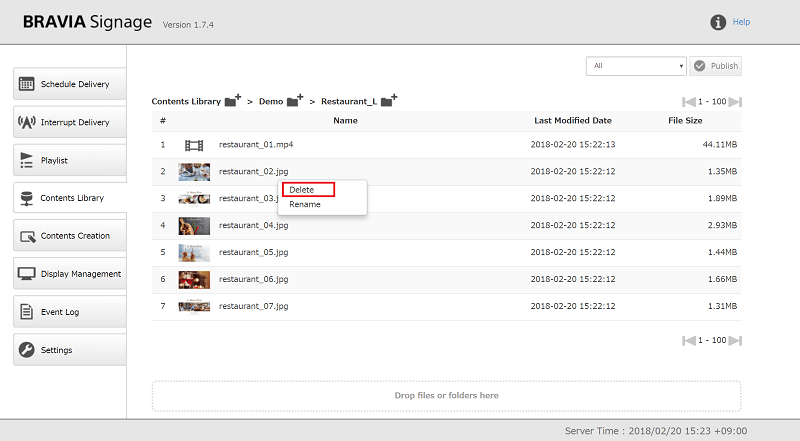
[2] When you select “OK(Delete)” on the next dialog displayed, the content is deleted from this page.
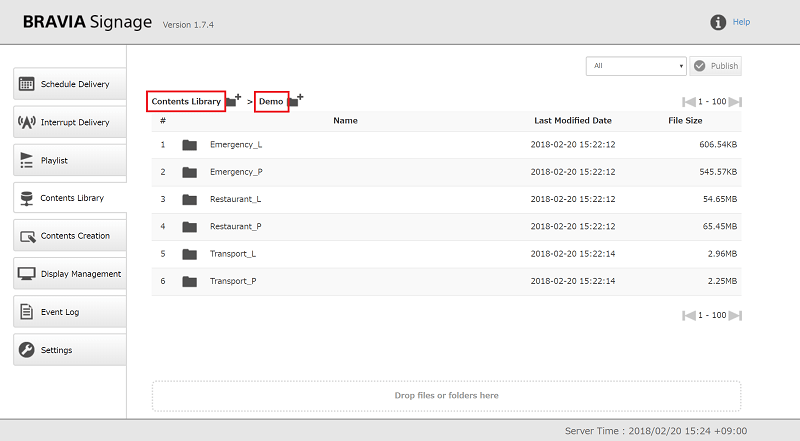
Content management with folder
- The folder can be created by clicking the folder icons displayed on the folder path at the top of this page. Click the icon and input the folder name.
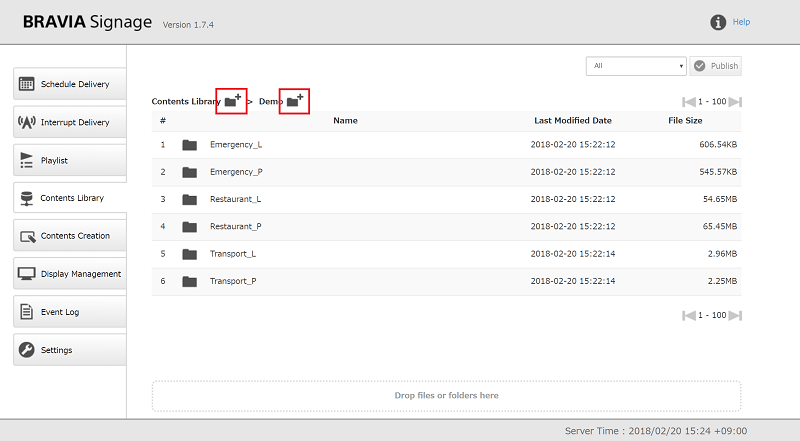
- The current folder can be changed by clicking the folder name on the folder path at the top of this page.
- Note that files are overwritten when you add content with the same name as content in the same folder.
Use other HTTP server
- When BRAVIA Signage Server is installed, Apache HTTP Server is also installed and initial settings for the content library feature are configured to use Apache. If you have already used another contents management server or want to use one, that server can be used and configured to work with the content library feature. Refer to Advanced contents library setting for how to configure.
Contents creation
On this page, content can be created in accordance with the selected layout and material on this page. The created content can be registered to the [Content Library] page, specified to the playlist, and published to the displays. This section describes how to create content and notices. To use this feature, [Menu Tab] of [Contents Creation] on the [Settings] page must be set to “Show”.
How to create content
[1] Select a content layout from [1. Layout] at the top of the screen.
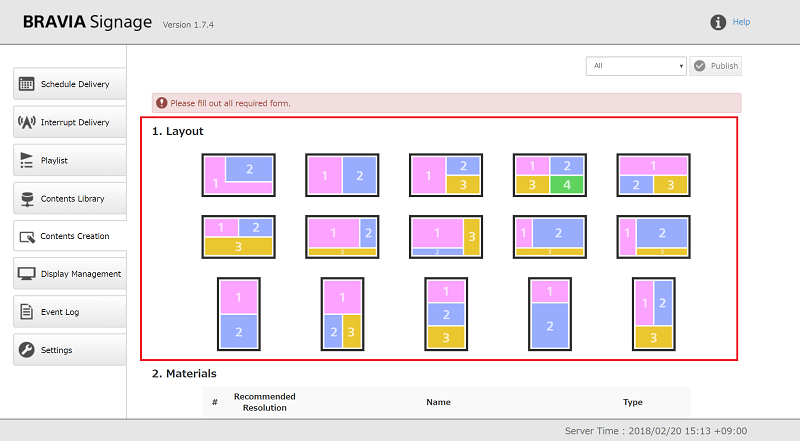
[2] When you select the layout, the materials can be specified on [2. Materials]. Specify the materials in accordance with the number displayed on the layout icon selected in step [1] and the following:
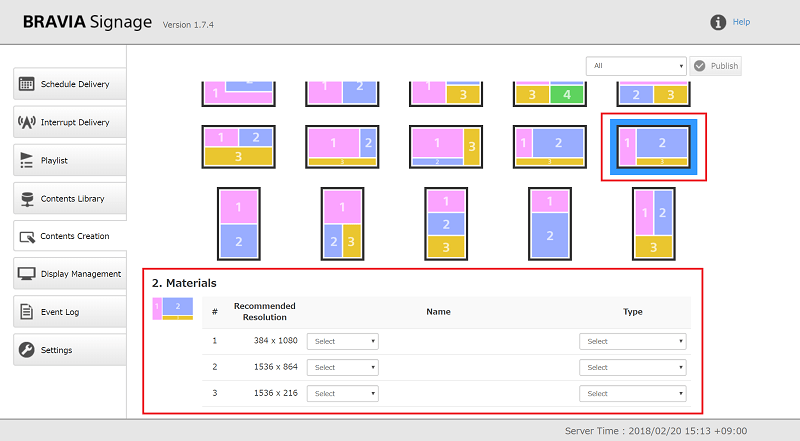
- There are three approaches for specifying materials: selecting files saved to the PC, inputting a URL, and selecting to use the external input of the display. Select “Select File”, “Input URL” or “External Input” for each.
- If you select “Select File”, the [Select] button appears. Push this button and select a file from the files saved to the PC. It should be noted that there is no support for files with names containing multi-byte characters and files with a size of 4 GB and over.
- If you select “Input URL”, the input field appears. Input the URL string. It should be noted that there is no support for the website response X-Frame-Option header.
- If you select “External Input” and publish to displays, video from the display external input can be displayed. The displayed video input is the input enabled in [Input] of display settings. It should be noted that the portrait layout is not supported for selecting external input.
- Refer to the value displayed in [Recommended Resolution] for the resolution of materials specified to each area of the layout.
- If the aspect ratio of the specified material is different from the value of [Recommended Resolution], the content is downscaled with a maintained aspect ratio and displayed on the published displays. In that case, the displayed position is center.
- In addition, if the specified material is at a lower resolution than [Recommended Resolution], the content is displayed without scaling at the center of the published displays.
- Multiple videos can be specified as materials. If you specify the multiple video, any of one of the specified videos is displayed on the published displays, though all specified videos are displayed in the preview of step [5].
- In addition, there is no support for content creation with both video (MP4, MPEG2TS, 4K) and external input.
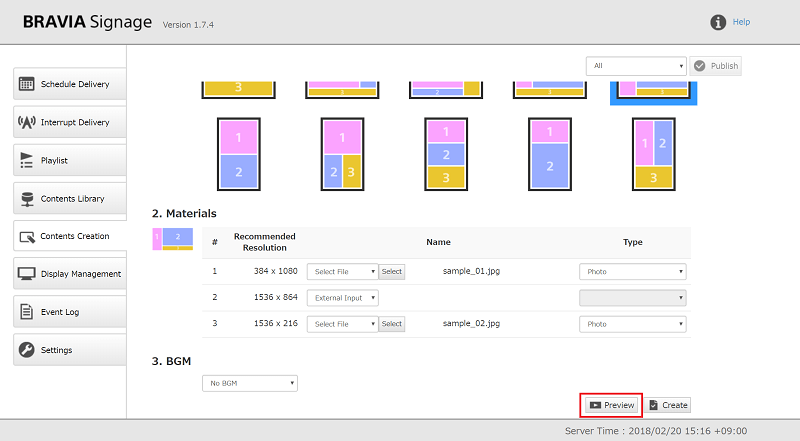
[3] Input [Type] after specifying the materials. Refer to the following for [Type].
- Refer to Playlist for [Type] if selecting “Select File” in step [2].
- Specify “HTML” as [Type] if selecting “Input URL” in step [2].
[4] If needed, specify BGM in accordance with the following. If specifying BGM, BGM can be played with contents without audio, such as images.
- There is no support for BGM if specifying video (MP4, MPEG2TS, 4K) as material in step [2].
- The following are the supported audio formats to be specified as BGM.
| Protocol | Container | Codec | MIME type | Others |
|---|---|---|---|---|
| HTTP(S) | MP4 | AAC-LC | audio/aac | 32kHz, 44.1kHz, 48kHz / 384kbps(max) / 5.1ch |
| HE-AAC | audio/aac | 32kHz, 44.1kHz, 48kHz, 2ch | ||
| HTTP(S) | MP3 | MP3 | audio/mp3 | 32kHz, 44.1kHz, 48kHz, 2ch |
[5] After you input the required items, the [Preview] button on the bottom of screen is enabled. If needed, push this button. When you push this button, another tab is opened on the browser and the content can be previewed.
- If you select “External Input” as material, it cannot be displayed in preview.
- The specified video may not be previewed depending on the settings of your PC.
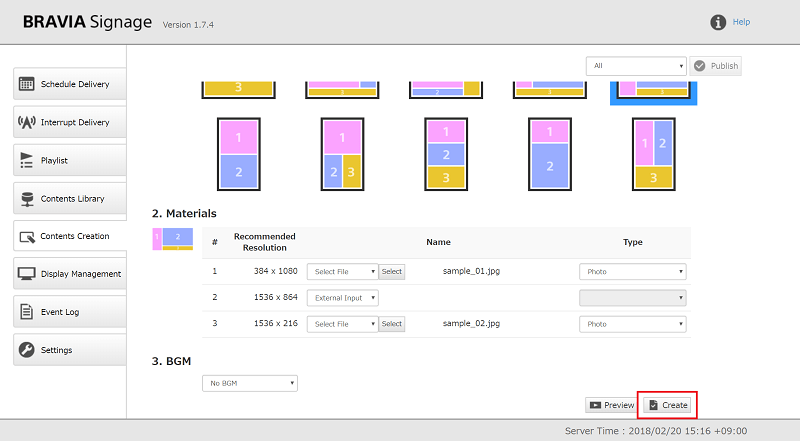
[6] After you input the required items, the [Create] button on the bottom of screen is enabled. Push this button.
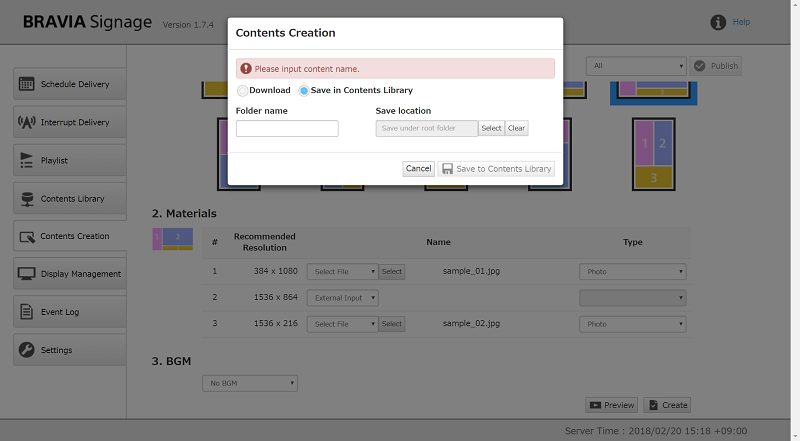
[7] A dialog is displayed next. Select either [Download] or [Save in Contents Library], and create the content.
- If you select [Download], the created content is downloaded in zip format after you push the [Download] button. When you extract the downloaded zip file and open index.html with a browser content the same as that previewed in step [5] is displayed.
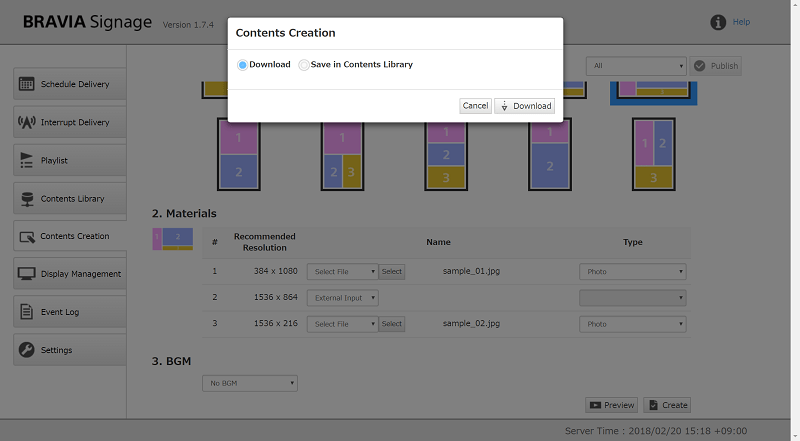
- If you select [Save in Contents Library], the created content can be directly saved to the [Contents Library] page. When you push the [Save to Contents Library] button, the content whose name is a string input in [Folder name] is created and uploaded to the folder specified in [Save location]
Display management
On the [Display Management] page, groups and displays can be managed. A group is used to manage multiple displays, and the delivery information registered to the [Schedule Delivery] page and [Interrupt Delivery] page is specified in each group. This section describes how to operate on this page.
In addition, timezone setting can be configured for every group, and there is a feature to operate in areas and countries with multiple timezones. Refer to Configuration across multiple timezones for details.
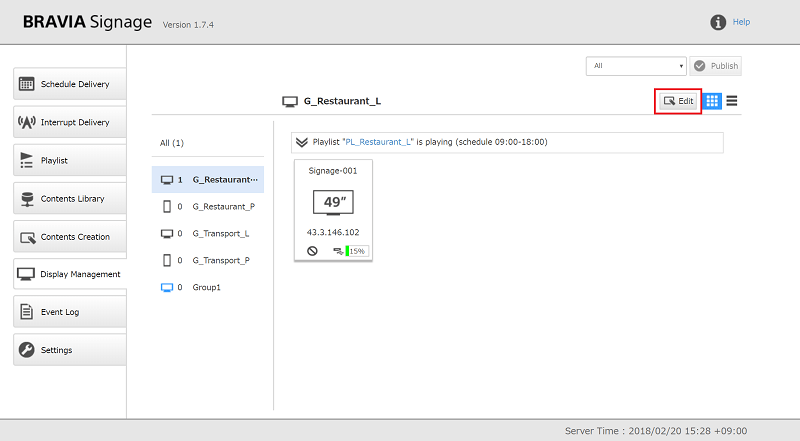
Appearance of [Display Management] page
-
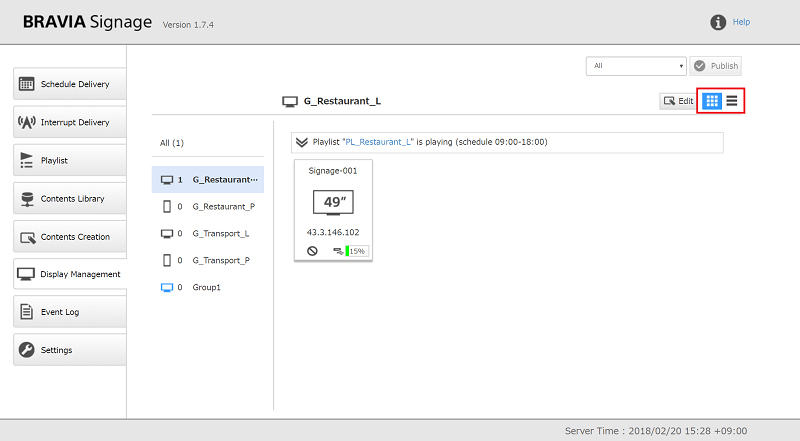
“Tile view” or “List view” can be selected from the upper right of the screen.
-
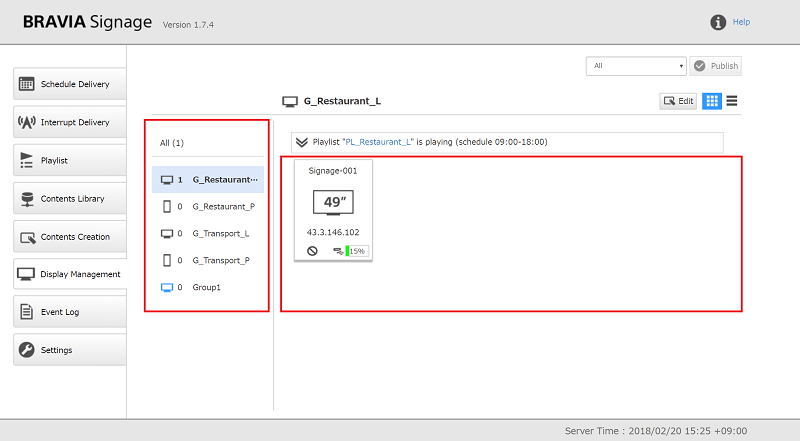
The group list is displayed on the left of the screen, and displays are shown at right of the screen in accordance with the selected group in the group list. The blue icon in the group list indicates the initial group that is registered when the displays are newly added.
-
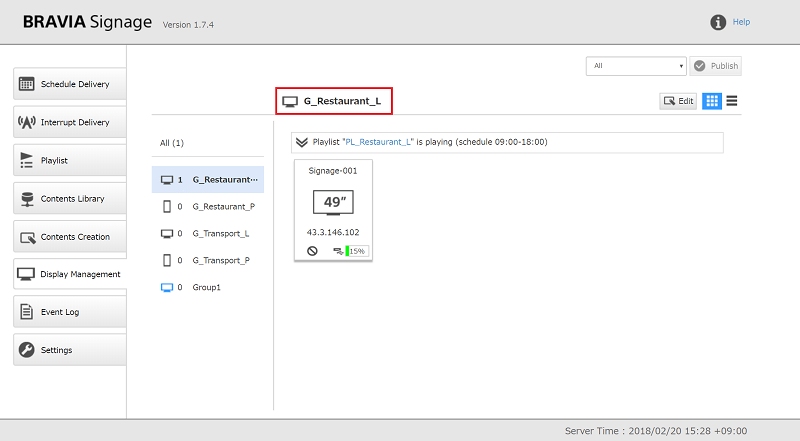
The group name and the information to identify the display orientation as landscape or portrait are displayed at the top of the screen in accordance with the selected group.
Group information
-
The group name, display orientation, and group status are displayed as group information.
-
The group name is displayed at the top of the screen, and landscape or portrait is displayed on the left. Group status is displayed at the top of the display list.
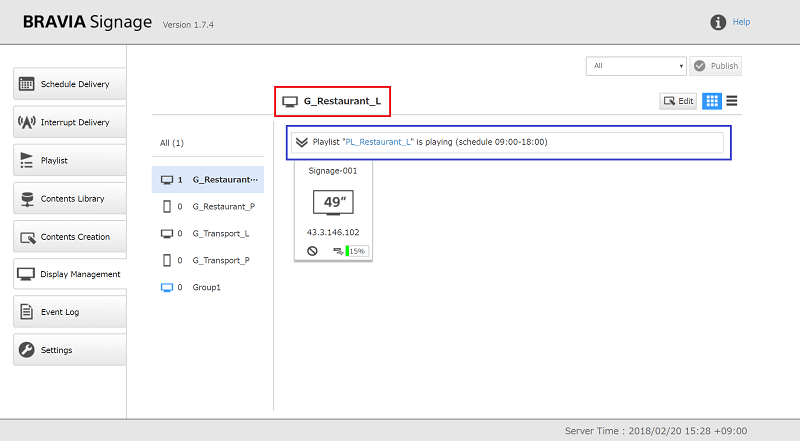
Group Status
Status Descriptions Playlist {playlist name} is playing (schedule {begin time}-{end time}) Indicates the status the schedule delivery is running. Playlist {playlist name} is playing (interrupt {interrupt delivery name}) Indicates the status the interrupt delivery is running. There is no content to play Indicates the status power schedule is in the ON period, but no playlist is delivered. Scheduled to power off Indicates the status power schedule is in the OFF period.
-
If at least one display is in a group and while delivering a playlist, the detailed delivery status of the display can be checked. When you open the group status and select a display, the details are displayed as follows.
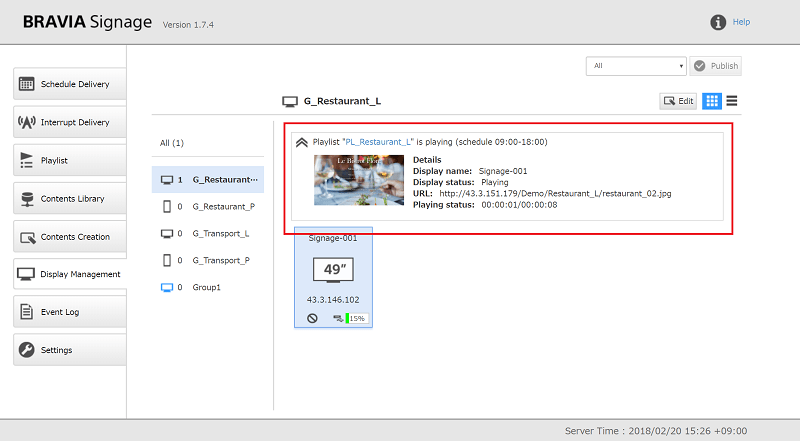
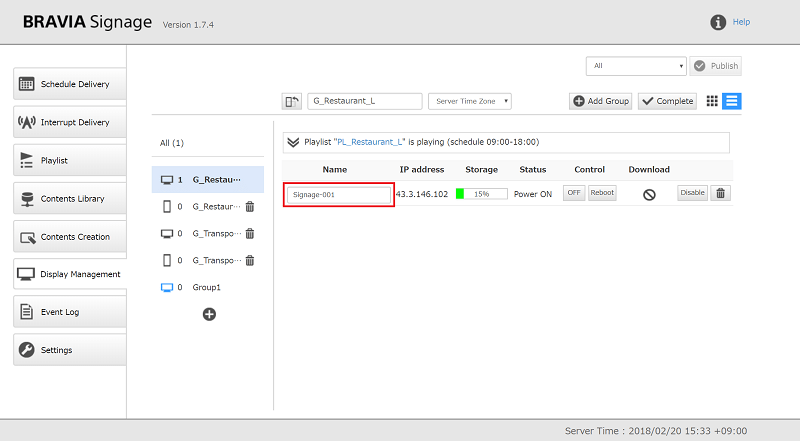
Display information
- The following information is displayed as display information.
| Item | Descriptions |
|---|---|
| Name | This is the specified name to identify each display. If you select tile view, this is displayed at the top of each display's information. |
| IP address | If you select tile view, this is displayed in the center of each display's information. |
| MAC address | If you select tile view, this is shown only when the detailed information is displayed. If you select list view, this is shown by mouseover on the IP address information. |
| Model name and inch | This is displayed only in tile view. The model name can be shown only in the detailed information, and inch is the number shown on the display icon. |
| Firmware | The firmware version of the display is displayed. This can be displayed in only the detailed tile view. |
| Software | The player version installed on the display is displayed. |
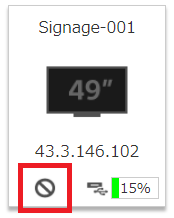
| Storage | The usage of a USB flash memory connected via the display's USB port is displayed. If you select tile view, it is displayed on the lower right of the display icon. |
| Condition | Refer to the following. |
| Download Status | Refer to the following. |
- Display running condition can be checked from this page. The condition is shown with the icon color as follows. In addition, additional text information is also displayed in list view.
| Status | Icon color | Descriptions |
|---|---|---|
| Power ON | 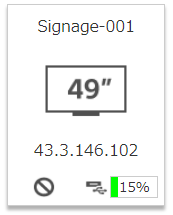 |
Indicates the display power status is ON. |
| Power OFF | 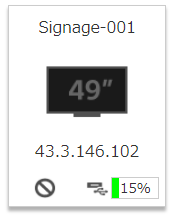 |
Indicates the display power status is OFF. |
| Offline | 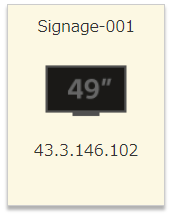 |
Indicates the display is not connected with the network, such as during rebooting. |
| Disable | 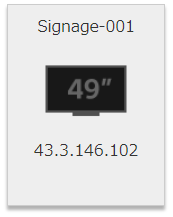 |
Indicates the display is disabled. |
-
Playlist download status can be checked from this page. In tile view, this is displayed as the status icon on the lower left of the display icon. In list view, this is displayed in [Download].
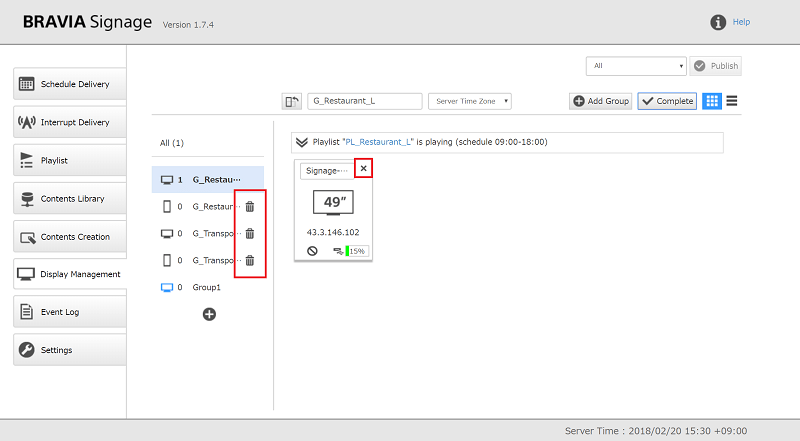
Tile view
List view

The descriptions of playlist download statuses are as follows:
Status Icon Description No Status 
Indicates no playlist whose download settings are enabled. Waiting 
This is shown if there are some playlists whose download settings are enabled and there are no playlists that failed downloading. Downloading 
This is shown if there are some playlists whose download settings are enabled and the download status is not "Downloaded", "Failed", or "Waiting". Downloaded 
This is shown if there are some playlists whose download settings are enabled and all playlists have completed downloading. Failed 
This is shown if there are some playlists whose download settings are enabled and there are playlists that failed downloading.
How to register new group
[1] Push the [Edit] button on the upper right of the screen.
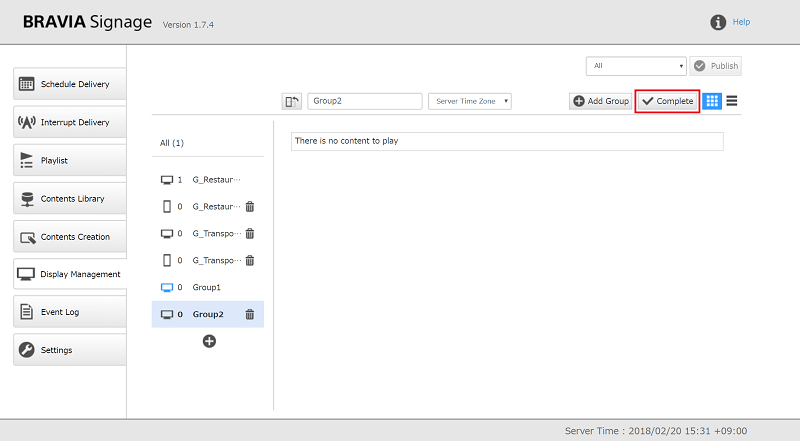
[2] After you push this button, the [Add Group] button and [+] button under the group list are displayed. When you push either button, a new group is added.
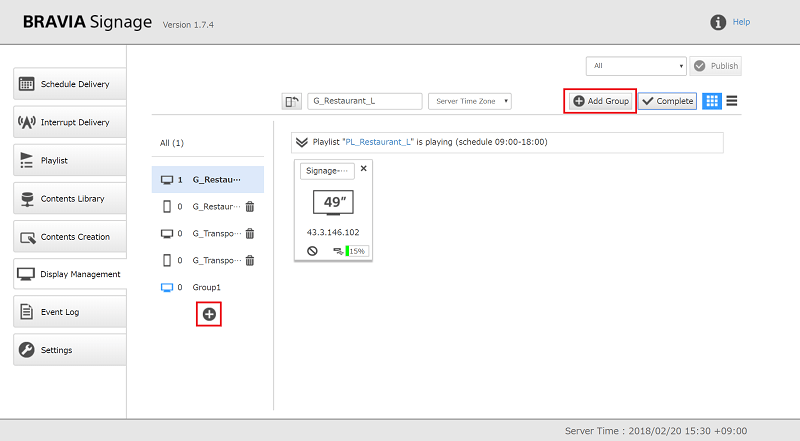
[3] If needed, the group name can be changed by editing the group name displayed on the upper left of the screen. In addition, when you click the icon on left of the group name, the information to identify display orientation as landscape or portrait can be configured.

[4] Lastly, push the [Complete] button on the upper right of the screen.
How to edit group information
- Refer to the steps [1], [3], and [4] in “How to register new group”.
How to register new display
To register a new display to the [Display Management] page, BRAVIA Signage Player installed to the display must be configured.
[1] Make the file “config.txt” as follows and save it in the root folder of the USB flash memory. When you insert it to the display’s USB port, the following screen appears on the display. When you select [Start] and push the [OK] button on this screen, BRAVIA Signage Player can be configured in accordance with the settings described in config.txt.
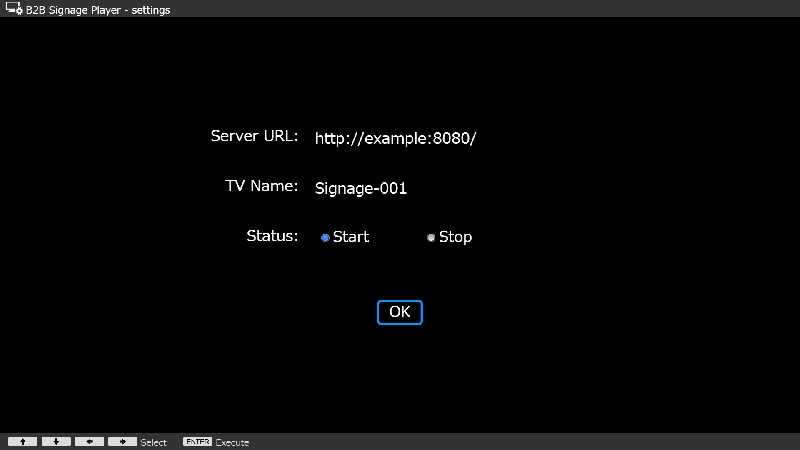
“config.txt” is a configuration file for BRAVIA Signage Player. This must be a JSON formatted description, and settings such as the display name and URL of BRAVIA Signage Server are described. This section describes only the minimum required settings. Refer to Appendix IV. config.txt specification for more details.
The following is one example. Configure BRAVIA Signage Server URL as a “server” key and identify the display name as “tv-name”. Configure as in the following example for other settings as well.
  "settings" : {
    "server" : "http://example:8080/",
    "tv-name" : "Signage-001",
    "override" : true
  },
  "version" : "1"
[2] Display information is registered and displayed on the [Display Management] page after configuration, and the display is registered to the initial group, whose icon is blue.
How to move display to other group
[1] Push the [Edit] button on the upper right of the screen.
[2] After pushing this button, the group the display belongs to can be changed when you drag the display information from the display list and drop it in to the group in the group list.
[3] Lastly, push the [Complete] button on the upper right of the screen.
How to change display name
[1] Push the [Edit] button on the upper right of the screen.
[2] After pushing this button, edit the field of the display name.
[3] Lastly, push the [Complete] button on the upper right of the screen.
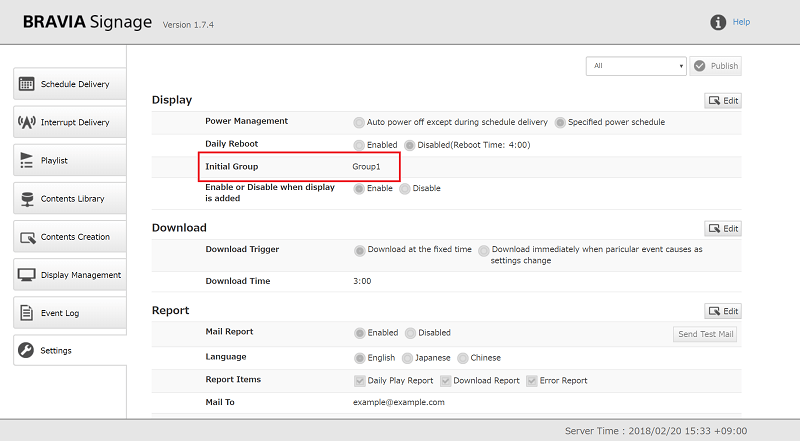
How to change initial group
- Open the [Settings] page and change this from [Initial Group] of [Display]. Check that the display icon is blue in the group list of the [Display Management] page after changing.

How to delete group and display information
- After you push the [Edit] button on the upper right of the screen, these can be deleted by pushing the trash icon and the “x” mark. After deleting the information, push the [Complete] button on the upper right of the screen.
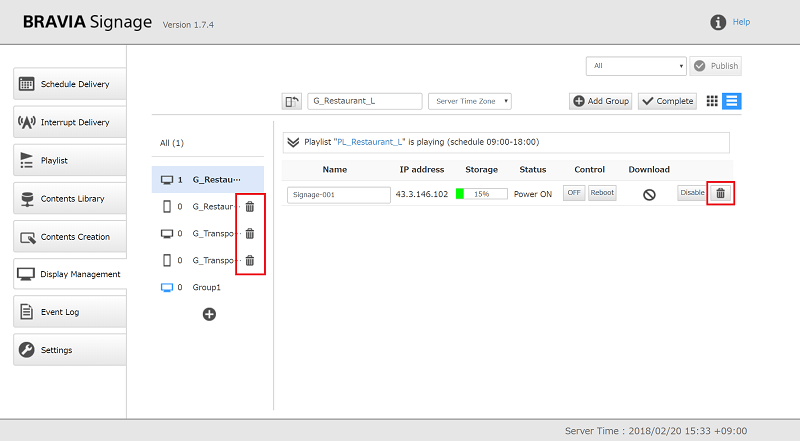
How to control display from remote place
- The power ON/OFF, rebooting, and enabling/disabling of the display can be controlled from a remote place. When you select list view, each operation button is displayed. Push those buttons.
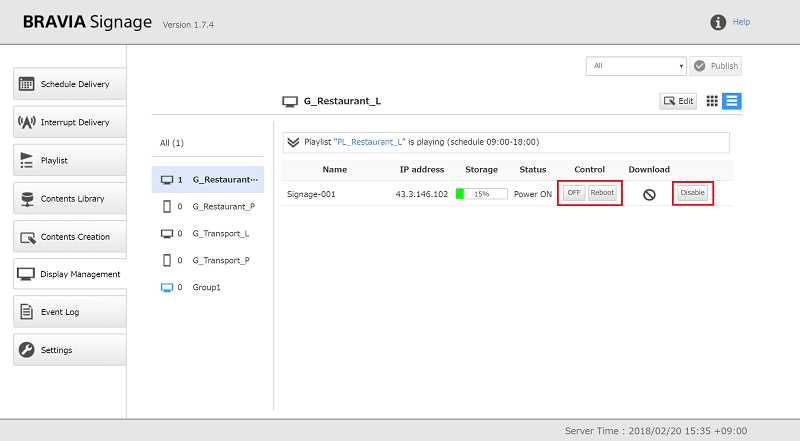
- To enable and disable are the operations to enable or disable connection of BRAVIA Signage Player with BRAVIA Signage Server. When operating to change from enabled to disabled, target displays start to reboot, and BRAVIA Signage Player cannot connect to BRAVIA Signage Server after booting.
Others
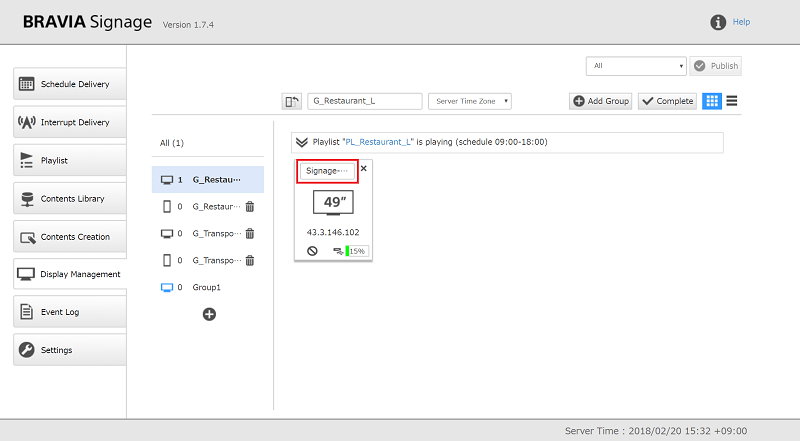
-
When you select tile view, the detailed information is displayed by mouseover operation on the display icon. In addition, when you right-click while the detailed information is displayed, [Copy details to clip board] appears. If you select this, the display information can be copied and pasted to a text editor, etc.
-
Similarly, when you select [Download event log], the event log can be downloaded. The event logs received from BRAVIA Signage Player are saved and shown, and downloaded as files in another [Eventlog] screen. Event logs saved in the display can be directly obtained and downloaded as files when [Download event log] is selected. BRAVIA Signage Player retries to send event logs to BRAVIA Signage Server for a maximum of 10 minutes after an event occurs, considering an operation environment where the network quality is low. On the other hand, if the network continues to be offline for 10 minutes or more, such as through infrastructure and network failure etc., this retry is useless. In that case, to obtain event logs for troubleshooting, etc., use this feature.
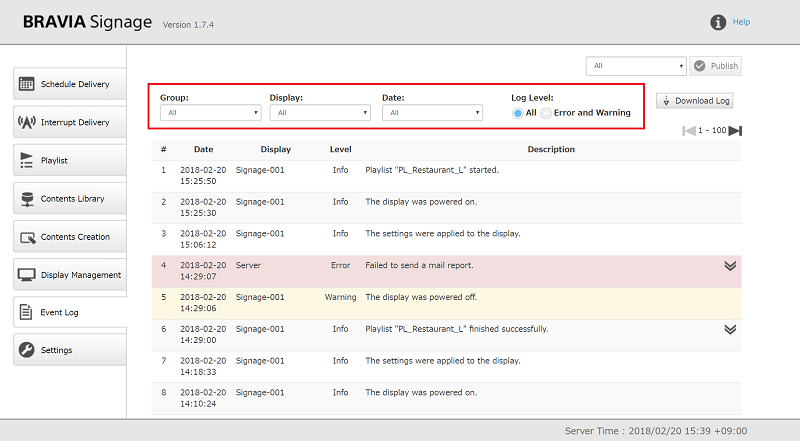
Event log
On this page, log messages of daily signage operations are displayed, such as the displays’ running conditions, playlist playback results, playlist download results, etc.
Log messages
Log messages are displayed when the following events occur. Refer to Appendix III. The details of event log for details.
System-related Event
- BRAVIA Signage Server started
- Failed to send mail report
- Display switched to another BRAVIA Signage Server
- Display switched between enable/disable from the [Display Management] page
Event of Signage Operation
- Changed and published the delivery schedule, power schedule, etc.
- Change in the displays’ running conditions (online/offline, power on/off, reboot)
- Playback event (playback start and result)
- Playlist download (download start and result)
These events are grouped by level:
- Info : If the BRAVIA Signage runs without system and operation failure, level event logs are notified during operation events (Playback starts, etc.). You can check that there are no errors or warnings by monitoring these level logs.
- Warning : Notifies when the operation has failed. If this log message is notified, you need to confirm the BRAVIA’s status and configuration in accordance with the log.
- Error : Notifies when BRAVIA and the software have broken down.
Filter displayed log
- When using select boxes and radio buttons at the top of screen, the log messages filtered by group name, display name, date, and level can be displayed.
Export log and setting information
An event log can be downloaded as a file. When contacting customer support for troubleshooting etc., this feature helps you explain your situation.
- When you push the [Download Log] button on the upper right of the screen, the dialog opens. Select the date on the dialog and push the [Download] button, to download the log file.
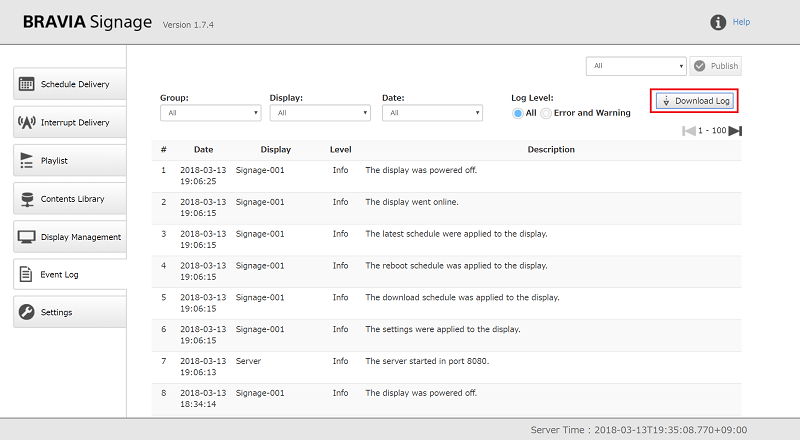

-
Dates can be specified for a period of up to 7 days.
-
CSV or JSON can be specified as the downloaded file format.
-
If checking [Information other than log], the information saved in the database is also downloaded with the event log file.
Settings
On the [Settings] page, you can configure BRAVIA Signage as follows.
Display
- This is the configuration for display management.
| Items | Value | Descriptions |
|---|---|---|
| Power Management | Auto power off except during schedule delivery | If enabled, the display's power is automatically disabled except during schedule delivery registered in [Schedule Delivery] page. |
| Specified power schedule (Initial Value) | If enabled, the power schedule can be manually specified on the [Schedule Delivery] page. | |
| Daily Reboot | Enable | Enable daily reboot. Also configure the reboot time. |
| Disable (Initial Value) | Disable daily reboot. | |
| Initial Group | - | Though the display is added to the [Display Management] page on the BRAVIA Signage Server when starting BRAVIA Signage Player for the first time, this configuration is to select which group the display belongs to at this time. |
| Enable or Disable when display is added | Enable (Initial Value) | When displays are registered to the [Display Management] page, configure the initial value to enable or disable. |
| Disable |
Download
- This is the configuration for triggering content download to start.
| Items | Value | Descriptions |
|---|---|---|
| Download Trigger | Download at the fixed time (Initial Value) | Contents download runs at the specified time every day. Also configure [Download Time]. |
| Download immediately when a particular event occurs as a settings change | Refer to "Trigger Content Download Starts" in "Appendix I. Playlist download specification". | |
| Download Time | 3:00 (Initial Value) | Set the download time at the fixed time if [Download Trigger] is "Download at the fixed time". |
Report
- BRAVIA Signage has a feature to send emails to a specified email address detailing errors that occurred and playback and download results found during daily operations. This is the configuration for that feature. To use this feature, prepare an SMTP server supported for SMTP-AUTH (PLAIN). If there is no user authentication for the SMTP server, this feature does not run.
Report items
| Report | Descriptions |
|---|---|
| Daily Play Report | Reports on playback results of contents of the previous day are sent at 1:00 a.m. every day. |
| Download Report | Reports on download results of playlists are sent. Reports are sent when all download of a playlist finishes. |
| Error Report |
The following reports are sent. Reports are sent immediately when any error occurs. - Display went offline. - Display failed to be powered on according to the power schedule. - Display failed to be powered off according to the power schedule. - Display was powered on because of a factor other than the power schedule. - Display was powered off because of a factor other than the power schedule. - A playlist failed to start playing. - Some contents failed to be played back after a playlist start playing. - A content failed to play. - Download of playlist finishes, but a part of contents fails to be downloaded. - A content failed to be downloaded, and display retried downloading. - A content failed to be downloaded. |
Items
| Items | Value | Descriptions |
|---|---|---|
| Mail Report | Enable | Enable or disable mail report. |
| Disable (Initial Value) | ||
| Language | English (Initial Value) | Select language of mail report as English, Japanese, or Chinese. |
| Japanese | ||
| Chinese | ||
| Report Items | Daily Play Report | If enabled, sends Daily Play Reports. |
| Download Report | If enabled, sends Download Reports. | |
| Error Report | If enabled, sends Error Reports. | |
| Mail To (*) | - | Email address to receive mail reports. You can configure multiple addresses with ";". The initial value is "example@example.com". |
| Mail From (*) | - | Email address to send mail reports. Initial value is "example@example.com". |
| SMTP Server (*) | - | SMTP server address to send mail reports. The initial value is "smtp.example.com:25". |
| User Name (*) | - | User account to access the SMTP server. The initial value is "username". |
| Password (*) | - | Password to access the SMTP server. The initial value is "password". |
(*) The setting value is not displayed. If it has been set, it will be displayed as “Configured”, and if it has not been set, it will be displayed as “Not Configured”. If you want to change the setting value, enter the value and save it. To delete the setting value, check the “Delete” check box and save.
Transition Effect
- This is the configuration for transition effects between contents if multiple contents are specified in a playlist.
| Items | Value | Descriptions |
|---|---|---|
| Effect Type | Disable (Initial Value) | Disable the effect. |
| Fade In/Out | Enable the Fade In/Out effect at the transition. | |
| Effect Duration (sec) | 1 (Initial Value) | Time of Fade In/Out |
Contents Library
- This is the configuration to use the features on the [Contents Library] page.
| Items | Value | Descriptions |
|---|---|---|
| Document Root | C:\Apache24\htdocs (Initial Value) | Document root folder of web server used as the contents library. |
Contents Creation
- This is the configuration to use the features on the [Contents Creation] page.
| Items | Value | Descriptions |
|---|---|---|
| Menu Tab | Show | Show the [Contents Creation] page in the tab. |
| Hide (Initial Value) | Hide the [Contents Creation] page in the tab. |