BRAVIA Meeting Setting Methods
Network
Setting methods
1
Management server settings
1: INSTALLING BRAVIA MEETING DISPLAY MANAGEMENT
- Run bravia-meeting-display-management.msi on the server PC.
- Follow the on-screen instructions to proceed with installation.
- After installation is complete, follow the on-screen instructions to restart the server PC.
- After the server PC is restarted, the Windows service for BRAVIA Meeting Display Management automatically starts.
2: SETTING BRAVIA MEETING DISPLAY MANAGEMENT
- Open the following URL on your PC browser.
- When a reverse proxy is installed, set the URL of the reverse proxy.
- When a reverse proxy is not installed, set as follows:
http://<BRAVIA Meeting Display Management server PC IP address>:40004
Note:
Click the BRAVIA Meeting Display Management desktop icon on the windows server PC
Keep your USB memory inserted during use.
2
Display settings
- Go to the Pro Setting Mode
Pro mode - Connect the network cable to BRAVIA, or disable the network connection by selecting
One step settings - Set "Power" > "Eco" > "Idle TV standby" to "off".
- Set the time.
- Connect the network cable to BRAVIA, or disable the network connection by selecting "Home"→"Network Settings"→ "Wi-Fi".
- When a proxy setting is necessary, set by selecting "Home"→"Network Settings"→"Proxy Settings".
- When BRAVIA is already connected to the Internet, select
"Home"→"Settings"→"Date/Time"→"Automatically Set Date/Time"→"Synchronize With Network Time".Check that the time is displayed correctly by "Home"→"Settings"→"Date/Time". When an NTP server is not used, proceed to the procedure in "Install BRAVIA Meeting on BRAVIA". - To use an NTP server, BRAVIA must be set to the "Pro Setting Mode".
- Set the address of the NTP server by selecting "Home"→"Pro Setting Mode"→"NTP Server".
3
Installation of BRAVIA Meeting
- Copy "extapp_installer.pkg" to the USB memory root directory.
- Insert the USB memory into BRAVIA.
- The installation screen is displayed. Follow the on-screen instructions to proceed with the installation.
- When you have finished the entire procedure, remove the USB memory and restart the system.
- BRAVIA Meeting automatically starts up a short time after the system is restarted.
4
Connection with the management server
1: CONFIGURE FROM THE BRAVIA MEETING SETTING SCREEN
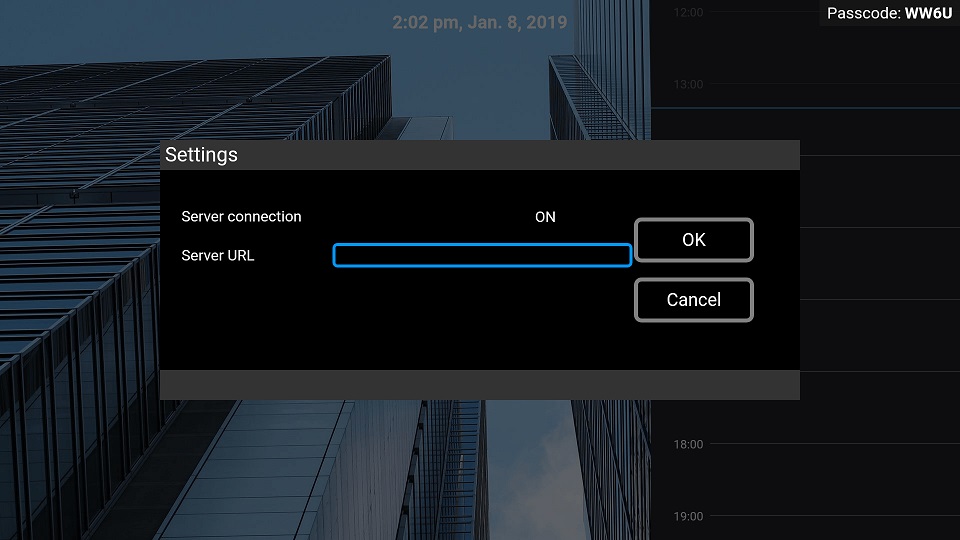
- Display the setting dialog box by pressing the "Play" button on the remote control on the BRAVIA Meeting home screen.
- Turn on the "server connection" and enter the server URL.
2: IMPORT SETTING INFORMATION FROM USB MEMORY
- Copy the configuration files, etc. to the USB memory root directory.
- Display the setting dialog box by pressing the "Play" button on the remote control at the BRAVIA Meeting home screen.
- Insert the USB memory into BRAVIA.
- The import confirmation dialog box is displayed. Follow the on-screen instructions to complete the import.
- This completes the basic initialization.
Following are the setting methods for management software.
Refer to the BRAVIA Meeting user guide additional settings and usage.
BRAVIA Meeting Display Management settings
Open BRAVIA Meeting Display Management to show the connected displays. Click the display that you want to configure to advance to the setting screen of that display. Click the edit mark in the top right corner of the screen to edit the settings.
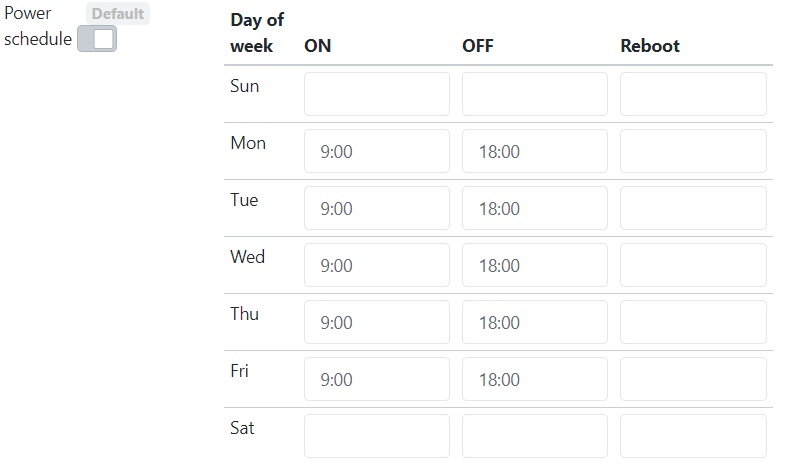
1: Configure the power schedule of the display
You can configure the power schedule of the display with "Power schedule" on the edit screen in the settings. The power on/off and restart schedule can be configured by day of the week.
2: Transmit contents on to the home screen of the display
There are two methods of transmitting contents from BRAVIA Meeting Display Management to the home screen of the display.
1: SET A URL
Enter the URL that you want to show on the home screen from "Web URL" on the settings edit screen.

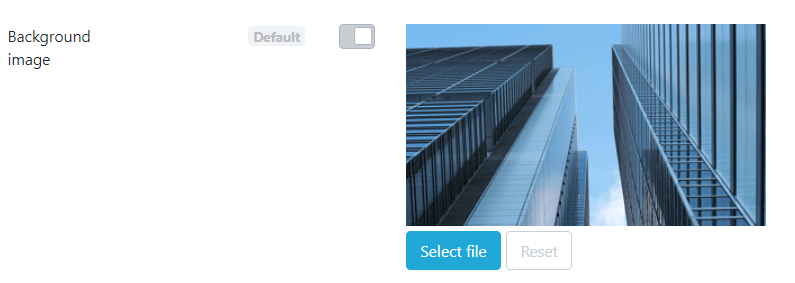
2: SET AN IMAGE FILE
Upload a specified image/video file with the name "backgrounds.zip" from "Background image" on the settings edit screen to show that image/video file on the home screen. Refer to Appendix III. backgrounds.zip, backgrounds.zip for formats of the backgrounds.zip file.
3: SET SCHEDULE COLLABORATION WITH GROUPWARE
BRAVIA Meeting can collaborate with the following groupware.
- GSuite (Google Calendar)
- Microsoft Exchange Server
- Microsoft Office 365
Refer to BRAVIA Meeting Setup (Paid version) for the setting method of each GW.
To get more info, please visit BRAVIA Meeting User Guide and BRAVIA Meeting Client User Guide.