Getting Started
Estimated reading time: 5 minutes
Note:
The support information on this page may differ by region in terms of availability and timing.
*Japan : Support is scheduled for soon. API Specs for Provisioning is not supported. API Specs for Management is planned to be supported.
*China : Not supported
Preparation
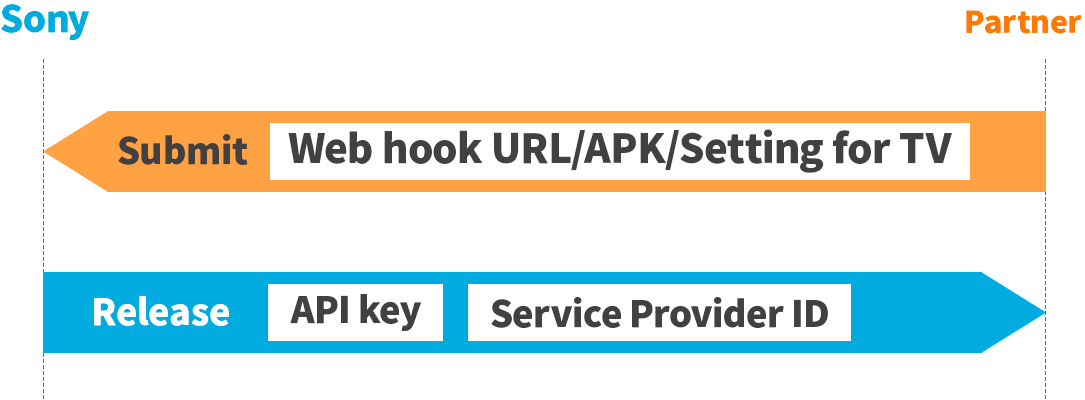
- Before you can start using the Cloud API, certain information must be pre-registered on Sony’s server. Please submit the following details to your Sony representative using secure methods, such as password-protected emails or closed-space chat platforms:
1. APKs to be installed by default during provisioning[1]
2. Default setting values for the device[2]
3. Webhook URL[3]
-
Once Sony receives and validates this information, it will be registered on Sony’s server. Within five business days, Sony will issue the following credentials to enable your access to the Cloud API:
- Service Provider ID[4]
- API Key[5]

[1]: Up to three preset APK applications can be installed via Zero-touch Provisioning.
[2]: See here for the format of the setting values.
[3]: Once provisioning is complete, Sony will send a token to this URL. It must be an HTTPS URL with an official server certificate.
[4]: Service Provider ID for application partners using the Cloud API.
[5]: Be careful not to leak.
- If you choose not to use the Provisioning API but instead use Sony’s proprietary applications, such as the Device Provisioning Tool or Remote Device Manager, you do not need to submit items [1] and [2].
Implementation Sequence
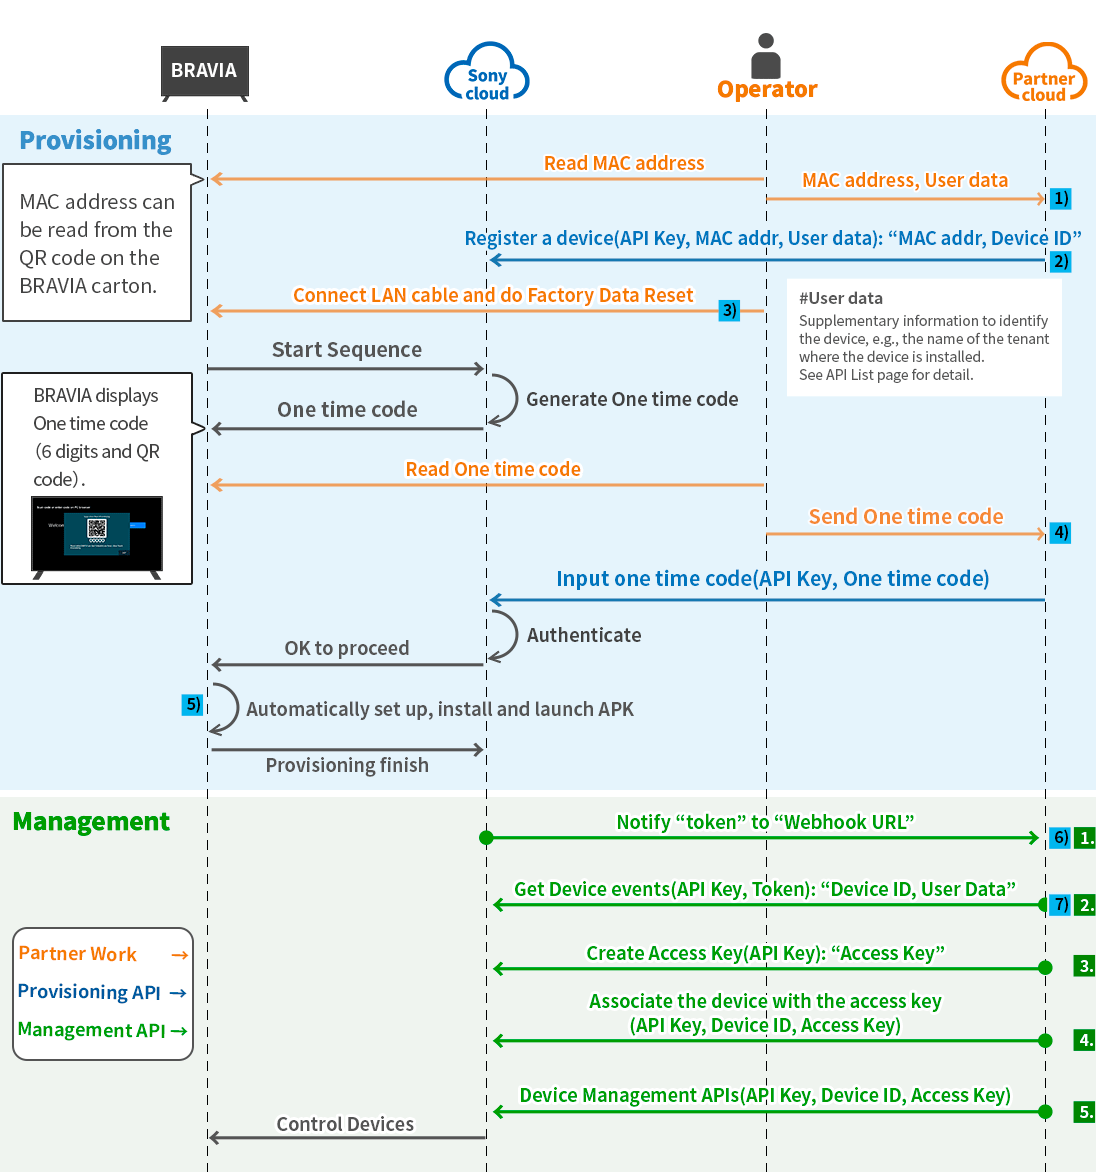
Once you have received the Service Provider ID and API Key from Sony, you can begin developing your Zero-touch Provisioning and Remote Management System using the Cloud API. The following diagram outlines the sequence of steps to implement the system, with descriptions of each part provided below.

Steps to Provision a Display
1) Prepare Device Information
- Gather the MAC address of the display you wish to provision.
- Prepare user data, which should include supplementary information to identify the device, such as the tenant name where the device will be installed. For more details, please see API Spec page.
2) Register the Device
- Use the API "Register a device" to register the MAC address and user data with Sony’s server. This process will generate a Device ID.
3) Perform a Factory Reset
- Connect a LAN cable to the display and perform a factory data reset.
4) Generate and Submit the One-Time Code
- After a few seconds, a One-Time Code (6-digit code and QR code) will appear on the display screen. The One-Time Code expires in 30 minutes. (This period is subject to change.)
- Read the One-Time Code and send it to Sony’s server using the API "Input a One-Time Code."
5) Start Device Provisioning
- Once Sony authenticates the One-Time Code, device provisioning will automatically begin. This process may take several minutes.
6) Webhook Notification
- Upon completion of device provisioning, a Token will be POSTed to the Webhook URL you submitted to Sony during the preparation phase. The Token expires in 1 hour. (This period is subject to change.)
7) Verify Provisioning
- You can verify the provisioning status by calling the API "Get Device events" using the token to retrieve the Device ID of the display.
Implementing Device Management
Once Device Provisioning is complete, follow these steps to monitor the display’s status and control it in real-time:
1. Webhook Token
- After provisioning, a Token will be POSTed to the Webhook URL you submitted to Sony during the preparation phase. The Token expires in 1 hour. (This period is subject to change.)
2. Retrieve Device ID
- Use the API “Get Device events” with the token to retrieve the Device ID of the display that has completed provisioning.
3. Create an Access Key
- Generate an Access Key for a specific device group using the API “Create Access Key.”
4. Associate Device with Access Key
- Link the Device ID to the Access Key using the API “Associate the device with the access key.”
5. Complete Remote Management Preparation
- Once the device is associated with the Access Key, you are ready to monitor and control the display in real-time. Use any Management API with the Device ID and Access Key to perform these actions.


