5. Setup (Paid version)
Estimated reading time: 31 minutes
Setting Up BM1 Server
Skip this chapter if BRAVIA Meeting is to be used in a standalone configuration.
Installing BM1 Server Software
Windows
- Run bravia-meeting-display-management.msi on the server PC.
- Follow the on-screen instructions to proceed with installation.
- After installation is complete, follow the on-screen instructions to restart the server PC.
- After the server PC is restarted, the Windows service for BM1 Server Software automatically starts.
You can check if services are running normally by the following procedure.
- Open the service menu: Control Panel → Administrator Tools → Services
- Check the “BRAVIA Meeting Display Management Service” status.
- If the status is “Stopped”, right click and select “Start” from the menu.
- To stop a service, right click and select “Stop” from the menu.
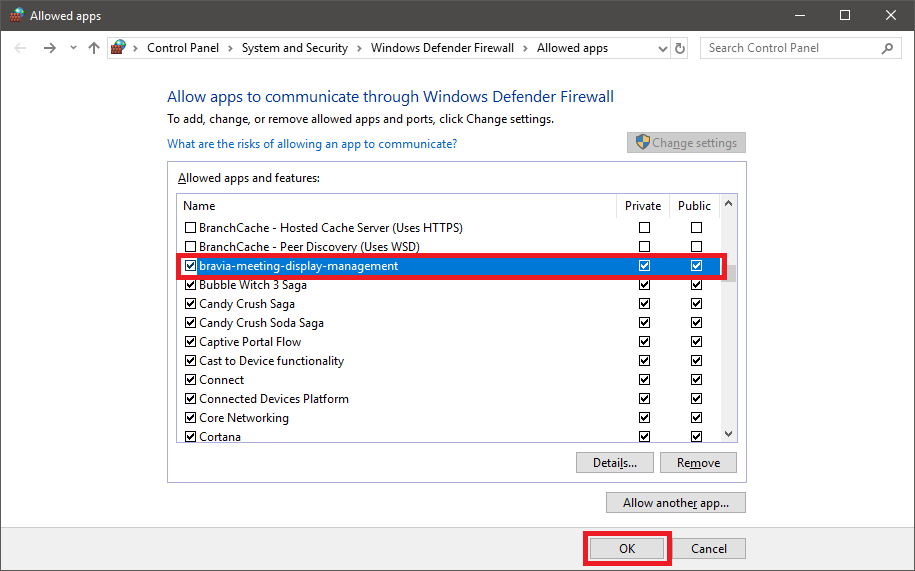
Allow BM1 Server Software to comunicate through the firewall.
Allow BM1 Server Software to communicate through Windows Defender Firewall. If you are using another firewall software, follow the instructions on the software to allow BM1 Server Software to communicate through it.
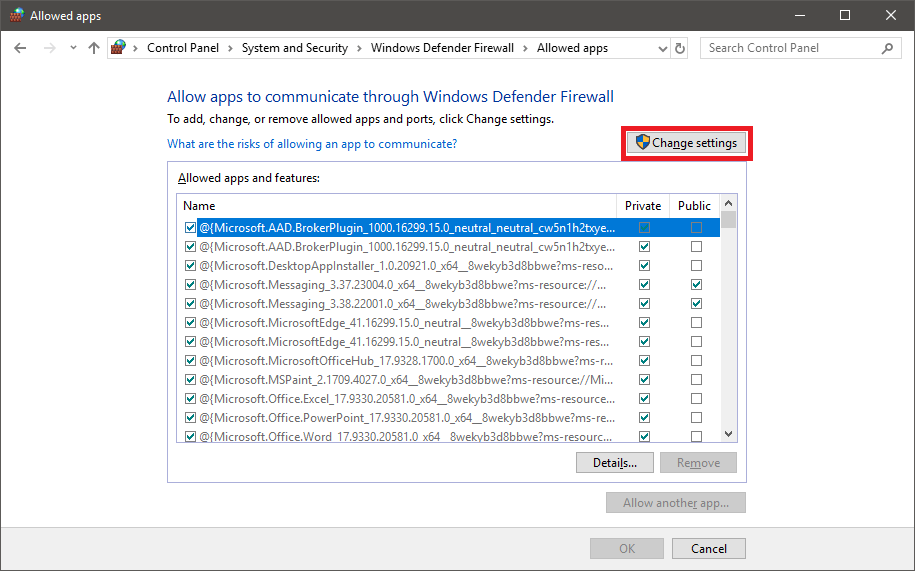
- Open “Control Panel > System and Security > Windows Defender Firewall” and select “Allow an app or feature through Windows Defender Firewall”.
- Click “Change settings”.
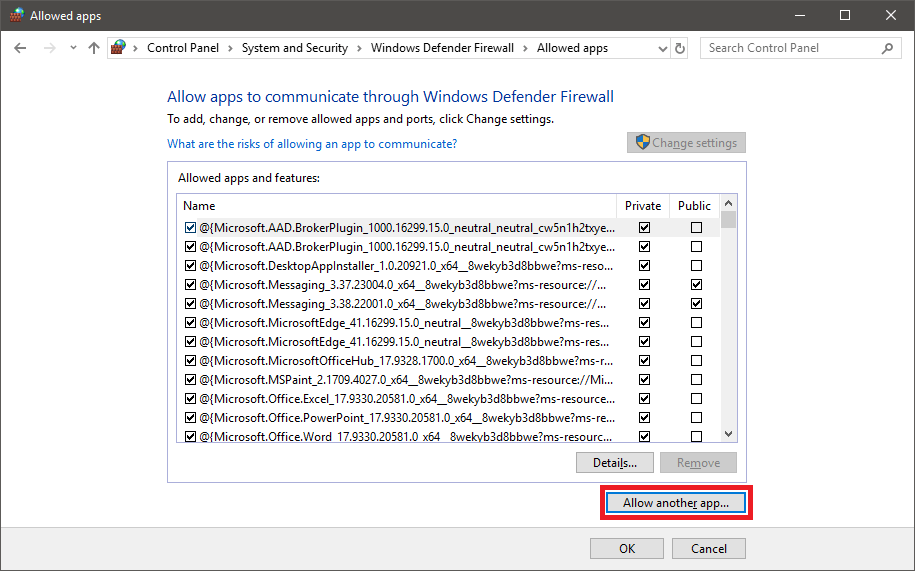
- Click “Allow another app...”.
- Click “Browse...” and select the following path.
Windows(C): > Program Files (x86) > Sony > bravia-meeting-display-management-win32-ia32 > bravia-meeting-display-management.exe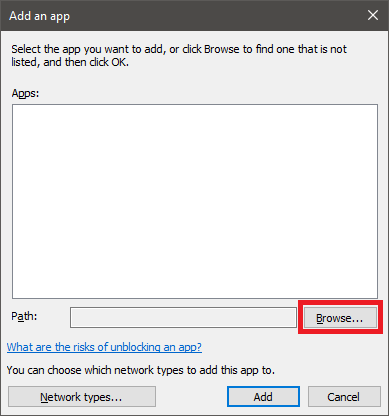
- Select the network types according to your network environment from “Network types...” and click “Add”.
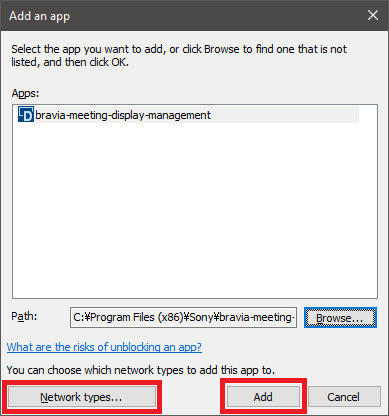
- Check that “bravia-meeting-display-management” is on the list and click “OK”.
Synology NAS
Install BM1 Server Software from the Package Center.
Setting BM1 Server
- Open the following URL on your PC browser.
- If a reverse proxy is installed, open the BM1 Admin Page URL set with the reverse proxy.
- If a reverse proxy is not installed, open the following URL:
http://<BM1 Server PC host name or IP address>:40004/manage/ui/
- Or click the BM1 Server desktop icon on the windows server PC.

Setting Up the Display Management URL
The “Display Management URL” is used to generate URLs such as the callback URL used by OAuth2 authentication. This URL must be set when you have a reverse proxy installed or are using OAuth2 authentication.
- Open the “Settings” tab on BM1 Admin Page and press the “Edit” icon.
- Set the “Server” setting “Display management URL”.
- Do not include the path
/manage/ui/in the URL. Ex)http://example.com:40004 - Set reverse proxy URL if you have one. Include a path to specify the reverse proxy URL. Ex)
https://example.com/bravia-meeting/
- Do not include the path
- Press the “Save” button to save your settings.
Collaboration Server URL
You need the collaboration server URL to use the BM1 companion application feature.
- Select the “Settings” tab on BM1 Admin Page.
- Set the URL of the collaboration server at “Collaboration Server URL”.
- If a reverse proxy is installed, set the URL set with the reverse proxy.
- If a reverse proxy is not installed, set as follows:
http://<BM1 Collaboration Server PC host name or IP address>:40004
When this setting is blank, the Display Management URL setting is used for the collaboration server URL. When the Display Management URL is also blank, the collaboration server URL is automatically configured. If collaboration with the client is not established or a reverse proxy is being used in your network, specify a collaboration server URL.
Setting Up Authentication for BM1 Admin Page
BM1 Admin Page supports local admin account and OAuth2 authentication.
Authentication is disabled by default. Enable “Auth management” in the “Settings” tab of BM1 Admin Page to enable authentication.
Local admin account
The initial password for the local admin account is admin. Change the password from “Change admin password” in the “Settings” tab before starting your operation.
Setting OAuth2 authentication
OAuth2 authentication is disabled by default. Enable “OAuth2 management” and configure the settings to access the service provider in the “Settings” tab.
Setting Display Management URL
You need the “Display Management URL” when use the OAuth2 authentication. Refer to the “Display Management URL” in “Setting Up BM1 Server”.
Setting HTTP proxy
You need the HTTP proxy settings when your BM1 Server requires a proxy to connect to OAuth2 service providers.
- Open “Settings” tab of BM1 Admin Page and press “Edit” icon.
- Set “HTTP Proxy” of the “Server” setting.
- Press “Save” button to save the settings.
Setting OAuth2 service provider
This section shows examples of OAuth2 autentication. Configure your own settings values depending on your environment.
Google account
Service provider side
- Access to the following URL and sign in.
https://console.developers.google.com - Create a new project from “NEW PROJECT”.
- Select “Dashbord” from the menu and click “ENABLE APIS AND SERVICES”.
- Select “Google People API” and enable it.
- Configure “Quotas” depending on your environment if needed.
- Select “Credentials” from the menu and select “OAuth content screen” tab.
- Select “Application type” depending on your environment.
- Confirm that “email”, “profile” and “openid” are listed in “Scopes for Google APIs”.
- Set your domain for BM1 Server to “Authorized domains”.
- Domain name is required to authenticate with Google.
- Select “Credentials” from the menu and select “Credentials” tab.
- Click “Create credentials” then “OAuth client ID”.
- Select “Web application” and enter an arbitrary name.
- Enter the value of “Callback URL” of “OAuth2 management” of “Settings” tab of BM1 Admin Page, then click “Create”.
- Copy “Cliend ID” and “Client secret” of “OAuth client” dialog.
BM1 Server side
- Open “Settings” tab of BM1 Admin Page and press “Edit” icon.
- Enable “OAuth2 management”.
- Enter the following settings to connect a service provider.
- Enter an arbitrary value to “Name” and “Login button label”.
- Enter the following value to “Authorization URL”.
https://accounts.google.com/o/oauth2/auth - Enter the following value to “Token URL”.
https://oauth2.googleapis.com/token - Enter the following value to “User data URL”.
https://www.googleapis.com/oauth2/v1/userinfo - Enter “Client ID” and “Client secret” assgined by the service provider.
- Enter the following value to “Scope”.
openid email profile
- Add emails of users to be permitted to access BM1 Admin Page.
- Use emails which are registered to the OAuth2 service provider.
- Press “Save” button to save the settings.
Microsoft Azure Active Directory account
Service provider side
- Access to the following URL and sign in.
https://admin.microsoft.com - Go to Azure Active Directory admin center by clicking “Admin center” - “Azure Active Directory” from the menu.
- Select “Azure Active Directory” from the “All services” of the menu.
- Select “App registration” from the menu.
- Click “New application registration”.
- Enter an arbitrary name, select “Web app / API” on “Application type” and enter BM1 Server URL to “Sign-on URL”, then click “Create”.
- Copy the value of “Application ID” in the application settings.
- Clisk “Settings” of the application settings.
- Select “Settings” - “Reply URLs” and enter the value of “Callback URL” of “OAuth2 management” of “Settings” tab of BM1 Admin Page, then click “Save”.
- Select “Settings” - “Keys”, enter an arbitrary name to “DESCRIPTION” and select an arbitrary duration from “EXPIRATION”, then click “Save”.
- After saved, copy the value of “VALUE”.
- Make sure to copy the value. You won’t be able to retrieve after you leave the blade.
BM1 Server side
- Open “Settings” tab of BM1 Admin Page and press “Edit” icon.
- Enable “OAuth2 management”.
- Enter the following settings to connect a service provider.
- Enter an arbitrary value to “Name” and “Login button label”.
- Enter the following value to “Authorization URL”. Set
<tenant>orcommondepending on your environment.https://login.microsoftonline.com/<tenant>/oauth2/v2.0/authorizeor
https://login.microsoftonline.com/common/oauth2/v2.0/authorize - Enter the following value to “Token URL”. Set
<tenant>orcommondepending on your environment.https://login.microsoftonline.com/<tenant>/oauth2/v2.0/tokenor
https://login.microsoftonline.com/common/oauth2/v2.0/token - Enter the following value to “User data URL”.
https://graph.microsoft.com/oidc/userinfo - Enter “Application ID” and VALUE of the key assgined by the service provider to “Client ID” and “Client secret”.
- Enter the following value to “Scope”.
openid profile email offline_access - You can see the values for “Authorization URL”, “Token URL”, “User data URL” and “Scope” by accessing the following URL”
https://login.microsoftonline.com/<tenant>/v2.0/.well-known/openid-configuration
- Add emails of users to be permitted to access BM1 Admin Page.
- Use emails which are registered to the OAuth2 service provider.
- Press “Save” button to save the settings.
Facebook account
Service provider side
- You need to be Facebook developer.
- Sign-in to Facebook then move to the developer page by clicking “Manage Apps” from the menu.
- Create a new app from “Add a New App”.
- Configure your app depending on your environment and enable it.
- Select “Settings” - “Basic” from the menu and copy “App ID” and “App Secret”.
- Select “PRODUCT+” from the menu and click “Settings” of “Facebook Login”.
- Select “Facebook Login” - “Settings” from the menu and enter the value of “Callback URL” of “OAuth2 management” of “Settings” tab of BM1 Server to “Valid OAuth Redirect URIs”, then save the changes.
BM1 Server side
- Open “Settings” tab of BM1 Admin Page and press “Edit” icon.
- Enable “OAuth2 management”.
- Enter the following settings to connect a service provider.
- Enter an arbitrary value to “Name” and “Login button label”.
- Enter the following value to “Authorization URL”.
https://www.facebook.com/v3.2/dialog/oauth - Enter the following value to “Token URL”.
https://graph.facebook.com/v2.3/oauth/access_token - Enter the following value to “User data URL”.
https://graph.facebook.com/me?fields=name,email - Enter “App ID” and “App Secret” assgined by the service provider to “Client ID” and “Client secret”.
- Enter the following value to “Scope”.
email
- Add emails of users to be permitted to access BM1 Admin Page.
- Use emails which are registered to the OAuth2 service provider.
- Press “Save” button to save the settings.
GitHub account
Service provider side
- Sign-in to GitHub.
- Select “Settings” from the menu.
- Select “Developer settings” from the menu of the settings page.
- Create a new app from “Register a new application”.
- Enter the the of “Callback URL” of “OAuth2 management” of “Settings” tab of BM1 Server to “Authorization callback URL”.
- Copy “Client ID” and “Client secret” from the app settings.
BM1 Server side
- Open “Settings” tab of BM1 Admin Page and press “Edit” icon.
- Enable “OAuth2 management”.
- Enter the following settings to connect a service provider.
- Enter an arbitrary value to “Name” and “Login button label”.
- Enter the following value to “Authorization URL”.
https://github.com/login/oauth/authorize - Enter the following value to “Token URL”.
https://github.com/login/oauth/access_token - Enter the following value to “User data URL”.
https://api.github.com/user - Enter “Client ID” and “Client secret” assgined by the service provider.
- Leave “Scope” to blank.
- Add emails of users to be permitted to access BM1 Admin Page.
- Use emails which are registered to the OAuth2 service provider.
- Press “Save” button to save the settings.
GitHub setting for every user
Email address of every GibHub user must be public to authenticate with GitHub.
- Sign-in to GitHub.
- Select “Settings” from the menu.
- Select “Emails” from the settings menu and uncheck “Keep my email address private”.
- Select “Profile” from the settings menu and select the registered email from “Public email”, then save the changes.
Setting Up BRAVIA
When a timetable of the meeting room is displayed in collaboration with groupware or when performing server and client authentication by TLS communications, setting of the time on the BRAVIA unit is required.
Although a network connection is not required when BRAVIA Meeting is to be used in a standalone configuration, you must set the BRAVIA network and time or set the time to BM1 Display so that the correct time is displayed on the home screen.
- Connect the network cable to BRAVIA, or enable the network connection by selecting “Home” > “Network Settings” > “Wi-Fi”.
- If a proxy setting is necessary, set by selecting “Home” > “Network Settings” > “Proxy Settings”.
- If BRAVIA is already connected to the Internet, select “Home” > “Settings” > “Date/Time” > “Automatically Set Date/Time” > “Synchronize With Network Time”. Check that the time is displayed correctly by “Home” > “Settings” > “Date/Time”. If an NTP server is not used, proceed to the procedure in “Installing BM1 Display Software”.
- To use an NTP server, BRAVIA must be set to the “Pro Setting Mode”.
- Set the address of the NTP server by selecting “Home” > “Pro Setting Mode” > “NTP Server”.
Enable USB camera for Android version 8.0 when using the video conferencing function. It’s not necessary for Android version 9.0 or later.
- Change BRAVIA to the “Pro Settings” mode.
- Set “Pro settings” > “Developer options” > “Enable USB camera” to “on”.
Enable the installation from a USB flash memory as follows if you are using Android 10.0 or later model. If you need to prevent a third party from installing any software during use, switch to Pro settings mode after installation of BM1 Display Software, disable this setting, and then switch to Pro mode again. If this setting is disabled, you need to re-enable it when updating or uninstalling BM1 Display Software.
- Change BRAVIA to the “Pro Settings” mode.
- Set “Pro settings” > “USB drive auto run” > “Install BPK” to enabled.
Installing BM1 Display Software
- Copy “extapp_installer.pkg” to the USB storage device root directory.
- Insert the USB storage device into BRAVIA.
- The installation screen is displayed. Follow the on-screen instructions to proceed with the installation.
- When you have finished the entire procedure, remove the USB storage device and restart the system.
- BM1 Display Software automatically starts up a short time after the system is restarted.
Setting Up BM1 Display
You can configure settings on the paid version of BM1 Display using the following three methods:
- Operating BM1 Display by remote control
- You can set the basic setting items in BM1 Display.
- Importing setting information saved on USB storage device to BRAVIA
- You can configure almost all settings by importing, basic settings, custom settings, background still image settings for the home screen, certificates and other settings.
- Configuring settings from BM1 Admin Page
- You can configure almost all settings, with the exception of importing certificates.
BM1 Display Basic Setting Items
You can set the following basic setting items in BM1 Display:
| Setting Item | Explanation |
|---|---|
| Server Connection | Sets to connect or not connect BRAVIA to BM1 Server. “Server URL” can only be configured when this setting is “ON”. The other setting items can only be configured when this setting is “OFF”. When the server connection is enabled, the BM1 Display settings can only be set through BM1 Server. |
| Server URL | Sets the URL of BM1 Server to be connected. If a reverse proxy is installed, use the reverse proxy URL. If a reverse proxy is not installed, set as follows: http://<BM1 Server IP address>:40004 |
| Home screen > Title | Sets the name of the meeting room and organization that is displayed on the home screen. |
| Home screen > Subtitle | Sets the name of the meeting room and organization that is displayed on the home screen. |
| Home screen > Clock | Displays the clock on the home screen. |
| Home screen > Web frame | Sets the URLs of web pages that are displayed on the home screen. “None”: No display “Half”: Web page is displayed in the upper half of the screen “Full”: Web page is displayed on the full screen Web Pages which are not allowed to be displayed in an iframe by the “X-Frame-Options” HTTP response header can’t be displayed. |
| Power > Auto power off | Turns BRAVIA OFF when operation is disabled due to inactivity on the home screen. This item can be set in 1-minute increments. |
| Power > Auto reboot | Automatically reboots BRAVIA weekly. BRAVIA is rebooted when it has been inactive for a while. |
| Inputs | Sets the labels of the inputs. |
| Help URL | Sets the URL of your help page. The default help page is replaced when this is set. |
| Annotation > Canvas color | Sets the annotation mode canvas color. |
| Annotation > Save annotation to USB storage device | Sets if the button to save drawing on the annotation to USB storage device is displayed or not displayed. |
| Settings lock | Sets the PIN code needed to open the setting screen. When a PIN code is set, the setting screen can only be opened by entering the correct PIN code. |
Setting by Operating BM1 Display with the Remote Control
Display the setting dialog box by pressing the “Play” button on the remote control on the BM1 Display home screen.
Importing Setting Information from USB storage device
You can import basic settings, custom settings, background still image settings for the home screen, etc. by inserting a USB storage device containing the configuration files and these settings.
Place the following files in the USB storage device root directory. You can set the following content:
| Setting Content | File | Operation |
|---|---|---|
| Basic settings | settings.json | (optional) For details on format, see the Appendix. |
| Custom settings | custom.zip | (optional) For details on format, see the Appendix. |
| Background still images/video on home screen | backgrounds.zip | (optional) For details on format, see the Appendix. |
| Root certificate/intermediate certificate | ca_certs/* | (optional) Place certificates in PEM format in the “ca_certs” folder. Any file name is acceptable, and you can place multiple files. |
| Client certificate | client_cert/cert.pfx | (required when there is the “passphrase.txt” file) Place private keys and client certificates in PKCS#12 format in the “client_cert” folder. |
| Pass phrase for private key of client certificate | client_cert/passphrase.txt | (required when the “cert.pfx ” file is present) Place the text file containing the pass phrase. |
Import Procedure
- Copy the configuration files, etc. to the USB storage device root directory.
- Display the setting dialog box by pressing the “Play” button on the remote control at the BM1 Display home screen.
- Insert the USB storage device into BRAVIA.
- The import confirmation dialog box is displayed. Follow the on-screen instructions to complete the import.
Setting from BM1 Admin Page
You can configure the BM1 Display settings on the “Displays” tab of BM1 Admin Page.
To set from BM1 Admin Page, the URL of BM1 Server must be set to BM1 Display, and BM1 Display must be connected to BM1 Server. For this reason, you must set the “Server URL” either by operating the remote control or by importing by USB storage device.
Setting Still Images and Videos as the Home Screen Background
You can play back still images and videos on the BM1 Display home screen.
There are two ways of setting customized settings as follows:
- Importing from USB storage device
- Import the backgrounds.zip file stored on the USB storage device.
- Use a backgrounds.zip file which includes no image or video file to reset the home screen background to default.
- For details on the format of the backgrounds.zip file, see the Appendix.
- Import the backgrounds.zip file stored on the USB storage device.
- Setting from BM1 Admin Page
- Upload a still image file, a video file, or the backgrounds.zip file in “Background image” under the display settings or the tab settings.
- You can set either a single still image file, a video file, or multiple files in the zip file.
- For details on the format of the backgrounds.zip file, see the Appendix.
- Upload a still image file, a video file, or the backgrounds.zip file in “Background image” under the display settings or the tab settings.
Don’t include a video element in the web page set by “Web URL” when you set a video for the background.
Home Screen Background Setting Specifications
The specifications of the background settings for the home screen are as follows:
- Files are played back by name in alphabetical order (regardless of whether media type is still image or video)
- Sub-folders are not supported
- The default playback time for still images is 10 seconds
- The playback time can be specified by appending the file name before the file extension with the desired playback time (e.g. “30sec”)
- Example)
image(30sec).png
- Example)
- The playback time for video is to the end of the video content
- The playback time can be specified by appending the file name before the file extension with the desired playback time (e.g. “30sec”)
- If the only media file is one still image, that image is displayed at all times
- If the only media file is one video, that video is repeatedly played back.
Supported Format and Extension
For details on the supported format codecs, refer to the BRAVIA B2B HTML5 Solution Technical Manual.
- Still images
- JPEG: jpeg, jpg
- PNG: png
- Videos
- MP4: mp4
- MPEG TS: ts, m2ts
Extensions are not case-sensitive.
Setting up Schedule Collaboration with Groupware
HTTP proxy setting
You need to set the HTTP proxy setting when it’s required to connect to a groupware server from your BM1 Server.
- Select the “Settings” tab on BM1 Admin Page.
- Set “HTTP Proxy” in the “Server” setting.
GSuite (Google Calendar)
GSuite side
- Project settings
- Access the following URL and sign in.
https://console.developers.google.com - Add the project from the project selection dialog.
- Fill in the project name. (Ex. BraviaMeeting)
- Enable the API by selecting “ENABLE APIS AND SERVICES” in the “Dashboard” tab.
- Open the “Library” tab and select “Google Calendar API”, and then select “ENABLE” to enable the API.
- “Queries per day” and “Queries per 100 seconds” are editable from “Quotas”.
- This software uses the API once or twice every 100 seconds, or 1440 times per day for each display.
- If the maximum number of queries is not high enough, request Google to change the maximum limitation from “Queries quota limit” on the same page.
- Create credentials: “Credentials” tab - “Create credentials” - “Service account key”.
- Select “Service account” - “New service account”, then fill in “Service account name” and “Service account ID”.
- Select “Role” - “Project” - “Viewer”
- Select “Key type” - “JSON”, and execute “Create”.
- Save created JSON file (*1).
- Record the “Service account ID” (*2).
- Ex)
account@project-777777.iam.gserviceaccount.com - You can also go to “Credentials” tab - “Credentials”-“Manage service accounts” to confirm the “Service account ID”.
- Ex)
- Access the following URL and sign in.
- Room resource settings
- Follow the instructions in the link below to register your meeting rooms as resources.
https://support.google.com/a/answer/1033925
- Follow the instructions in the link below to register your meeting rooms as resources.
- Calendar settings
- Access the following URL and sign in.
https://calendar.google.com/calendar/render - Change the following settings for each resource calendar so that they can be displayed.
- Open calendar settings.
- Record the “Calendar ID” (*3).
- Add the service account ID of (*2) to “Share with specific people” and set “See all event details” permissions.
- Access the following URL and sign in.
BM1 Server Side
- Open the “Settings” tab of BM1 Admin Page and press the “Edit” button.
- Open “Edit credentials” of the “Google Calendar” item, select the service account key downloaded by (*1) and press “OK”.
- Press “OK” to save the settings.
- Change the following “Schedule integration” settings for each display.
- Set “Schedule enabled” to “ON”.
- Select “Google Calendar” in “System”.
- Set “Room ID” to the calendar ID of (*3) on each display.
Microsoft Exchange Server
BM1 Server Side
- Open the “Settings” tab of BM1 Admin Page and press the “Edit” button.
- Set “URL” in the “Microsoft Exchange Server” item to the URL of the EWS service.
- Ex)
https://computer.domain.contoso.com/EWS/Exchange.asmx
- Ex)
- Select the method from “Authentication/Authorization method” of the “Microsoft Exchange Server” item.
- Fill in “User” and “Password” based on the method from “Edit credentials” of the “Microsoft Exchange Server” item.
- Use the “domain\user” format if the NTLM method and domain are used in your environment.
- Press “OK” to save the settings.
- Change the following “Schedule integration” settings for each display.
- Set “Schedule enabled” to “ON”.
- Select “Microsoft Exchange Server” in “System”.
- Set the e-mail address of the facility resource to “Room ID” of each display.
Microsoft Office 365
Microsoft Office 365 side
You need the following settings when you use OAuth for the Authentication/Authorization method.
- Application registration portal
- Access the following URL and sign in as an administrator.
https://apps.dev.microsoft.com - Click “Add an app”.
- Input “Application Name” and click “create”.
- Record the displayed “Application ID” (*1).
- Click “Generate New Key Pair” in “Application Secrets”, and download the generated PFX file (*2).
- Click “Add Platform” in “Platforms”, and select “Web”.
- Input the follwing URL to “Redirect URLs”.
http://localhost:40002 - Click “Add” in “Microsoft Graph Permissions” - “Application Permissions”.
- Activate “Calendars.Read”, and click “OK”.
- Save settings.
- Access the following URL and sign in as an administrator.
- Permission
- Access the following URL and sign in as an administrator.
https://login.microsoftonline.com/{tenant}/adminconsent?client_id={application ID}&state={arbitrary value}&redirect_uri=http:%2f%2flocalhost:40002 - Click “Accept”.
- Access the following URL and sign in as an administrator.
BM1 Server Side
- Open the “Settings” tab of BM1 Admin Page and press the “Edit” button.
- “URL” will be automatically set based on the Authentication/Authorization method.
- Select the method from “Authentication/Authorization method” of the “Microsoft Office 365” item.
- Fill in the credentials based on the method from “Edit credentials” of the “Microsoft Office 365” item.
- Fill in “User” and “Password” when you use BASIC authentication.
- When you use OAuth.
- Enter the domain part of the e-mail address in “Tenant”.
- Enter the ID of (*1) to “Application ID”.
- Select the downloaded PFX file (*2) for “Application secret”.
- Enter the password which you set to download the PFX file.
- Press “OK” to save the settings.
- Change the following “Schedule integration” settings for each display.
- Set “Schedule enabled” to “ON”.
- Select “Microsoft Office 365” in “System”.
- Set the e-mail address of the facility resource to “Room ID” of each display.
Remarks
- The schedule function is available only if the display’s timezone is set correctly.
- The schedule function is available only if access rights are correctly given to the user.
Setting up Video Conference
BRAVIA Meeting supports video conferences between two BRAVIAs with USB cameras or USB microphones. You can select either video and audio mode or audio only mode when you start a video conference.
Below is a summary of how to set up a video conference.
- Connect a USB camera or USB microphone to the BRAVIA.
- Set up the video conference on BM1 Admin Page if needed.
Setting up BRAVIA
Enable USB camera for Android version 8.0. It’s not necessary for Android version 9.0 or later. Refer to the “Setting Up BRAVIA” in “Setup (Paid version)”.
Connect a USB camera or USB microphone to the BRAVIA. BRAVIA Meeting supports the following cameras and microphones.
- Camera: SONY FWA-CE100
- Microphone: Generic USB HID microphone (Not all devices are guaranteed to work.)
BRAVIA Meeting supports using a USB camera and USB microphone at the same time. When a USB camera and USB microphone are connected to BRAVIA at the same time, the camera is used for video and the microphone is used for audio. Connecting two or more cameras or microphones is not supported.
When you start a video conference for the first time, allow permissions for “Video” and “Mic” access.
Setting up Video Conference on BM1 Admin Page
The following settings for the video conference can be configured on BM1 Admin Page.
| Setting Item | Default | Explanation |
|---|---|---|
| Enabled | ON | Sets the video conference to enabled or disabled. When disabled, the video conference item on the menu is disabled and cannot be used to launch the video confernece function. |
| Outbound Resolution | 1280 x 720 | Sets the resolution of the video captured on the target display. This setting affects the resolution of the video displayed on the other side of the video conference. |
| Outbound Frame Rate | 15fps | Sets the frame rate of the video captured on the target display. This setting affects the frame rate of the video displayed on the other side of the video conference. |
| Inbound Bit Rate | 2Mbps | Sets the bit rate of the video received by the target display. This setting affects the bit rate of the video displayed on the target display of the video conference. |
| Auto Gain Control | OFF | Sets the auto gain control of audio capture on the target display to enabled or disabled. When enabled, the audio gain will be automatically adjusted based on the input level, and the output volume level will be equalled, but the audio quality may be worse in some situations. You may enable this setting when the BRAVIA is located in a larger meeting room. |
You can customize the resolution, frame rate, and bit rate settings depending on your network environment and the model of BRAVIA. The default values of these settings are optimized for BZ35F series. When you set them to a higher value than the default, performance such as the screen sharing connecting speed or the annotation mode drawing performance during the video conference will be affected.
Customizing UI Design
You can customize the UI design of BM1 Display. You can customize the following UI elements:
- Text (messages, font, text color, text size)
- Icon images
- Background color
- Time format
There are two ways of setting customized settings as follows:
- Importing from USB storage device
- Import the custom.zip file stored on the USB storage device.
- For details on the format of the custom.zip file, see the Appendix.
- Import the custom.zip file stored on the USB storage device.
- Setting from BM1 Admin Page
- Upload the custom.zip file in “Custom design” under the display settings or the tab settings.
- For details on the format of the custom.zip file, see the Appendix.
- Upload the custom.zip file in “Custom design” under the display settings or the tab settings.
Setting Up BM1 Client App
Skip this chapter if BRAVIA Meeting is to be used in a standalone configuration.
Downloading the installer
- Open the following URL on each user’s PC browser.
- If a reverse proxy is installed, set the URL set with the reverse proxy.
- If a reverse proxy is not installed, set as follows:
http://<BM1 Server host name or IP address>:40004
- Download the installer.
On a Windows PC
- Run bravia_meeting_client-<version>-setup.exe for each user on the Windows PC.
- Follow the on-screen instructions to proceed with the installation.
- After installation is completed, BM1 Client App automatically starts.
On a Mac
- Run bravia_meeting_client-<version>-mac.dmg for each user on the Mac.
- Follow the on-screen instructions to proceed with the installation.
- After installation is completed, launch BM1 Client App from Launchpad.
BM1 Client App Settings
Set “Server URL” as follows in the BM1 Client App settings.
- If a reverse proxy is installed, set the URL set with the reverse proxy.
- If a reverse proxy is not installed, set as follows:
http://<BM1 Server host name or IP address>:40004
Automatic Update of BM1 Client App
BM1 Client App supports automatic update. Software is automatically updated if there is new software in the connected BM1 Server.