1. Advanced usage (for Application)
Estimated reading time: 9 minutes
This chapter describes the procedures to change the settings of BRAVIA Signage Server with braviasignageserver.xml, the setting file of BRAVIA Signage Server, as well as the procedures for changing the port number, using authentication, etc.
1.1. How to change the port number of the BRAVIA Signage Server (for Windows)
The following procedure shows how to change the port number from initial 8080 to any value. Set up with “Administrative Privileges”.
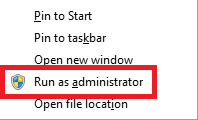
[1] Run a command prompt with “Administrative Privileges”. Right-click the mouse button on the start menu and select the “Run as administrator” option from the Power User menu.

Run all of the following commands in Command Prompt with “Administrative Privileges”.
[2] Run the following command to stop and uninstall the BRAVIA Signage Server.
  cd "c:\Program Files (x86)\SONY\BRAVIA Signage"
  braviasignageserver.exe stop
  braviasignageserver.exe uninstall
[3] Run any text editor with “Administrative Privileges”, open “c:\Program Files (x86)\SONY\BRAVIA Signage\braviasignageserver.xml”, add a XML tag with the port number to it as seen below, and save it.
  <service>
    <id>braviasignageserver.exe</id>
    <name>BRAVIA Signage Server</name>
    <description>BRAVIA Signage Server</description>
    <executable>%BASE%\node.exe</executable>
    <arguments>--harmony "%BASE%\node_modules\node-windows\lib\wrapper.js" -f "%BASE%\server\app.js" -l "BRAVIA Signage Server" -g 0.25 -w 1 -r 3 -a n</arguments>
    <logmode>reset</logmode>
    <startmode>Automatic</startmode>
    <env name="NODE_ENV" value="production"/>
    <env name="PORT" value="50000"/>
  </service>
[4] Run the following command to install and start the BRAVIA Signage Server again.
  cd "c:\Program Files (x86)\SONY\BRAVIA Signage"
  braviasignageserver.exe install --username {windows login user} --password {windows login password}
  braviasignageserver.exe start
1.2. How to run multiple services of the BRAVIA Signage Server (for Windows)
The following procedure shows how to run multiple services of the BRAVIA Signage Server. Setup with Administrative Privileges.
[1] Copy “braviasignageserver.exe” and “braviasignageserver.xml” in “c:\Program Files (x86)\SONY\BRAVIA Signage\braviasignageserver.xml” with other names. The file name excluding the file extension needs to be the same.
Example) braviasignageserver2.exe and braviasignageserver2.xml
[2] Run any text editor with Administrative Privileges, open the copied XML file, edit it as seen below, and save it.
( For BRAVIA Signage Server version 1.8.4 or earlier )
  <service>
    <id>braviasignageserver2.exe</id>
    <name>BRAVIA Signage Server (50002)</name>
    <description>BRAVIA Signage Server (50002)</description>
    <executable>%BASE%\node.exe</executable>
    <arguments>--harmony "%BASE%\node_modules\node-windows\lib\wrapper.js" -f "%BASE%\server\app.js" -l "BRAVIA Signage Server" -g 0.25 -w 1 -r 3 -a n</arguments>
    <logmode>reset</logmode>
    <startmode>Automatic</startmode>
    <env name="NODE_ENV" value="production"/>
    <env name="PORT" value="50002"/>
    <env name="MONGO_URI" value="mongodb://localhost/braviasignage2"/>
  </service>
( For BRAVIA Signage Server 2.0.0 or later )
<service>
  <id>braviasignageserver2.exe</id>
  <name>BRAVIA Signage Server (50002)</name>
  <description>BRAVIA Signage Server(50002)</description>
  <executable>%BASE%\app.exe</executable>
  <arguments>--max_old_space_size=2000 -- -f "%BASE%\server\app.js" -l "BRAVIA Signage Server" -g 0.25 -w 1 -r 3 -a n</arguments>
  <logmode>reset</logmode>
  <startmode>Automatic</startmode>
  <logpath>C:\Users\{ユーザー名}\AppData\Local\bravia-signage\logs</logpath>
  <env name="NODE_ENV" value="production" />
  <env name="POSTGRESQL_SU_PASSWORD" value="encrypted password" />
  <env name="POSTGRESQL_BS1_PASSWORD" value="encrypted password" />
  <env name="PORT" value="50002"/>
  <env name="POSTGRESQL_DATABASE" value="bravia_signage2"/>
</service>
XML tag definitions)
| Tag name | Atrribute | Edit | Description |
|---|---|---|---|
| id | - | Required | Name of an exe file |
| name | - | Optional | Name of the Windows service |
| description | - | Optional | Description of the Windows service |
| name | PORT | Required | Port number of the BRAVIA Signage Server The numbers need to be different for each BRAVIA Signage Server. |
| MONGO_URI | Required [BRAVIA Signage Server 1.8.4 or earlier] | URI of the database which the BRAVIA Signage uses Assign the database name corresponding with the exe file name. When omitted, the default value is ”mongodb://localhost/braviasignage”. | |
| POSTGRESQL_DATABASE | Required [BRAVIA Signage Server 2.0.0 or later] | URI of the database which the BRAVIA Signage uses Assign the database name corresponding with the exe file name. When omitted, the default value is ”bravia_signage”. |
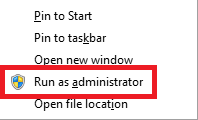
[3] Run a command prompt with Administrative Privileges. Right-click the mouse button on the start menu and select the [Run as administrator] option from the Power User menu.

Run all of the following commands in Command Prompt with Administrative Privileges.
[4] Run the following command to stop and uninstall the BRAVIA Signage Server.
  cd "c:\Program Files (x86)\SONY\BRAVIA Signage"
  braviasignageserver2.exe install --username {windows login user} --password {windows login password}
  braviasignageserver2.exe start
[5] Run procedures [1] to [4] for each service of the BRAVIA Signage Server.
1.3. Modify Contents Library URL (for Windows)
The URL of content previewed from the [Contents Library] page and the URL inserted automatically when adding content from the contents library to a playlist can be changed using the following steps.
[1] Run any text editor with [Administrative Privileges], and open “c:\Program Files (x86)\SONY\BRAVIA Signage\braviasignageserver.xml”. Next, write the following XML tag to specify the contents library’s URL in the file and save it.
  <service>
    <id>braviasignageserver.exe</id>
    <name>BRAVIA Signage Server</name>
    <description>BRAVIA Signage Server</description>
    <executable>%BASE%\node.exe</executable>
    <arguments>--harmony "%BASE%\node_modules\node-windows\lib\wrapper.js" -f "%BASE%\server\app.js" -l "BRAVIA Signage Server" -g 0.25 -w 1 -r 3 -a n</arguments>
    <logmode>reset</logmode>
    <startmode>Automatic</startmode>
    <env name="NODE_ENV" value="production"/>
    <env name="CONTENTS_SERVER_URL" value="http://192.168.1.1/a/b/c"/>
  </service>
[2] The value configured in step [1] is applied when BRAVIA Signage Server starts. Run the following command in the command prompt with “Administrative Privileges” to re-install and restart BRAVIA Signage Server.
  cd "c:\Program Files (x86)\SONY\BRAVIA Signage"
  braviasignageserver.exe install --username {windows login user} --password {windows login password}
  braviasignageserver.exe start
-
If “CONTENTS_SERVER_URL” is not in braviasignageserver.xml, BRAVIA Signage refers to the IP address of the network interface, and makes a contents library URL from it. When there are multiple network interfaces with IP addresses, the value used depends on the system.
-
If the IP address of the server is changed, BRAVIA Signage Server needs to be rebooted to apply “CONTENTS_SERVER_URL”.
1.4. How to add user authentication to Operation Web Application
You can configure the access limitations to Operation Web Application with a user name and password. This section describes the procedure for this configuration.
Windows
[1] Run any text editor with Administrative Privileges, open “c:\Program Files (x86)\SONY\BRAVIA Signage\braviasignageserver.xml”, edit this file with the following procedure (add “DIGEST_AUTH.USERNAME” as the user name and “DIGEST_AUTH.PASSWORD” as the password) and save it. In the following example, “user” and “password” are configured as the user name and the password, respectively.
Generate Password (Command Prompt):
Replace username “user” and password “password” in the command below.
> set /P HASH=user:BRAVIA_Signage_Server:password<NUL > digest.txt
> certutil -hashfile digest.txt sha256
SHA256 hash of digest.txt:
b8efe270ceb3b006079eab08d9bb1d7bd1d43262e4dfbbf81514bc10eb2eda7b
CertUtil: -hashfile command completed successfully.
Set the Hash value calculated by the User name and the above command.
  <service>
    <id>braviasignageserver.exe</id>
    <name>BRAVIA Signage Server</name>
    <description>BRAVIA Signage Server</description>
    <executable>%BASE%\node.exe</executable>
    <arguments>--harmony "%BASE%\node_modules\node-windows\lib\wrapper.js" -f "%BASE%\server\app.js" -l "BRAVIA Signage Server" -g 0.25 -w 1 -r 3 -a n</arguments>
    <logmode>reset</logmode>
    <startmode>Automatic</startmode>
    <env name="NODE_ENV" value="production"/>
    <env name="DIGEST_AUTH.USERNAME" value="user" />
    <env name="DIGEST_AUTH.PASSWORD" value="b8efe270ceb3b006079eab08d9bb1d7bd1d43262e4dfbbf81514bc10eb2eda7b"/>
  </service>
[2] The setting is configured when BRAVIA Signage Server starts. The procedure to stop and start BRAVIA Signage Server is the same as the procedure in 2.1. How to back up and restore the database (for Windows).
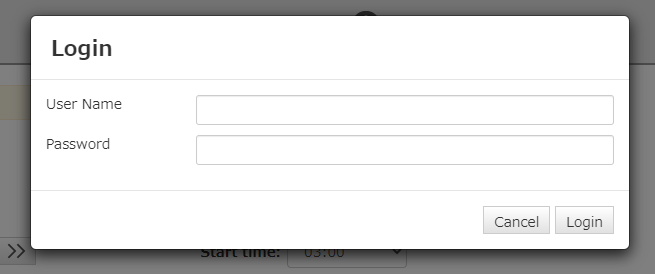
[3] When you open Operation Web Application, the following screen opens. Enter the user name and password configured in step [1].

Synology NAS
[1] Sign in Synology NAS as administrator.
[2] Run “File Station” and move to “docker > bs1” folder and download the “bs1.env.txt” file to your PC.
[3] Generate a password on your PC, edit the file and save it. In the following example, “user” and “password” are configured as the user name and the password, respectively.
Generate Password (Command Prompt):
Replace username “user” and password “password” in the command below.
> set /P HASH=user:BRAVIA_Signage_Server:password<NUL > digest.txt
> certutil -hashfile digest.txt sha256
SHA256 hash of digest.txt:
b8efe270ceb3b006079eab08d9bb1d7bd1d43262e4dfbbf81514bc10eb2eda7b
CertUtil: -hashfile command completed successfully.
Set the Hash value calculated by the User name and the above command.
BS1_PORT=8080
BS1_HOST_IP=192.168.100.100
BS1_DIGEST_USERNAME=user
BS1_DIGEST_PASSWORD=b8efe270ceb3b006079eab08d9bb1d7bd1d43262e4dfbbf81514bc10eb2eda7b
[4] Upload the file to “docker > bs1 > bs1.env.txt”.
[5] Restart BRAVIA Signage on Package Center on Synology NAS.
1.5. Logging and log files (for Windows)
Log files are output in case unexpected behavior or errors occur in BRAVIA Signage, such as system failure during operation. When contacting customer support for troubleshooting, etc., the information in these log files helps you explain your situation.
Saved folder and file name
Log files are saved in the “%USERPROFILE%\AppData\Local\bravia-signage\logs\” folder.
The names of log files of BRAVIA Signage Server include the port number used by BRAVIA Signage Server, in the format “bs1-server-{portnumber}.log”. The names of log files of BRAVIA Signage Player include the port number of BRAVIA Signage Server and the display’s MAC address,in the format “bs1-player-{port-number}-{mac-address}.log”.
Log rotation
Log files are rotated and managed in the following way. The maximum number of rotated files generated is 30.
-
The log files of BRAVIA Signage Server are rotated by date. Rotated files are saved with the file name plus the date, in the format “bs1-server-{port-number}.log-{YYYY-MM-DD}”.
-
The log files of BRAVIA Signage Player are rotated by file size. Rotated files are saved with the file name plus the the generation of rotation, in the format “bs1-player-{port-number}-{mac-address}.{index}.log”.
Logging configurations
The maximum generation and file size to rotate in BRAVIA Signage Player can be changed with braviasignageserver.xml with the following procedure:
[1] Run any text editor with Administrative Privileges, open “c:\Program Files (x86)\SONY\BRAVIA Signage\braviasignageserver.xml”, edit this file with the following procedure (add “MAX_LOG_FILE_SIZE” as the log file size to rotate and “MAX_LOG_BACKUP_SIZE” as the maximum generation number) and save it. In the following example, “50 MB” (52,428,800 bytes) and “10” are configured as the file size to rotate and the maximum generation number, respectively.
  <service>
    <id>braviasignageserver.exe</id>
    <name>BRAVIA Signage Server</name>
    <description>BRAVIA Signage Server</description>
    <executable>%BASE%\node.exe</executable>
    <arguments>--harmony "%BASE%\node_modules\node-windows\lib\wrapper.js" -f "%BASE%\server\app.js" -l "BRAVIA Signage Server" -g 0.25 -w 1 -r 3 -a n</arguments>
    <logmode>reset</logmode>
    <startmode>Automatic</startmode>
    <env name="NODE_ENV" value="production"/>
    <env value="52428800" name="MAX_LOG_FILE_SIZE"/>
    <env value="10" name="MAX_LOG_BACKUP_SIZE"/>
  </service>
[2] The setting is configured when BRAVIA Signage Server starts. The procedure to stop and start BRAVIA Signage Server is the same as the procedure in 2.1. How to back up and restore the database (for Windows).


