1. BRAVIA Signage Setup
Estimated reading time: 3 minutes
This section describes the setup of the server and display. The overview of the procedure is as follows:
-
[A] Server (Setup for BRAVIA Signage Server)
-
[B] Display (Setup for BRAVIA Signage Player)
- [1] Display settings (Required)
- [2] Pre-shared key settings (Optional)
- [3] Installation of BRAVIA Signage Player (Required)
- [4] BRAVIA Signage Player setup (Required)
1.1. Server PC Setup (BRAVIA Signage Server)
Refer to chapter 4 in “BRAVIA Signage Startup Guide”.
1.2. Confirm Display Settings
Refer to chapter 4 in “BRAVIA Signage Startup Guide”.
1.3. Configure Pre-Shared Key
BRAVIA has Pre-shared Key as a configuration. This configuration restricts the applications without Pre-Shared key to control power on/off, reboot and so on. You can configure Pre-Shared Key to BRAVIA Signage with config.txt described in “Appendix IV. config.txt specification” of [help] of upper right of Operation Web Application.
- Network Home Network IP control Authentication
Set “Pre-Shared Key” - Network Home Network IP control Pre-Shared Key
Set key
If you use this feature, configure display and BRAVIA Signage Player with the following procedures:
[1] Switch BRAVIA to Pro settings mode. Refer to BRAVIA Professional Displays Knowledge Center to switch Pro settings mode and for details of Pro settings.
[2] Configure display settings as the above.
[3] Switch BRAVIA to Pro mode.
[4] Edit the “pre-shared key” of config.txt as a key value in procedure [2] Configure BRAVIA Signage Player with the config.txt. Note that when BRAVIA Pre-Shared Key value does not match with “pre-shared-key” of config.txt, no error message is displayed on the display because the BRAVIA Signage Player cannot start.
1.4. Install BRAVIA Signage Player
Refer to chapter 4 in “BRAVIA Signage Startup Guide”.
1.5. Configure BRAVIA Signage Player
1.5.1. Configure and Start BRAVIA Signage Player
Refer to chapter 4 in “BRAVIA Signage Startup Guide” for this procedure, and refer to “Appendix IV. config.txt specification” of [help] of upper right of Operation Web Application. about the detail of config.txt used for the configuration.
1.5.2. Stop and Restart BRAVIA Signage Player
[1] Push [HOME] button of remote controller and select the following application icon displayed on HOME screen of the display.
![]()
[2] The configuration starts as seen in the diagram below. Select [Stop], push [OK], and BRAVIA Signage Player stops.
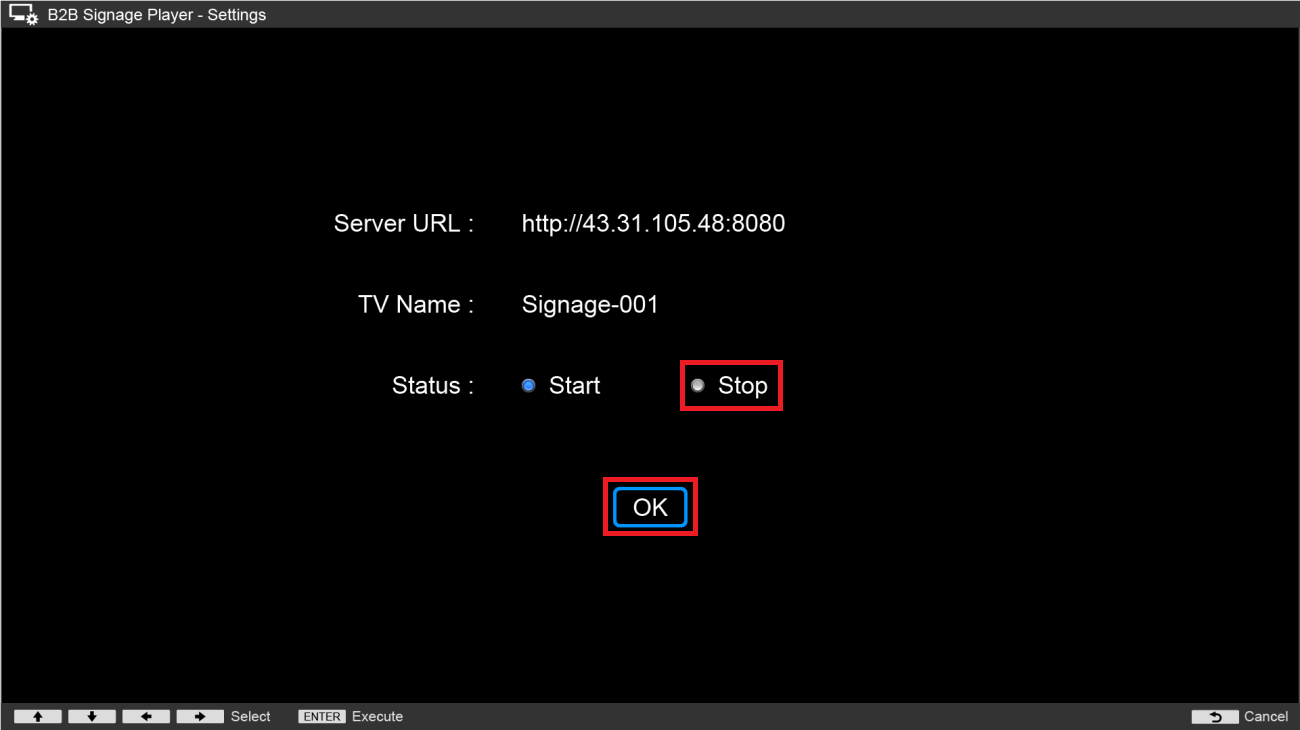
The configuration starts also when executing the same procedure as above while BRAVIA Signage Player stops. When selecting [Start] and pushing [OK], BRAVIA Signage Player starts to run again.
In addition, when inserting a USB flash memory with config.txt to the display USB port while the display is powered ON, the configuration starts. This operation can be used instead of the procedure [1] above.
1.5.3. Change the configurations of the BRAVIA Signage Player
Display configurations can be changed when inserting a USB flash memory with config.txt updated to change the configurations to the display USB port. In that case, “override” key must be “true” in config.txt. In addition, only the display name can be changed from [Display Management] page of Operation web application, and refer to [help] of upper right of Operation web application about this procedures.