3. Basic use
Estimated reading time: 7 minutes
This section describes the basic use of the three playback modes. Before trying the following procedures, you will need to copy the provided sony folder from the BRAVIA Signage Free software (WQF-BS1F) under the root folder of the USB flash memory. The following descriptions are the procedures with sample contents.
[1] Slideshow playback (3.1. Use slideshow playback)
[2] Playlist playback (3.2. Create playlist and play)
[3] Schedule playback (3.3. Configure playback schedule)
3.1. Use slideshow playback
Slideshow playback is the playback mode for playing contents that are saved to a USB flash memory inserted to a USB port on the BRAVIA in order of file name. Still images and HTML (except for videos) are played for a fixed amount of time. You can change this time on the setting screen.
Procedure to play contents (Required)
[1] Create a media folder in the root folder of the USB flash memory and copy sample contents “01_cosmetic_landscape.jpg” and “02_cosmetic_portrait.jpg” to the media folder.
[2] Enable launch application from a USB flash memory as follows if you are using Android 10.0 or later model (please visit the following article about USB drive auto run setting).
- Pro settings > Settings > USB drive auto run > Launch web app
Set to “Enable”.
[3] Insert the USB flash memory to a USB port on the BRAVIA.
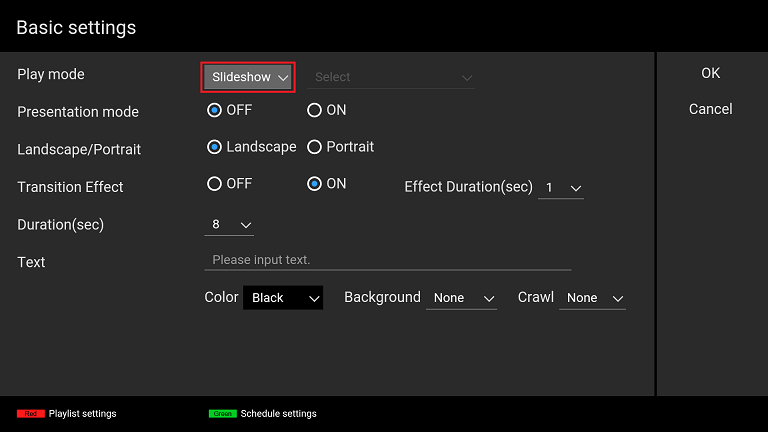
[4] Contents copied in step [1] are played in order of file name. If contents do not start playing, check whether [Play mode] on the [Basic settings] screen is set to “Slideshow” or not. The [Basic settings] screen is displayed when you press and hold the “1” button on the remote control of the BRAVIA for 3 seconds when the BRAVIA Signage Free app has been launched from the USB.
Playback settings (Optional)
Content playback automatically starts after inserting the USB flash memory, but you can change the playback configuration.
The [Basic settings] screen is displayed when you press and hold the “1” button of the remote control of the BRAVIA for 3 seconds as stated above, but you can change the following settings on this screen. To operate the settings screen, use the left, right, up, and down buttons and the ENTER button of the remote control.
-
Transition Effect
You can select fade-out and fade-in as a transition effect between playback contents. -
Duration
You can select a playback time for all contents. If videos are played, this setting time is not used. The video plays in full duration.

Other settings are described on the following pages.
3.2. Create playlist and play
Playlist playback is the playback mode for playing contents of created and selected playlists.
Playlists are lists that specify the playback order of contents such as videos, still images, and HTML as stated in 1. Overview, and you can create and edit playlists with the remote control of the BRAVIA. You can specify files in the media folder of the root folder of a USB flash memory inserted to the BRAVIA as contents of playlists.
You can operate the following screens with the left, right, up, and down buttons , the ENTER button, and the color buttons of the remote control.
Procedure to create playlists (Required)
1] Create a media folder in the root folder of the USB flash memory and copy sample contents “01_cosmetic_landscape.jpg” and “02_cosmetic_portrait.jpg” to the media folder.
[2] Insert the USB flash memory to a USB port on the BRAVIA.
[3] After inserting the USB flash memory, press and hold the “1” button of the remote control of the BRAVIA for 3 seconds when the BRAVIA Signage Free app has been launched from the USB and move to the [Basic settings] screen.
[4] Press the red button of the remote control and move to the [Playlist settings] screen.

[5] You can create a new playlist by pressing the red button of the remote control on the [Playlist settings] screen. After pressing the red button, a software keyboard is displayed and you can input the playlist’s name. For this procedure, input “Playlist1”.


[6] Move to the right on the screen and focus on [Content], then select contents. After selecting your contents, the [Type] is automatically selected. For this procedure, select “01_cosmetic_landscape.jpg”.
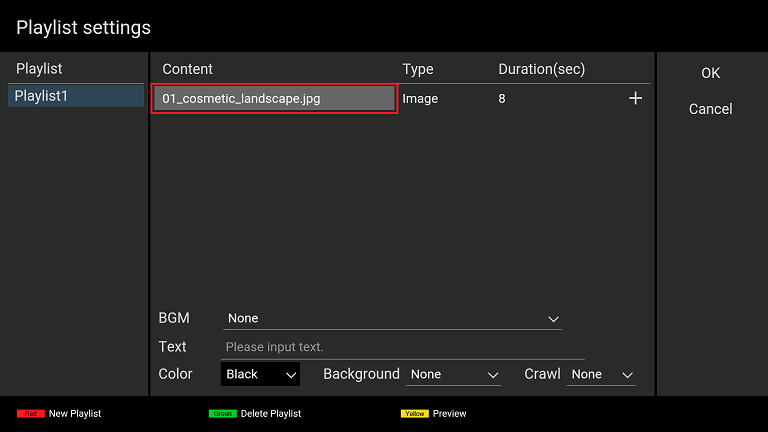
[7] Next, focus on [Duration(sec)] and select the playback time. For this procedure, select “10”.

[8] Focus on “+” on this screen and press the ENTER button to specify a second content. Select the [Content] and [Duration(sec)] of the second content following the procedure in steps [6] and [7]. For this procedure, select “02_cosmetic_portrait.jpg” as [Content] and “10” as [Duration(sec)].
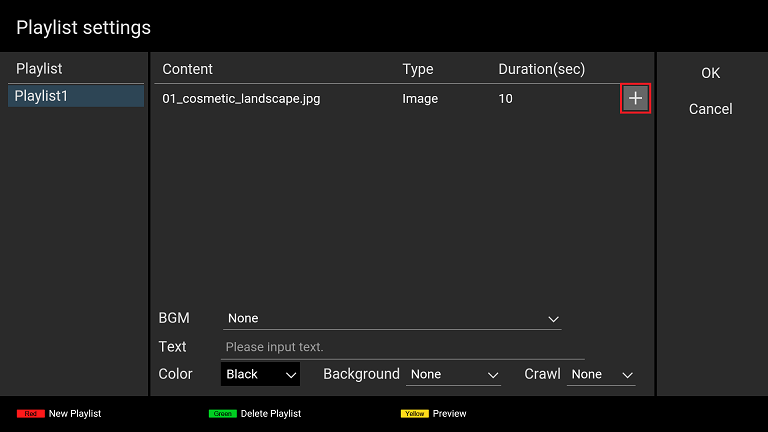

[9] Focus on the [OK] button on this screen and press the ENTER button of the remote control to save your edited playlist data and return to the [Basic settings] screen.
This ends playlist creation. Other settings on this screen are described on the following pages.
Procedure to change playback settings (Required)
You need to change the playback settings to play the playlist you created above.
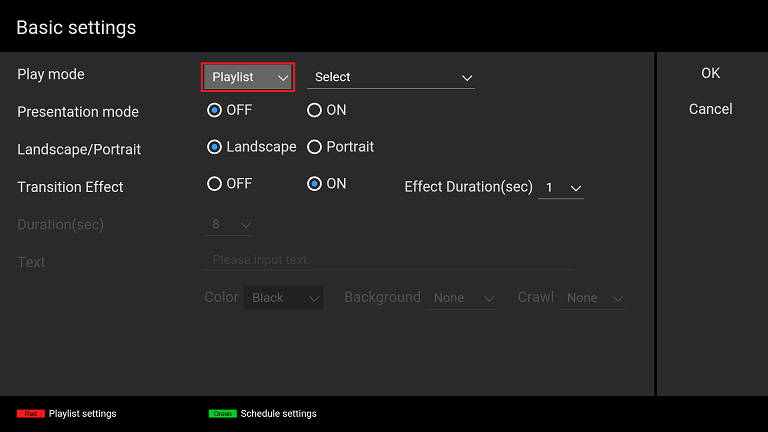
[9] Select “Playlist” as [Play mode] on the [Basic settings] screen.
[10] Select the playlist name from the dropdown menu to the right of the [Play mode] setting. For this procedure, select “Playlist1”
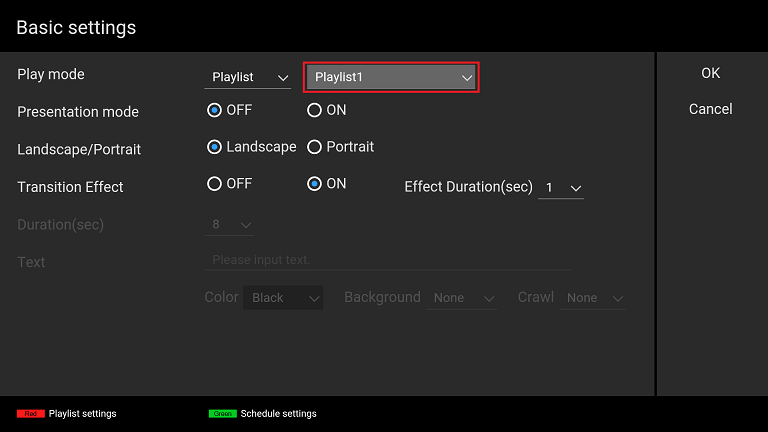
[11] Focus on the [OK] button on this screen and press the ENTER button of the remote control to start playing “Playlist1”.
3.3. Configure playback schedule
Scheduled playback is the playback mode for playing created playlists according to a playback schedule.
Schedules can be set by setting “Select day of the week”/”Select date and time”, “Starting time”, and “Ending time”. You can also set contents to play in the same way every day by not setting the day of the week or the date and time. You can operate the following screens with the left, right, up, and down buttons, the ENTER button, and the color buttons of the remote control.
Procedure to create playlists (Required)
Refer to 3.2. Create playlist and play for the procedure to create playlists.
Procedure to configure schedule (Required)
[1] The [Basic Setting] screen is displayed after editing and saving a playlist, press the green button of the remote control on the [Basic settings] screen and move to the [Schedule settings] screen.

[2] You can create a new schedule by pressing the red button of the remote control on the [Schedule settings] screen. After pressing the red button, a dialog is displayed and you can select the schedule type. For this procedure, specify the schedule of “Playlist1” to start playing at “09:00” and stop at “18:00” every day. Enable “Everyday” on the dialog, focus on the [OK] button, and press the ENTER button of the remote control.
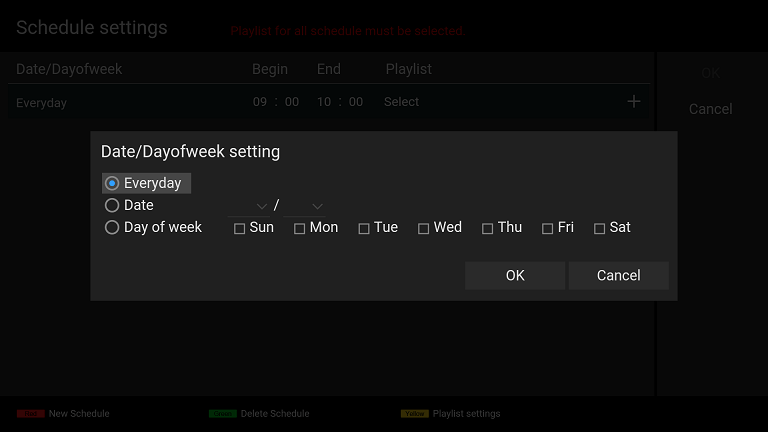
[3] Next, focus on the newly added “Everyday” column and pressing the ENTER button of the remote control to edit [Begin], [End], and [Playlist]. For this procedure, select “09:00” as [Begin], “18:00” as [End], and “Playlist1” as [Playlist]. After finishing selection, press the Return button of the remote control.

[4] Focus on the [OK] button on this screen and press the ENTER button of the remote control to save the edited schedule data and return to the [Basic settings] screen.
Procedure to change playback settings (Required)
You need to change the playback settings to make the playlist play according to the schedule you created above.
[5] Select “Schedule” as [Play mode] on the [Basic settings] screen.

[6] Focus on the [OK] button on this screen and press the ENTER button of the remote control to start playing “Playlist1” according to the schedule created above.
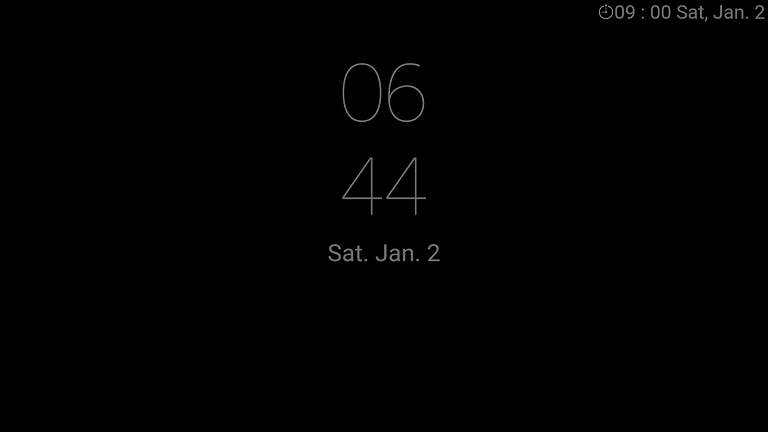
If a playlist does not play according to its set schedule, there may be discrepancies between the date and time configured on the BRAVIA and your edited schedule. If any contents are not played on the BRAVIA, press the DISPLAY button of the remote control. The Date/Time configured on the BRAVIA is displayed at the center of the screen, and the Date/Time of the next playback schedule is displayed at the lower right of the screen as shown below. Confirm the settings and reconfigure them in accordance with this information.