3. Advanced use and notice
Estimated reading time: 14 minutes
This section describes the advanced uses of signage operaition with BRAVIA Signage and notice.
Advanced schedule management
Auto power off management
If “Auto power off except during schedule delivery” is enabled in [Power Management] of the [Settings] page, the display’s power is automatically disabled except during schedule delivery. When starting and stopping interrupt delivery during power off, the display’s power is automatically enabled and then disabled.
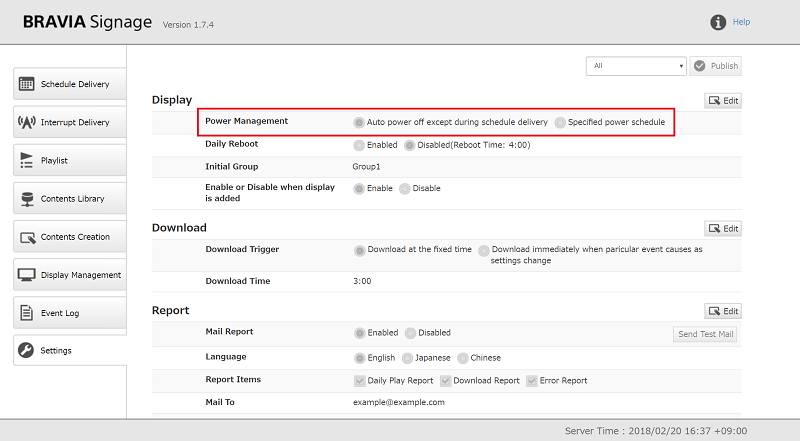
Manual power schedule management
If “Specified power schedule” is enabled in [Power Management] of the [Settings] page, the power schedule can be manually specified. In that case, if the timezone of the delivery schedule and the power schedule overlap each other, the power schedule takes priority over the delivery schedule.
Date based scheduling
When registering a schedule, schedules with a specified “day of week” or “date” can be registered. If both schedules exist, the schedule with a specified “date” takes first priority and the schedule with a specified “day of week” takes next priority.
For example, if the following two schedules are registered,
Schedule(1)
  Date: Wed, February 14
  Start time: 12:00
  End time: 15:00
  Playlist: Playlist1

Schedule(2)
  Day of week: Mon, Tue, Wed, Thu, Fri
  Start time: 09:00
  End time: 18:00
  Playlist: Playlist2
[1] Playlist2 is played from 09:00 to 18:00 on Monday, Tuesday, Thursday, and Friday. [2] Playlist2 is played from 09:00 to 18:00 every Wednesday except Wednesday, February 14. [3] Playlist1 is played from 12:00 to 15:00 on Wednesday, February 14 and Playlist2 is not played from 09:00 to 12:00 or from 15:00 to 18:00.
Time across dates
When registering a schedule, times after 24:00 can be specified as the end time. For example, times from 00:00 to 48:00 can be specified when registering a delivery schedule and power schedule, such as starting the delivery at 21:00 and stopping at 25:00.
As described in “Date based scheduling”, although a schedule with a specified “date” takes first priority and a schedule with a specified “day of week” takes next priority when using both specified “date” and “day of week” schedules, it should be noted that:
[1] If you registered a schedule with a specified date and whose end time is after 24:00, both that schedule and the schedule with a specified “day of week” will run on the day after the specified date. For example, if you register the following two schedules, both schedules run on Thursday, February 15.
e.g. Both schedules specified "Wed, February 14" and "Thursday" are registered

Schedule(1)
  Date: Wed, February 14
  Start time: 23:00
  End time: 25:00
  Playlist: Playlist1

Schedule(2)
  Day of week: Mon, Tue, Wed, Thu, Fri
  Start time: 22:00
  End time: 26:00
  Playlist: Playlist2

Behaviour
  Tue, February 13  00:00 to 02:00: Playlist2 is played.
                    22:00 to 24:00: Playlist2 is played.
  Wed, February 14  23:00 to 24:00: Playlist1 is played.
  Thu, February 15  00:00 to 01:00: Playlist1 is played.
                    01:00 to 02:00: Playlist2 is played.
                    22:00 to 24:00: Playlist2 is played.
  Fri, February 16  00:00 to 02:00: Playlist2 is played.
                    22:00 to 24:00: Playlist2 is played.
[2] If you register the following two schedules, each schedule indicates the same date and time, but the behaviour of “Schedule(1)” is different from that of “Schedule(2)” because “Schedule(1)” is treated as the schedule of “Thu, February 15” and “Schedule(2)” is treated as the schedule of “Wed, February 14”.
Schedule(1)
  Date: Thu, February 15
  Start time: 00:00
  End time: 01:00
  Playlist: Playlist1

Schedule(2)
  Date: Wed, February 14
  Start time: 24:00
  End time: 25:00
  Playlist: Playlist1
For example, displays run as follows:
e.g. Schedule specified "Thu, February 15" takes priority

Schedule(1)
  Date: Thu, February 15
  Start time: 00:00
  End time: 01:00
  Playlist: Playlist1

Schedule(2)
  Day of week: Mon, Tue, Wed, Thu, Fri
  Start time: 22:00
  End time: 26:00
  Playlist: Playlist2

Behaviour
  Tue, February 13  00:00 to 02:00: Playlist2 is played.
                    22:00 to 24:00: Playlist2 is played.
  Wed, February 14  00:00 to 02:00: Playlist2 is played.
                    23:00 to 24:00: Playlist2 is played.
  Thu, February 15  00:00 to 01:00: Playlist1 is played.
  Fri, February 16  00:00 to 02:00: Playlist2 is played.
                    23:00 to 24:00: Playlist2 is played.
e.g. Schedule specified "Wed, February 14" takes priority

Schedule(1)
  Date: Wed, February 14
  Start time: 24:00
  End time: 25:00
  Playlist: Playlist1

Schedule(2)
  Day of week: Mon, Tue, Wed, Thu, Fri
  Start time: 22:00
  End time: 26:00
  Playlist: Playlist2

Behaviour
  Tue, February 13  00:00 to 02:00: Playlist2 is played.
                    22:00 to 24:00: Playlist2 is played.
  Wed, February 14  Any playlists are not played.
  Thu, February 15  00:00 to 01:00: Playlist1 is played.
                    01:00 to 02:00: Playlist2 is played.
                    22:00 to 24:00: Playlist2 is played.
  Fri, February 16  00:00 to 02:00: Playlist2 is played.
                    23:00 to 24:00: Playlist2 is played.
Playlist download
How to use playlist download
When publishing playlists to a display, playback contents can be downloaded to a USB flash memory connected to the display and instead of network streaming these downloaded files can be played. This section describes how to use this feature.
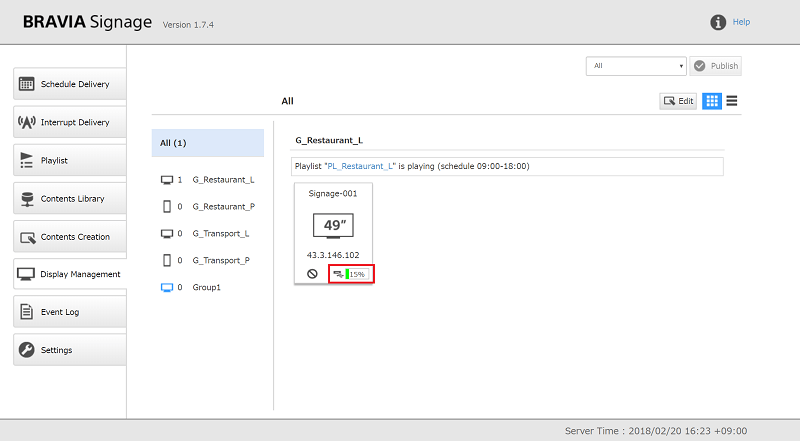
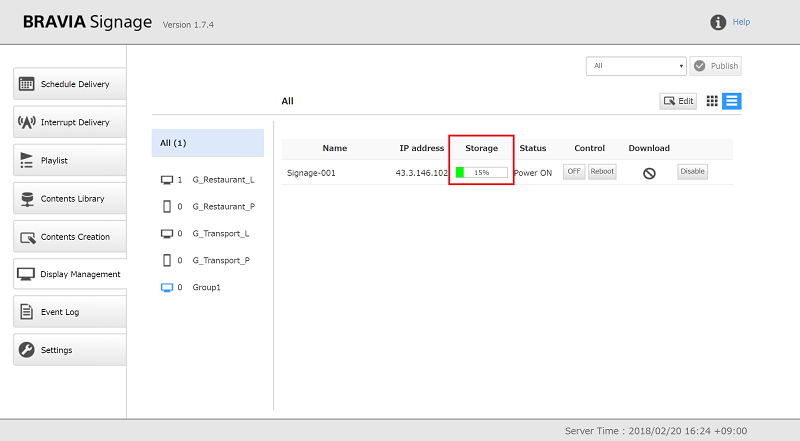
[1] Check whether the USB flash memory is inserted to the display’s USB port or not. This can also be checked on the [Display Management] page, shown as “Storage” for each display information on that page. It should be noted that contents are not downloaded and played by network streaming if the download setting is enabled but the display does not have a USB flash memory.
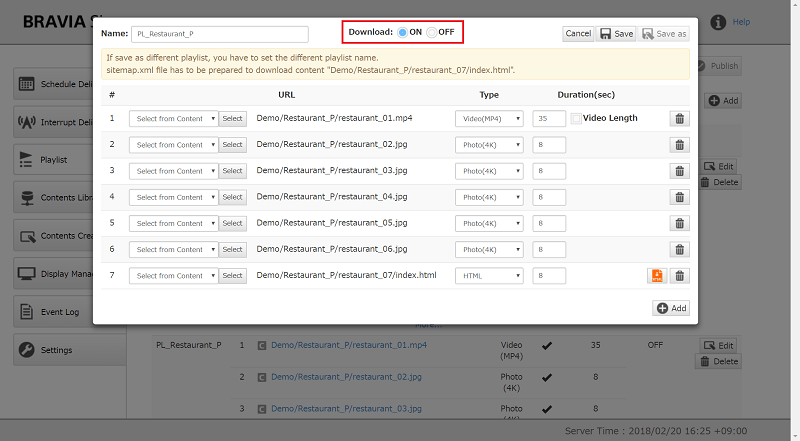
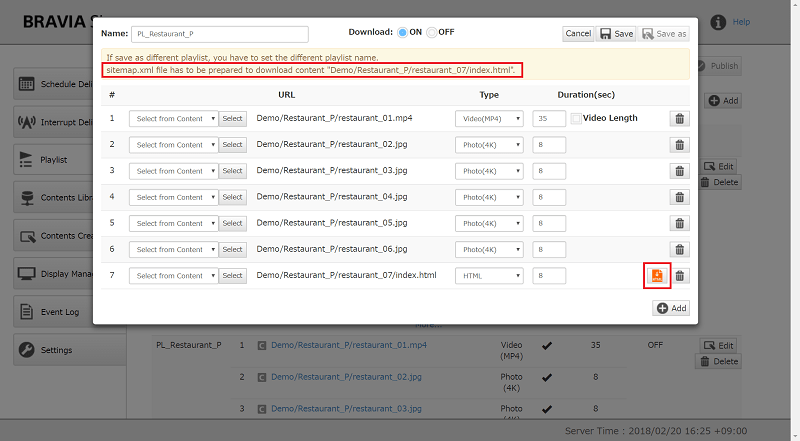
[2] Change to enable the [Download] setting on the [Playlist] page. If contents whose [Type] is “HTML” exist in the playlist, the sitemap file must be created to download this HTML content. Refer to “How to make sitemap file” as follows for details.
[3] If the playlist edited in step [2] is taken from a schedule registered to the [Schedule Delivery] page, push the [Publish] button at the top of screen and publish the edited information to the displays.
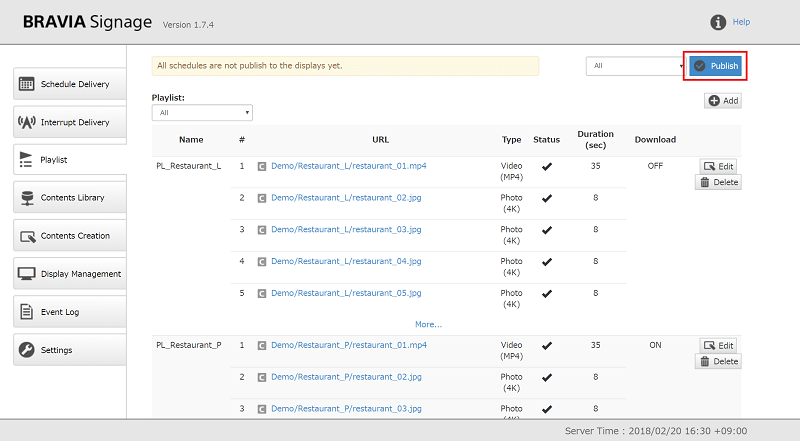
[4] Settings are completed. Download will start in accordance with the settings of [Download] on the [Settings] page. Download status can be checked from [Download] for each display on the [Display Management] page. It should be noted that the contents are played by network streaming if download has not been completed and switch to file playback after download has been completed. Refer to Appendix I. Playlist download specification for details of content download trigger.
How to make sitemap file
A sitemap file which lists files (such as images, videos, JavaScript, CSS etc.) used in an HTML file should be downloaded and is required for HTML download. Only files listed in the sitemap are downloaded. The format of a sitemap is XML, as defined by http://www.sitemaps.org/index.html. The following two approaches are used to make this sitemap file in BRAVIA Signage.
[a] Use the function to create sitemap file
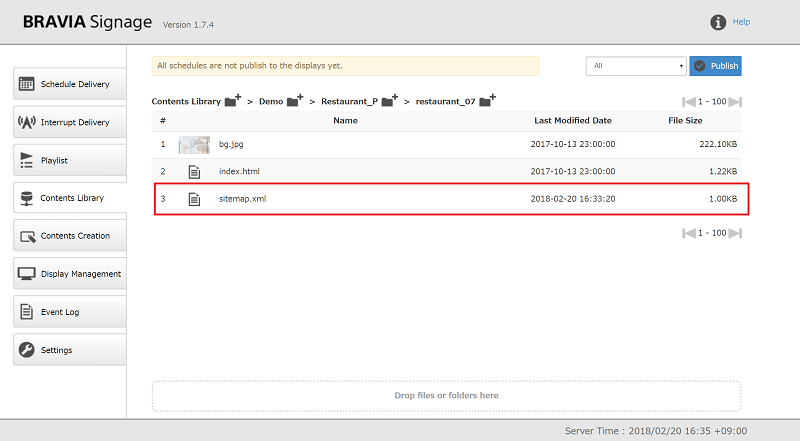
In HTML content uploaded in [Content Library] page, the sitemap.xml can be created with the function provided on the [Playlist] page.
[1] The button to create sitemap.xml is displayed as follows when the [Download] setting is enabled on a playlist that includes HTML content on the [Playlist] page. If the button color is orange, that means that the sitemap file does not exist or HTML content with sitemap.xml has been updated. If the button color is gray, that means that the sitemap file has been created. When you push this button, sitemap.xml is created in the same folder as the index.html specified as the URL of the playlist. If sitemap.xml has already been created and you push this button, the old sitemap file is overwritten.
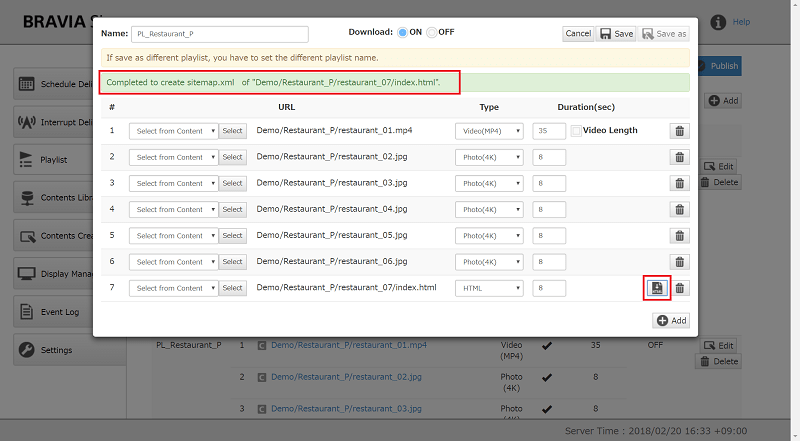
[2] Open the [Contents Library] page and open the folder containing the sitemap.xml created in step [1], and check whether sitemap.xml was successfully created or not.
In order to use this function, it should be noted that the following restrictions exist:
- An HTML file that is an entry point exists in the root folder of the HTML content.
- The name of the HTML file that is an entry point is “index.html”.
If the usage is not within the range of these restrictions, the sitemap.xml cannot be properly created.
[b] Create manually sitemap file
HTML content that is not within the range of restrictions described in “[a] Use feature to create sitemap file” needs to be created manually.
- For not managing content with the [Content Library] page, such as content management with other content management servers.
- The name of the HTML file that is an entry point is not “index.html”, or it is put in a folder that is not the root folder of the content.
Refer to Appendix II. Sitemap file specification for details of sitemap file specification used in BRAVIA Signage.
Redownload after contents are updated
Redownload is required if the contents in the playlist are updated after the playlist download has been executed. If the contents are updated, the contents will be redownloaded at the next download as described in Appendix I. Playlist download specification.
Advanced contents library setting
Use other HTTP server
When BRAVIA Signage Server is installed, Apache HTTP Server is also installed and initial settings for the content library feature are configured to use this Apache. If you have already used other contents management servers or want to use one, that server can be used and configured to work with the content library feature. This section describes how to configure this feature.
- Add the environment variable to your server configuration file (
braviasignageserver.xmlin the installation directory) and specify the document root path string of your HTTP server to [Document Root] of [Content Library]. - After editing the configuration file, restart the server.
- Confirm that the setting values are applied on the Setting tab.
<service>
    <id>braviasignageserver.exe</id>
    <name>BRAVIA Signage Server</name>
    <description>BRAVIA Signage Server</description>
    <executable>%BASE%\app.exe</executable>
    <arguments>--max_old_space_size=2000 -- -f "%BASE%\server\app.js" -l "BRAVIA Signage Server" -g 0.25 -w 1 -r 3 -a n</arguments>
    <logmode>reset</logmode>
    <startmode>Automatic</startmode>
    <env name="NODE_ENV" value="production"/>
    <env name="CONTENTS_SERVER_DOCROOT" value="C:\Apache24\htdocs2"/>
</service>
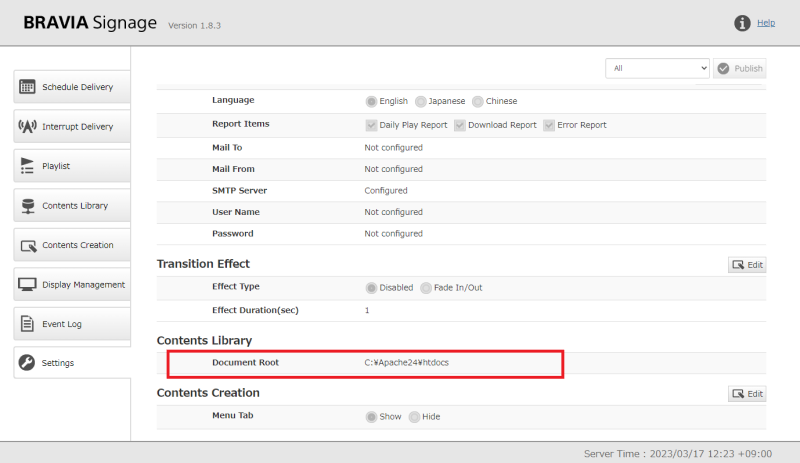
- Document Root indicates the root folder path of the HTTP server that is accessible from the outside.
- BRAVIA Signage Server needs to put the uploaded contents in the document root folder of the HTTP server when contents are uploaded. The server PC that BRAVIA Signage Server is running on needs to access the document root folder, and the document root folder must be mounted on the server PC if BRAVIA Signage Server accesses your HTTP server via network.
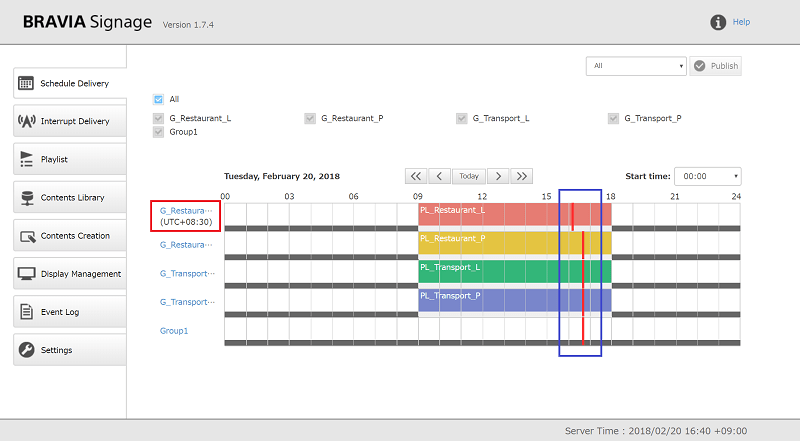
Configuration across multiple timezones
When operating in areas and countries with multiple timezones, schedules can be managed on the [Schedule Delivery] page without considering the time difference. The timezone can be configured for every group on the [Display Management] page, and the displays of each group run based on the time under the configured timezone.
How to configure
[1] Open the [Display Management] page, push the [Edit] button on the upper right of the page and change the timezone setting.
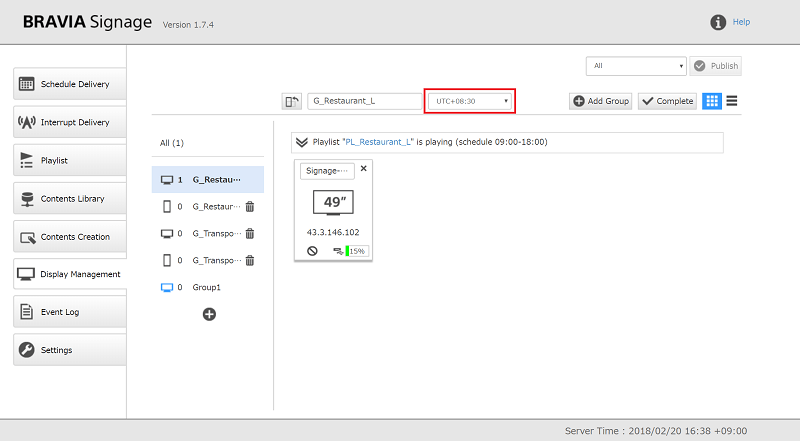
[2] When you push the [Complete] button after changing, the timezone is displayed with the group name, and all displays in edited groups will reboot.
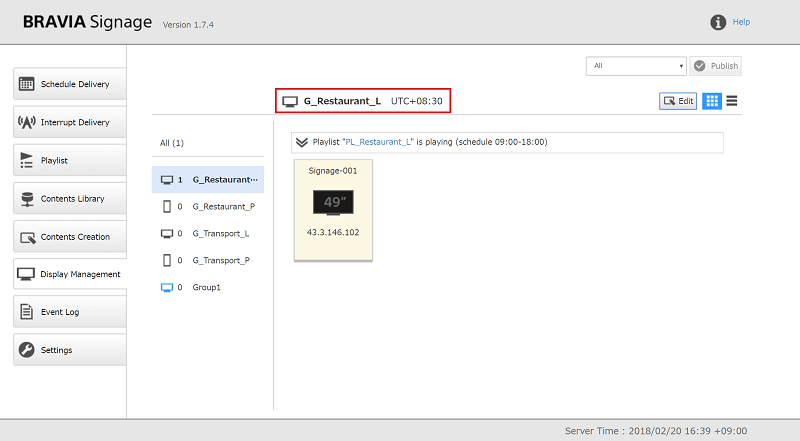
[3] After displays reboot in step [2], displays start schedule delivery and power schedule based on the time under the changed timezone. When you open the [Schedule Delivery] page, the timezone under the group name is displayed and the red line on scheduler that indicates the current time, is displayed offset by the difference between the server time and the time under the timezone.
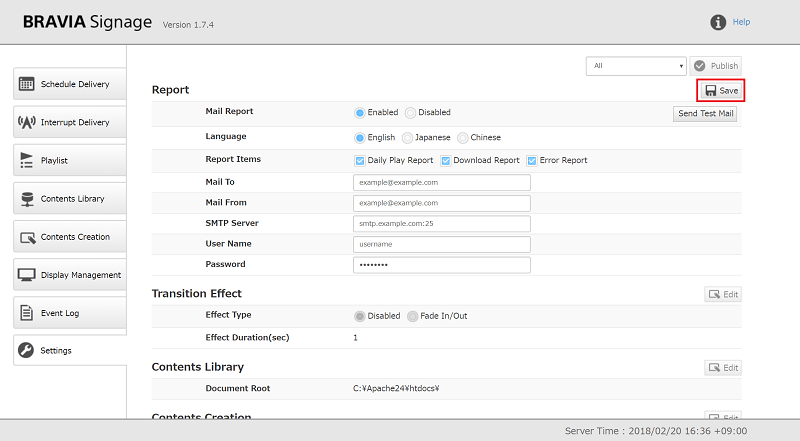
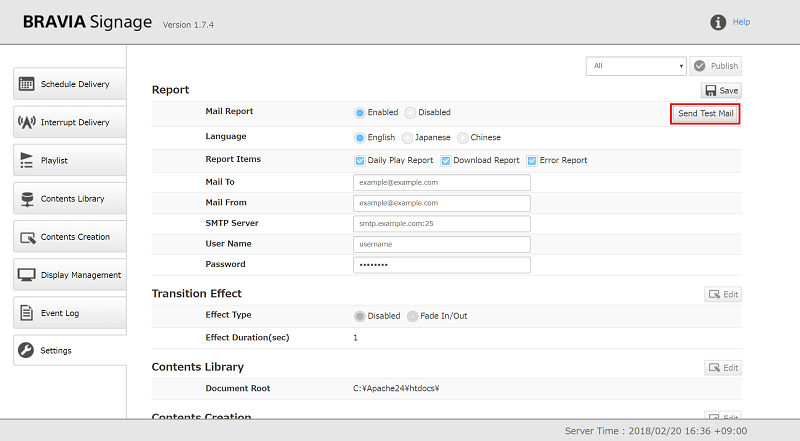
Mail reporting
BRAVIA Signage has a feature to send emails to specified email addresses detailing the errors that occurred and playback and download results in daily operations. Report by email is as follows:
Report items
| Report | Descriptions |
|---|---|
| Daily Play Report | Reports on playback results of contents of the previous day are sent at AM 1:00 every day. |
| Download Report | Reports on download results of playlists are sent. Reports are sent when all download of a playlist finishes. |
| Error Report |
The following reports are sent. Reports are sent immediately when any error occurs. - Display went offline. - Display failed to be powered on according to the power schedule. - Display failed to be powered off according to the power schedule. - Display was powered on because of a factor other than the power schedule. - Display was powered off because of a factor other than the power schedule. - A playlist failed to start playing. - A part of contents failed to be played back after a playlist start playing. - A content failed to play. - Download of playlist finishes, but a part of contents fails to be downloaded. - A content failed to be downloaded, and retry to download. - A content failed to be downloaded. |
How to configure
[1] Open the [Settings] page and configure items of [Report] in accordance with Settings.
[2] When you push the [Send Test Mail] button after configuration, check whether the configurations are correct or not. If you input each configuration and push this button, the following test mail is sent in accordance with the configurations such as SMTP server URL, user name, password, etc.
About send test mail
| Report | Subject | Descriptions |
|---|---|---|
| Daily Play Report | [BRAVIA Signage] MAIL REPORT SETTINGS TEST for Daily Play Report | SUCCESS!!! SETTINGS for Download Report are OK. |
| Download Report | [BRAVIA Signage] MAIL REPORT SETTINGS TEST for Download Report | SUCCESS!!! SETTINGS for Daily Play Report are OK. |
| Error Report | [BRAVIA Signage] MAIL REPORT SETTINGS TEST for Error Report | SUCCESS!!! SETTINGS for Error Report are OK. |
[3] Push the [Save] button after configuration.