5. How to Use
Estimated reading time: 9 minutes
This section explains how to use the IP Remote app.
5.1. Launch the IP Remote App
Tap the IP Remote app icon in the app list of your mobile device to launch the IP Remote app.
| Icon Image | Mobile Device |
|---|---|
 |
Android |
 |
iOS |
5.2. Display the Menu Screen (Side Menu)
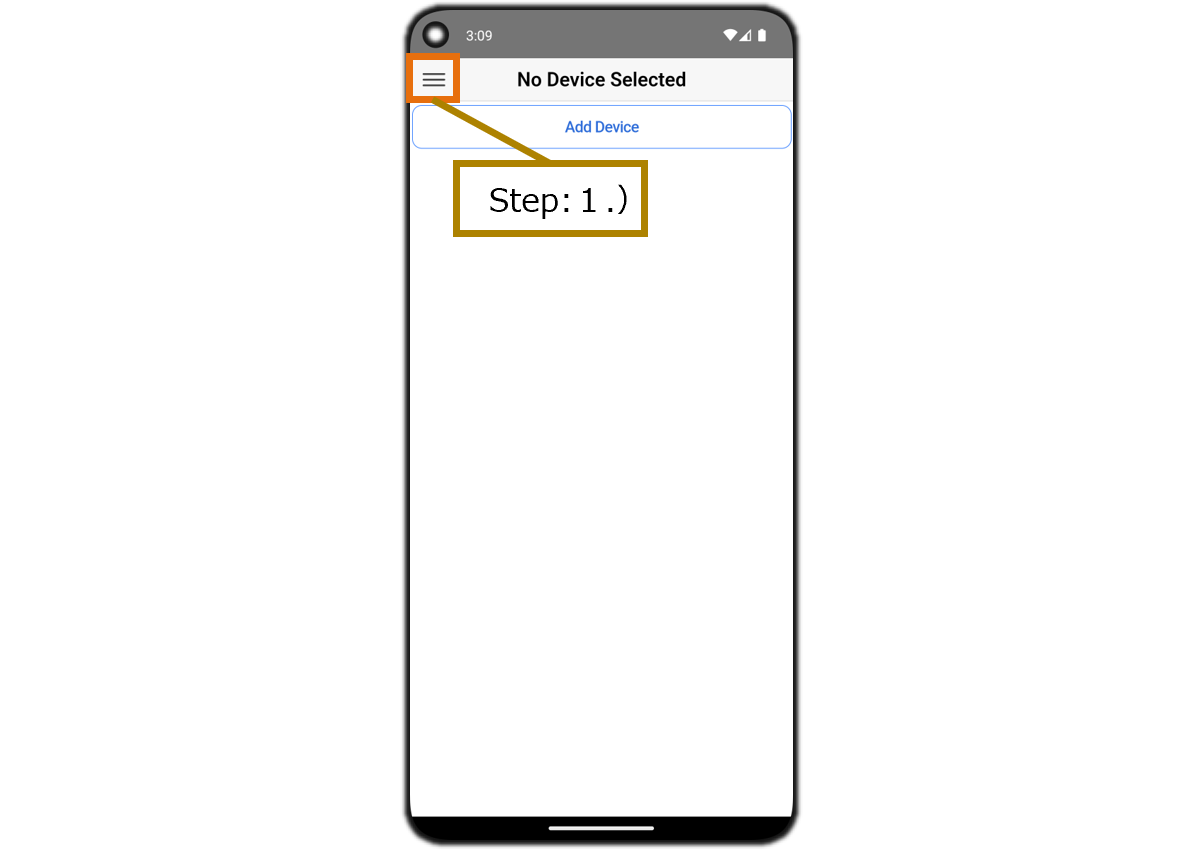
- Tap the Side Menu button on the No Device Selected screen or the Remote screen.
5.3. Add a New Operating Device (BRAVIA/Projector)
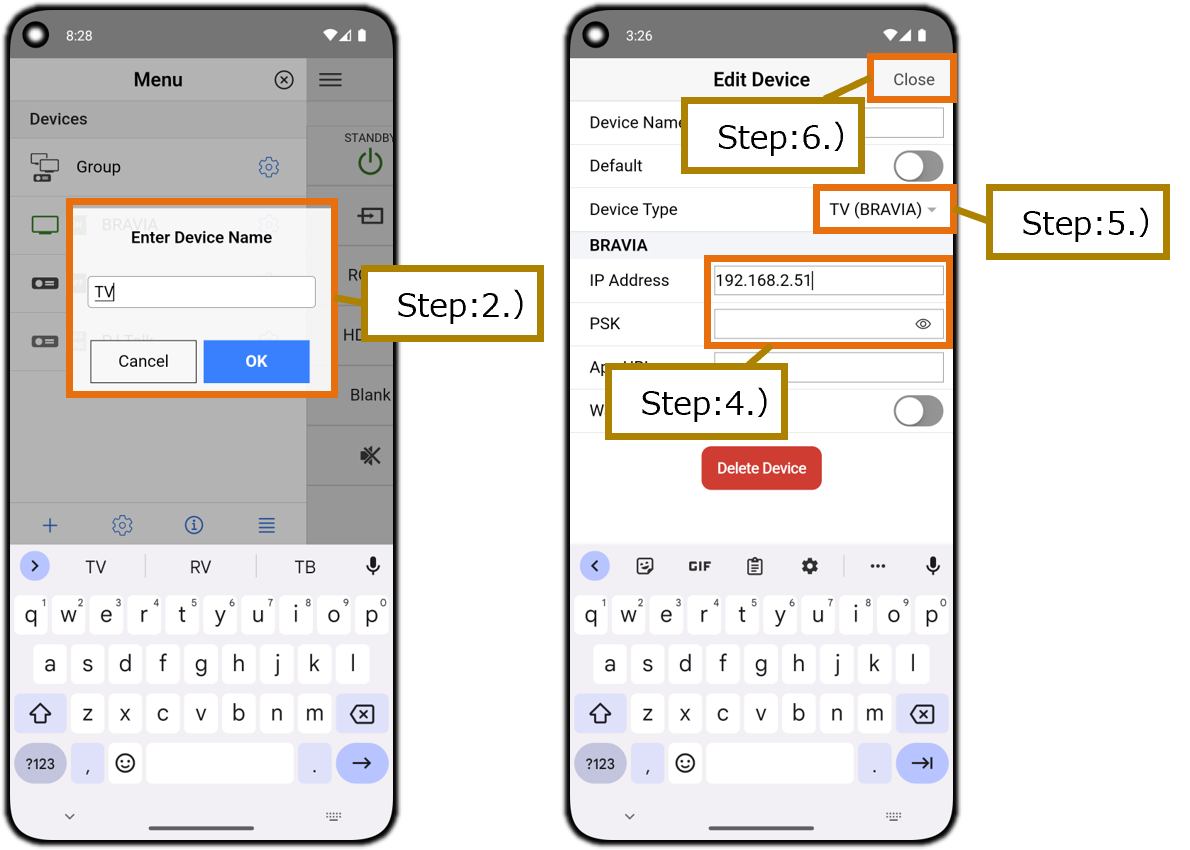
- On the No Device Selected screen, tap the Add Device button. Or on the Menu screen (side menu), tap the Add Device button.
- This displays the Enter Device Name dialog box. Enter your preferred device’s name and tap the OK button.
- On the device list of the Menu screen (side menu), tap the Device Settings button of the device added.
- Enter the IP of your operating device in the Edit Device dialog box. Enter the PSK (pre-shared key) when device authorization is enabled so that it cannot be operated by an unspecified user. Refer to the following for details.
- Select Device Type.
- Select “TV (BRAVIA)” for a BRAVIA unit.
- Select “PJ (ADCP)” or “PJ (SDCP)” for a projector.
- Tap the Close button on the top right of the Edit Device dialog box.
5.4. Delete a Registered Device (BRAVIA/Projector)
- Tap the Side Menu button on the Remote screen to display the Menu screen (side menu).
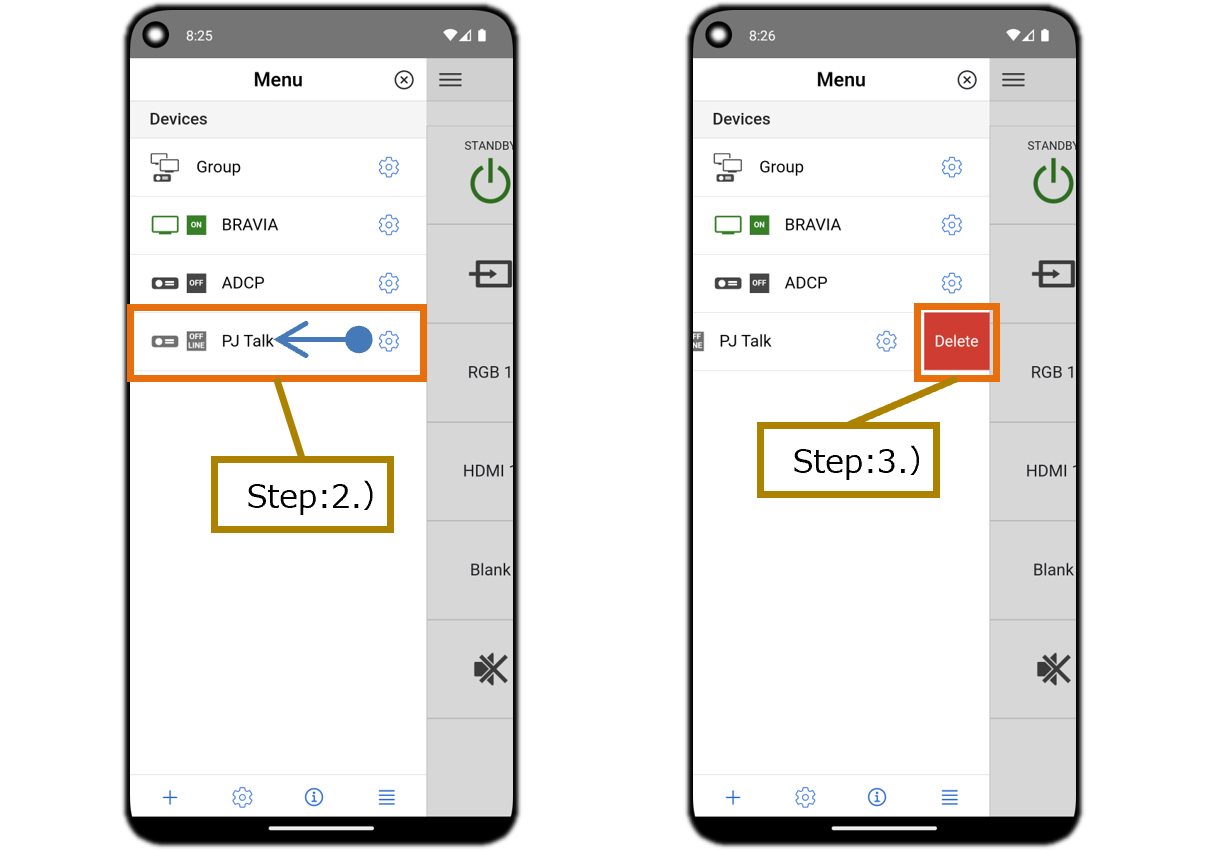
- Swipe left on the device that you want to delete in the device list on the Menu screen (side menu) to display the Delete button.
- Tap the Delete button.
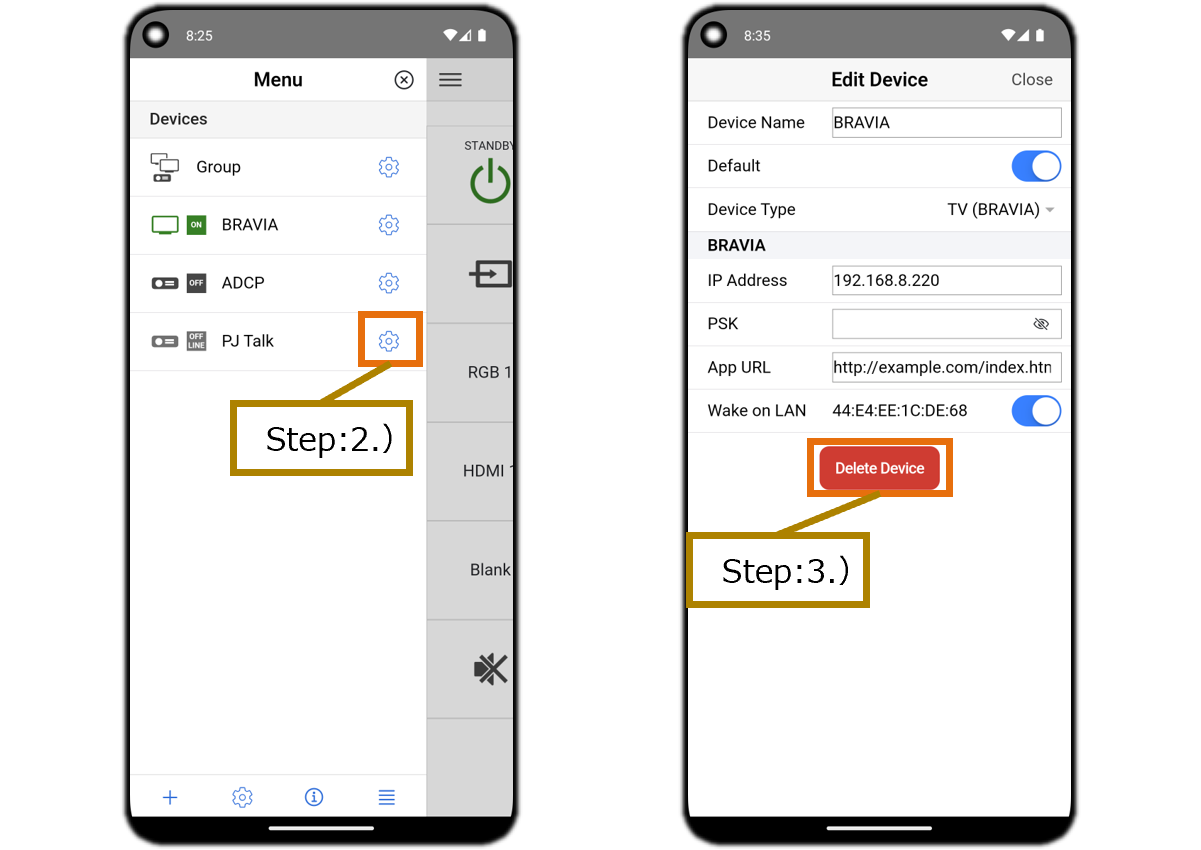
Deletion can also be performed through the following procedure.
- Tap the Side Menu button on the Remote screen and display the Menu screen (side menu).
- Tap the Settings button of the device you want to delete from the device list on the Menu screen (side menu).
- Tap the Delete Device button on the Edit Device dialog.
- Tap the Delete button on the Delete Device dialog.
5.5. Turn On the TV Power With the Wake on LAN Function [BRAVIA Only]
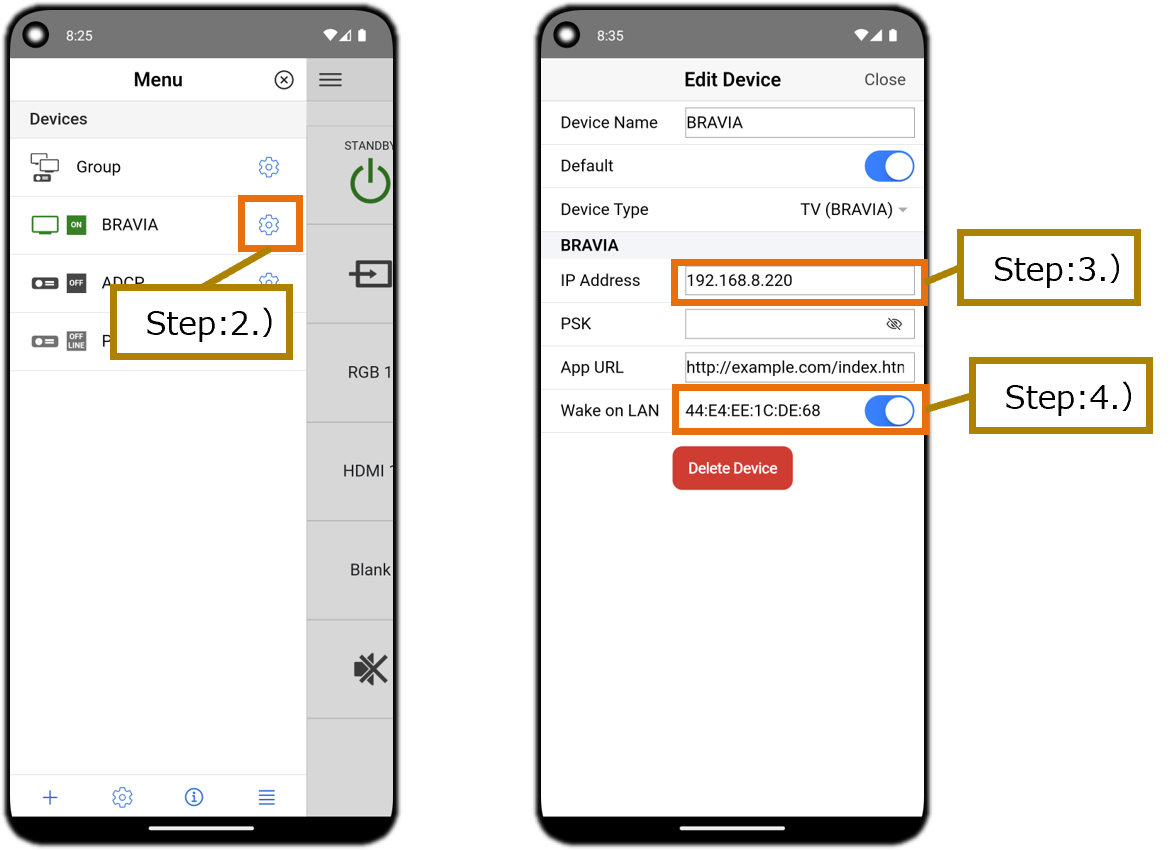
- Tap the Side Menu button on the Remote screen to display the Menu screen (side menu).
- On the device list of the Menu screen (side menu), tap the Device Settings button of the device you want to turn on with the Wake on LAN function.
- Enter the IP of your operating device in the Edit Device dialog box.
- Tap the Wake on LAN toggle button in the Edit Device dialog box to enable the function.
The operating device MAC address is displayed. - Tap the Close button on the top right of the Edit Device dialog box.
- Tap the Power On button of the Remote screen and turn on the TV power.
5.6. Designate an HTML App to Launch by the App Launcher Button [BRAVIA Only]
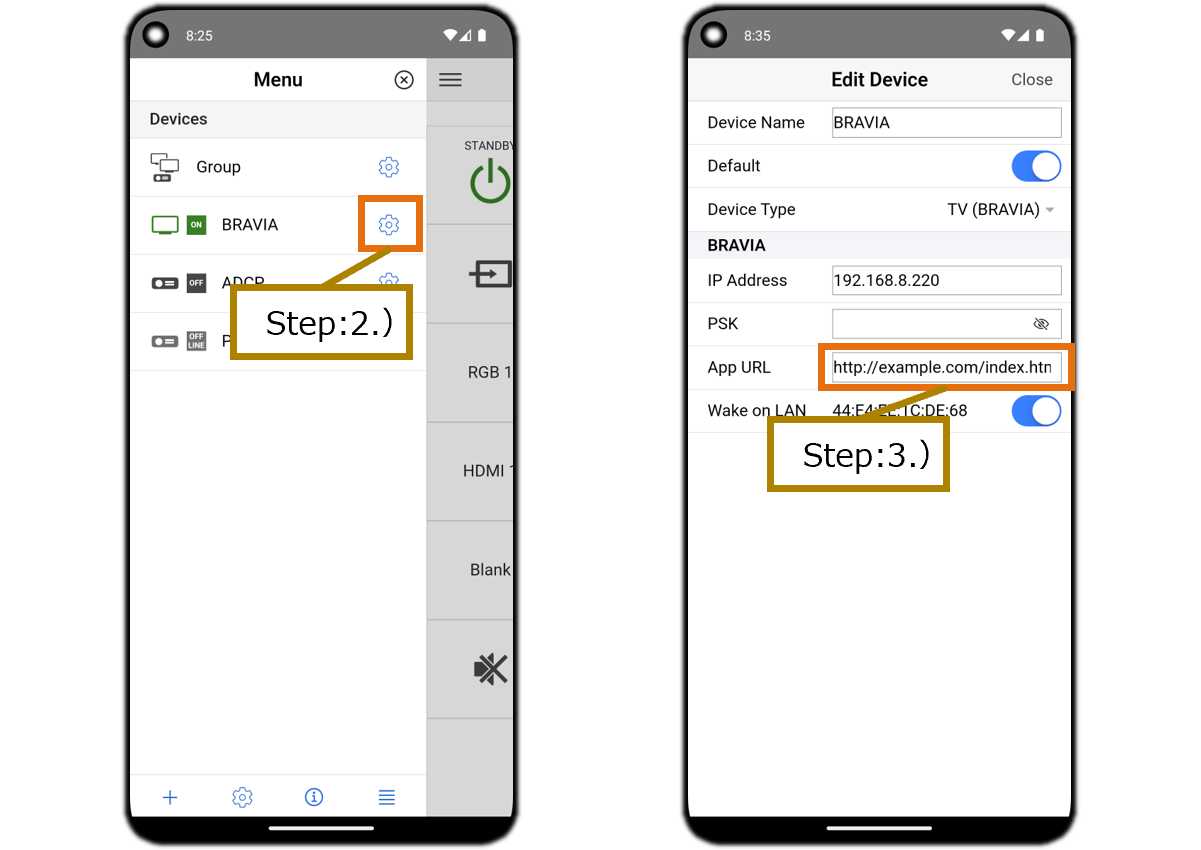
- Tap the Side Menu button on the Remote screen to display the Menu screen (side menu).
- On the device list of the Menu screen (side menu), tap the Device Settings button of the device that you want to perform App Launcher button settings for.
- In the App URL space of the Edit Device dialog box, set the HTML app URL that you want to launch with the App Launcher button.
5.7. Designate a Device (BRAVIA/Projector) for When IP Remote App Launches
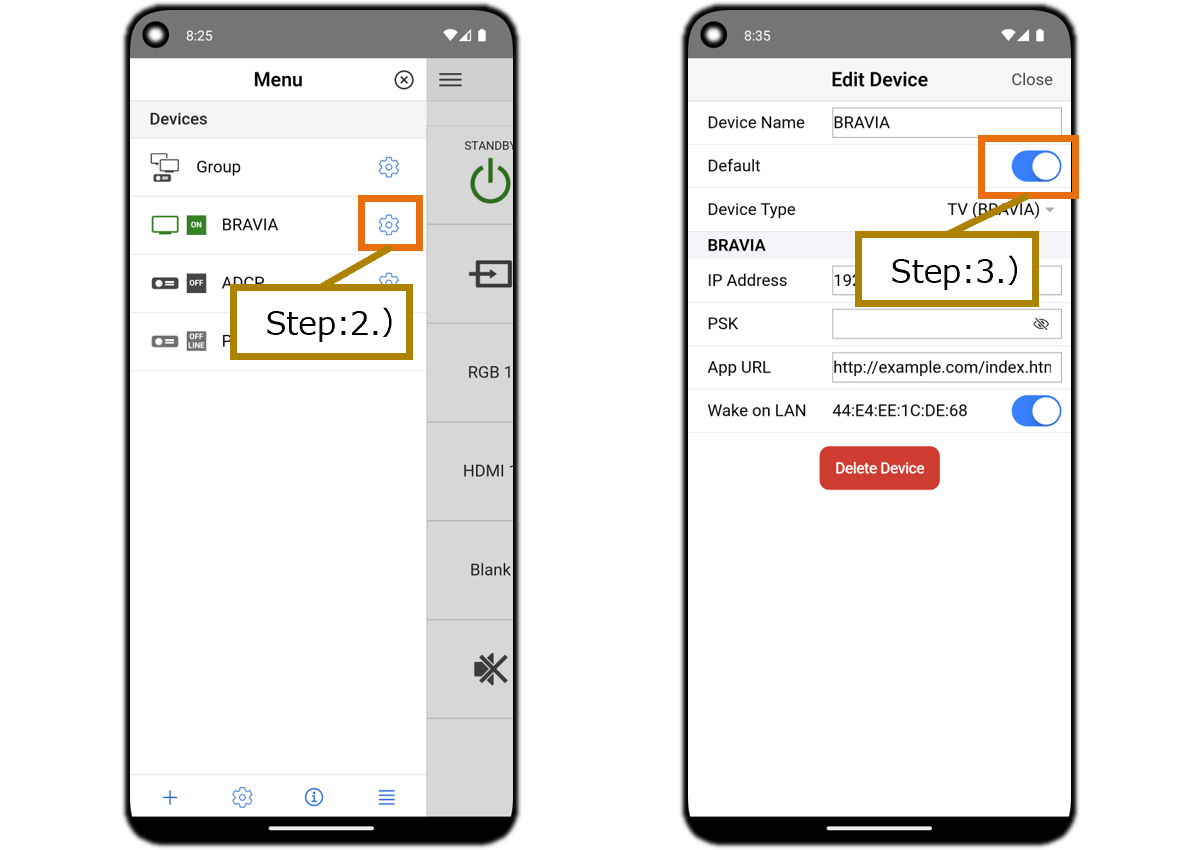
- Tap the Side Menu button on the Remote screen to display the Menu screen (side menu).
- On the device list of the Menu screen (side menu), tap the Device Settings button of the device that you want to designate as the device for when IP Remote app launches.
- Tap the Default toggle button in the Edit Device dialog box to enable the function.
5.8. Change the Order of the Device List
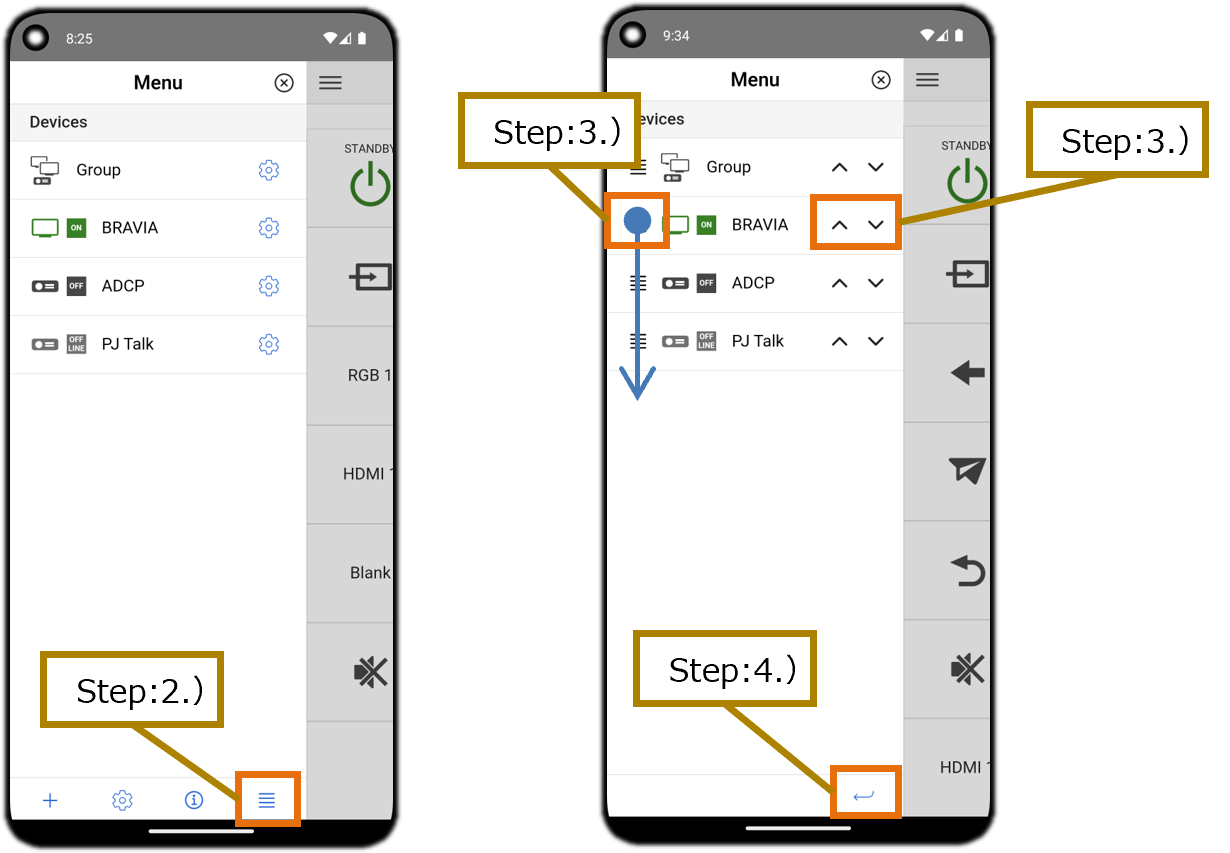
- Tap the Side Menu button on the Remote screen to display the Menu screen (side menu).
- Tap the Devices Reorder button on the Menu screen (side menu) to display the Reorder Drag icon and Reorder Arrow button of each device in the device list.
- Swipe the Reorder Drag icons up and down to reorder the device list. Or, tap the Reorder Arrow button and sort the devices upwards/downwards.
- Tap the Back button to finish reordering.
5.9. Operate BRAVIA
- Display Remote screen - TV (BRAVIA) and tap the buttons.
Refer to the following for the function of each button.
5.10. Operate the Projector
- Display Remote screen - PJ (ADCP) or Remote screen - PJ (SDCP) and tap the buttons.
Refer to the following for the function of each button.
5.11. Operate Multiple Devices (BRAVIA/Projector) Simultaneously
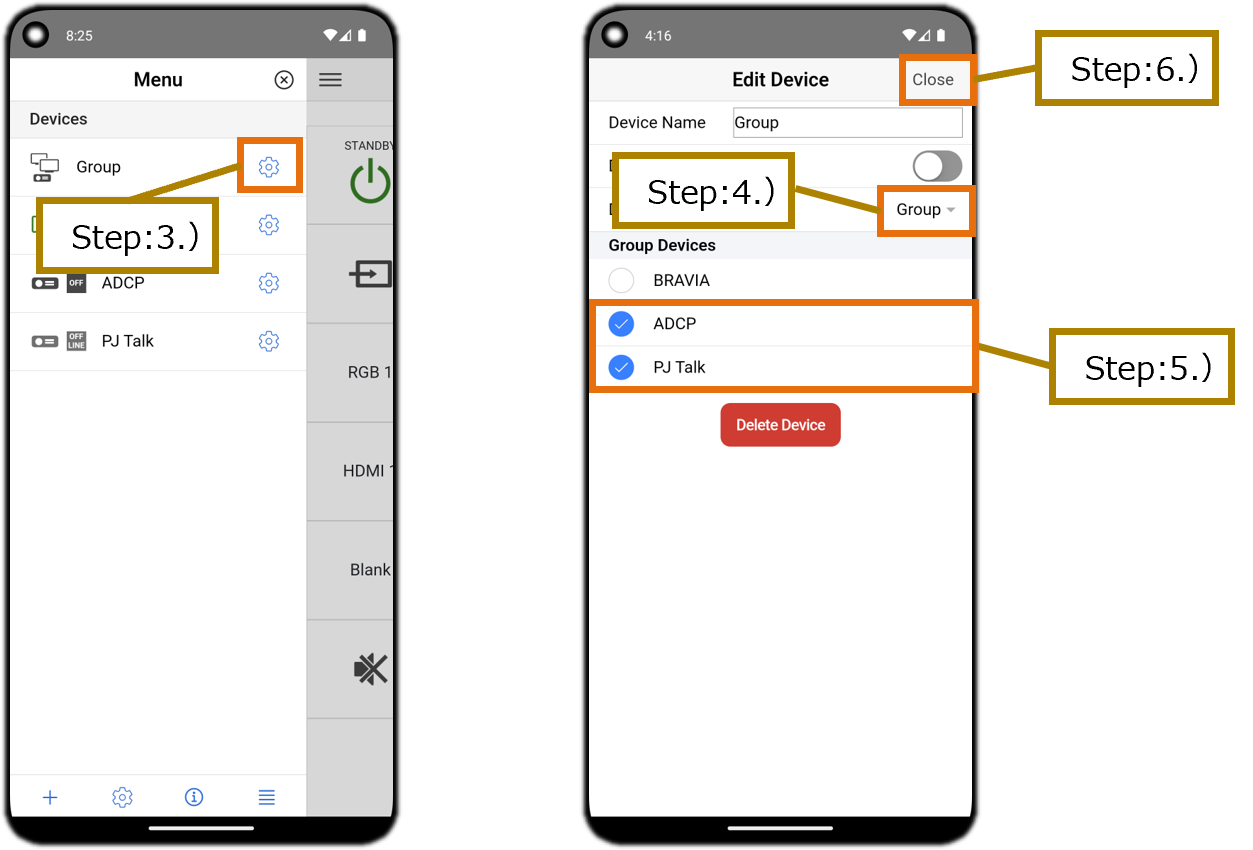
- On the No Device Selected screen, tap the Add Device button.
Or on the Menu screen (side menu), tap the Add Device button. - This displays the Enter Device Name dialog box. Enter your preferred device’s name (group name) and tap the OK button.
- On the device list of the Menu screen (side menu), tap the Device Settings button of the device added.
- Change the Device Type setting to Group in the Edit Device dialog box.
- The Group Devices list will be displayed at the bottom of the screen. Tap the check boxes of the devices you want to include in your group and enable it.
- Tap the Close button on the top right of the Edit Device dialog box.
- Display Remote screen - Group and tap the button.
Refer to the following for the function of each button.- “5.6 Remote Screen - Group: TV (BRAVIA) Only”
- “5.7 Remote Screen - Group: PJ (ADCP) Only”
- “5.8 Remote Screen - Group: PJ (PJ Talk) Only”
- “5.9 Remote Screen - Group: TV (BRAVIA) & PJ (ADCP)”
- “5.10 Remote Screen - Group: TV (BRAVIA) & PJ (PJ Talk)”
- “5.11 Remote Screen - Group: PJ (ADCP) & PJ (PJ Talk)”
- “5.12 Remote Screen - Group: TV (BRAVIA) & PJ (ADCP) & PJ (PJ Talk)”
5.12. When Device Authorization is Enabled to Prevent Operation by Unspecified Users
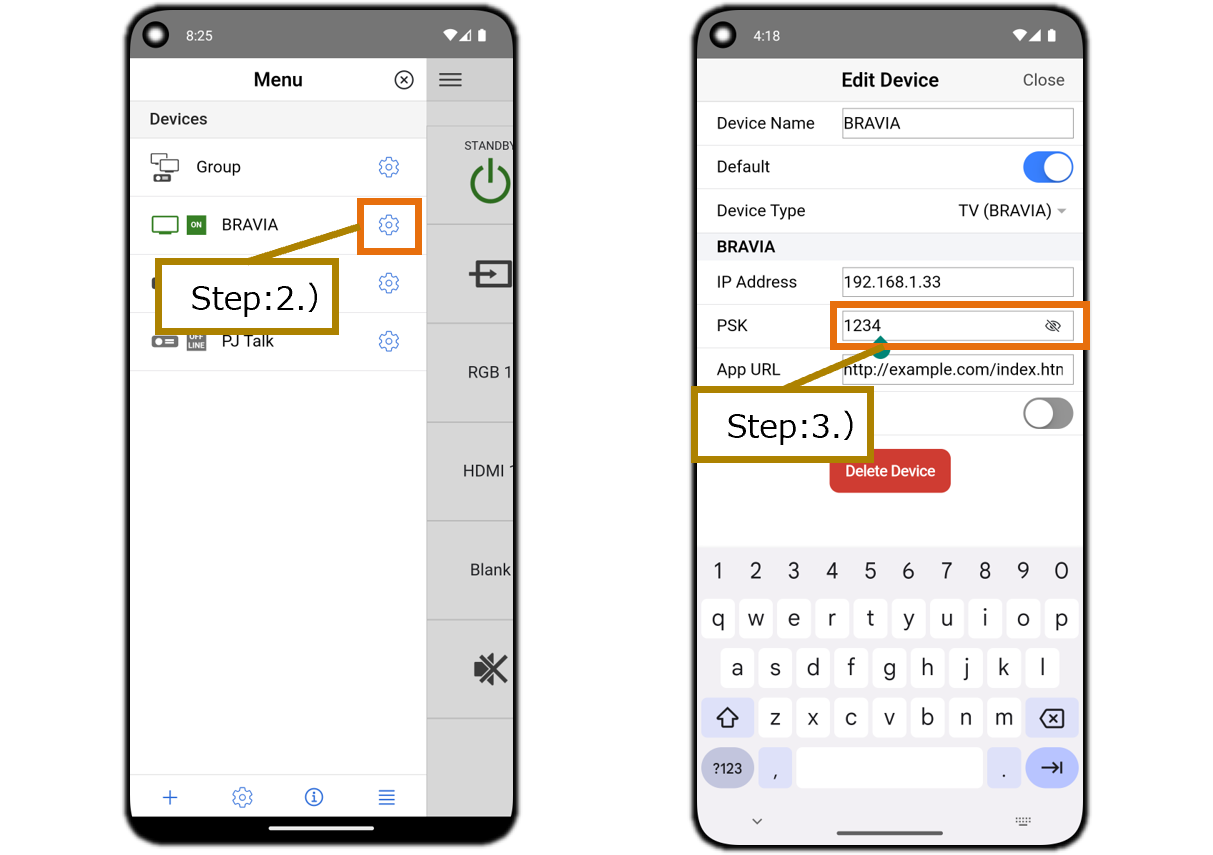
- Tap the Side Menu button on the Remote screen to display the Menu screen (side menu).
- On the device list of the Menu screen (side menu), tap the Device Settings button of the device that is set to prevent unspecified users from operating it.
- Enter the PSK of your device in the Edit Device dialog box.
- When Device Type is “TV (BRAVIA)”
Enter the pre-shared key value set by BRAVIA. - When Device Type is “PJ (ADCP)”
Enter the administrator password value set on the projector.
- When Device Type is “TV (BRAVIA)”
※Please note that there is a risk your device may be operated and device information may be stolen if your PSK and ADCP passwords are leaked.
5.13. Display End User License Agreement
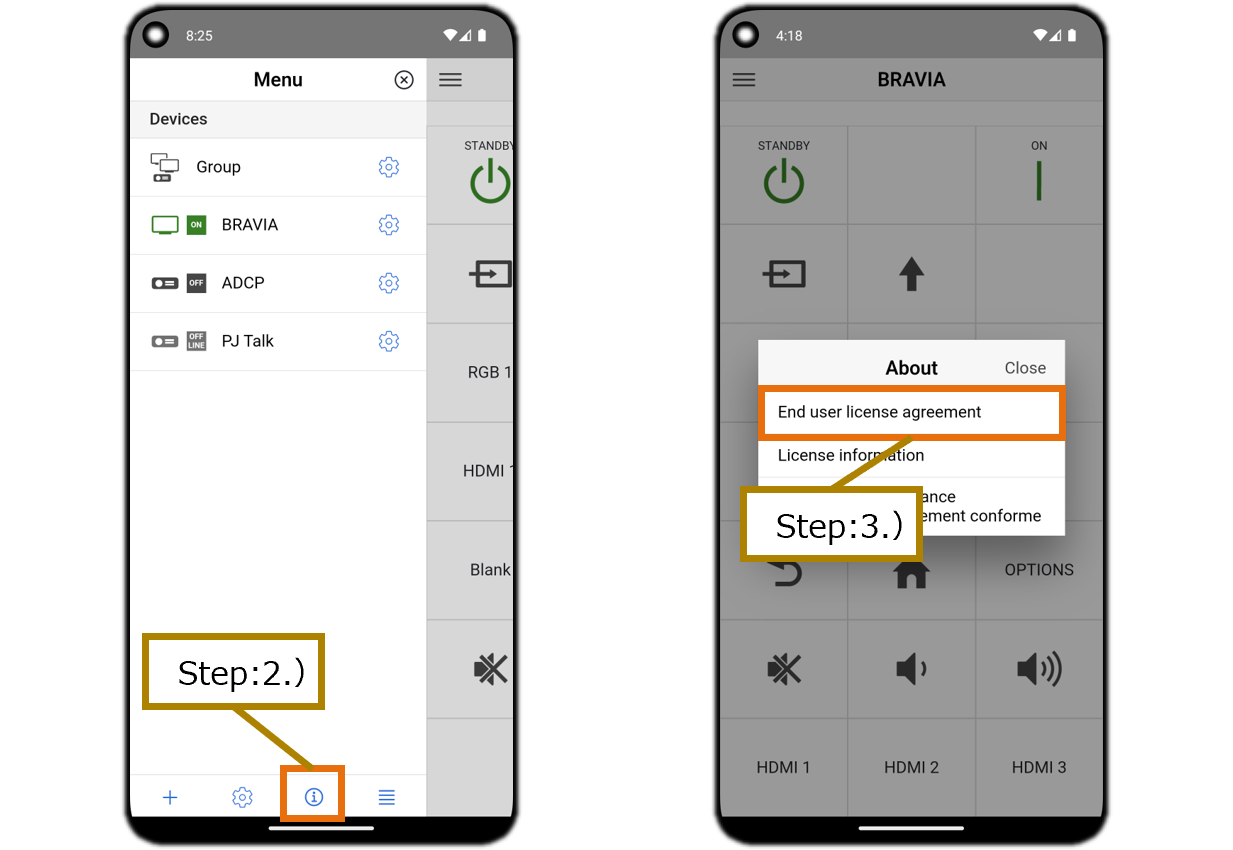
- Tap the Side Menu button on the Remote screen to display the Menu screen (side menu).
- Tap the About button on the Menu screen (side menu) to display the About dialog box.
- Tap the “End user license agreement” button in the About dialog box to display the “End user license agreement” screen.
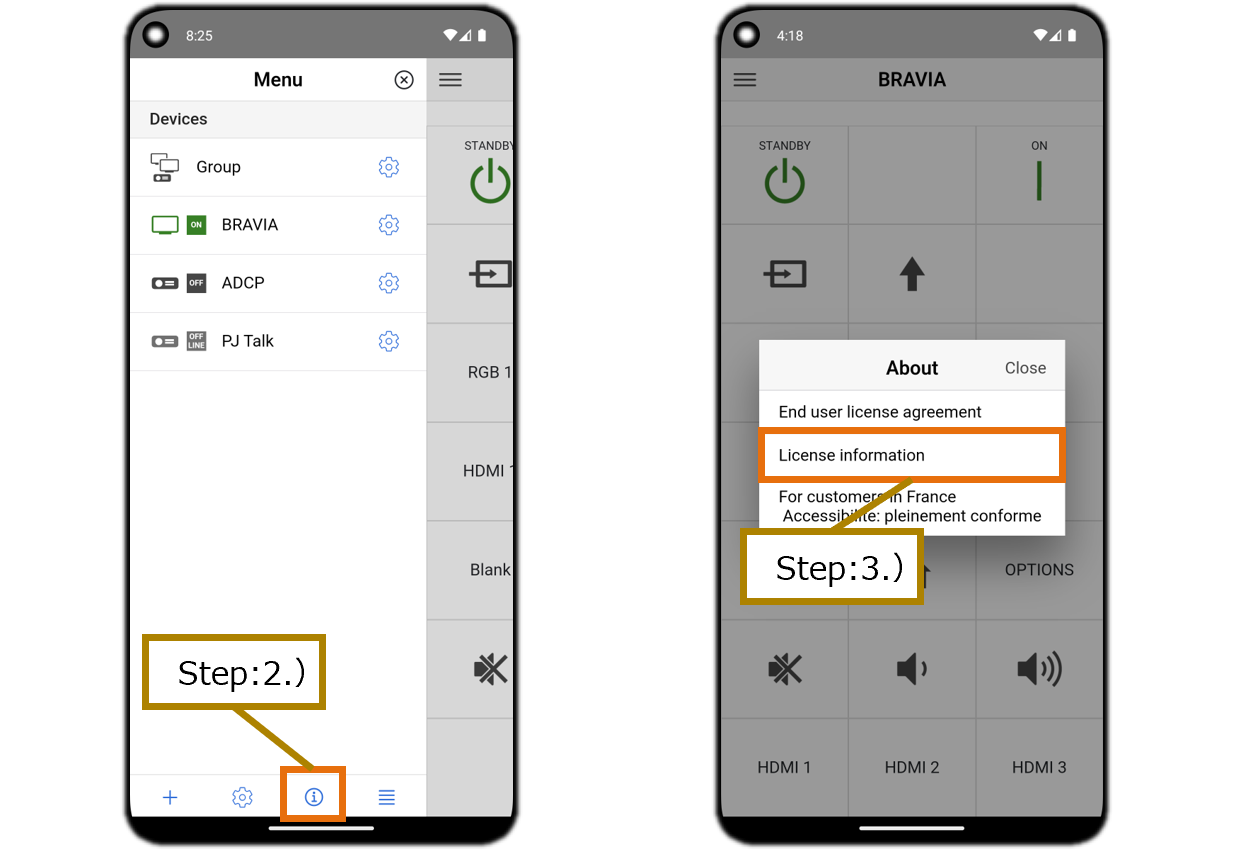
5.14. Display License Information
- Tap the Side Menu button on the Remote screen to display the Menu screen (side menu).
- Tap the About button on the Menu screen (side menu) to display the About dialog box.
- Tap the “License information” button in the About dialog box to display the “License information” screen.
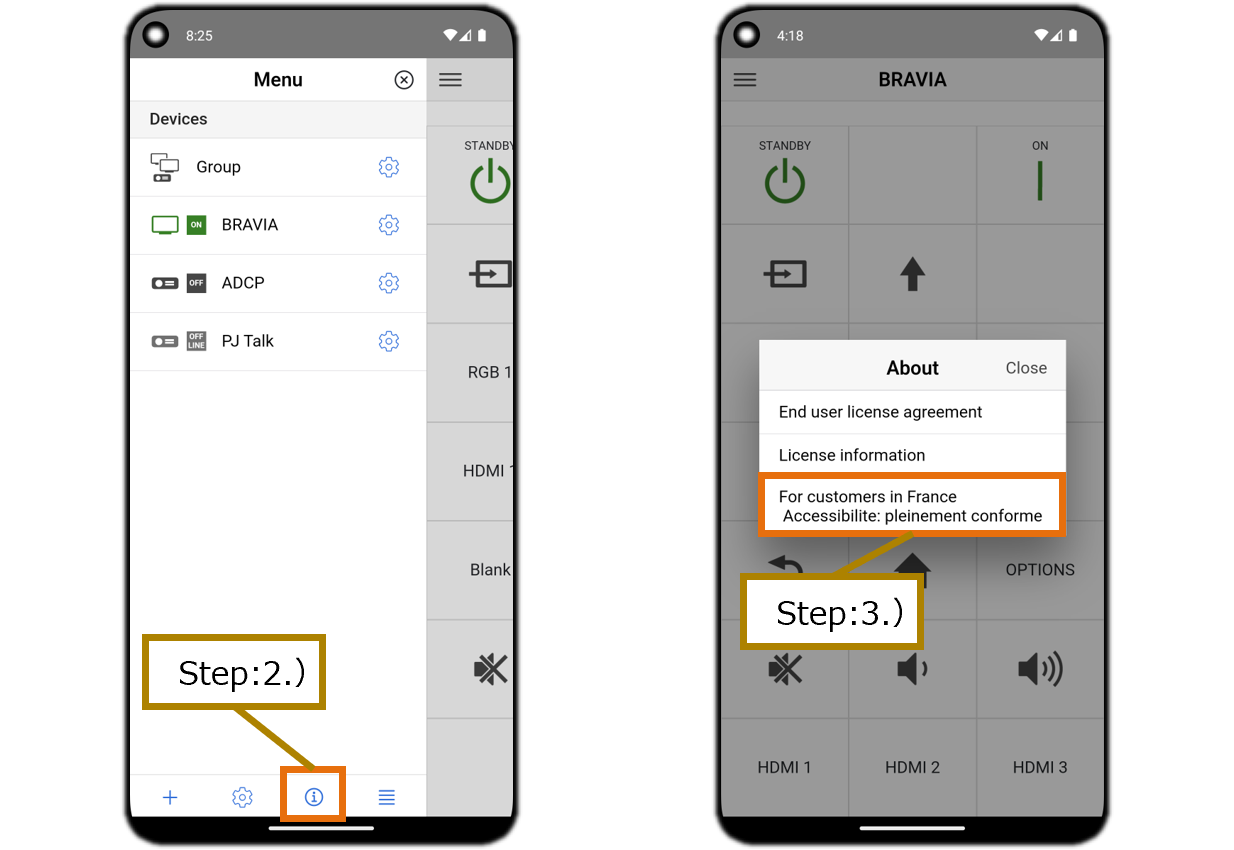
5.15. Display a website including details on the French online communication accessibility law
- Tap the Side Menu button on the Remote screen to display the Menu screen (side menu).
- Tap the About button on the Menu screen (side menu) and display the About dialog.
- Tap the For customers in France button on the About dialog and display the website including details on the French online communication accessibility law.
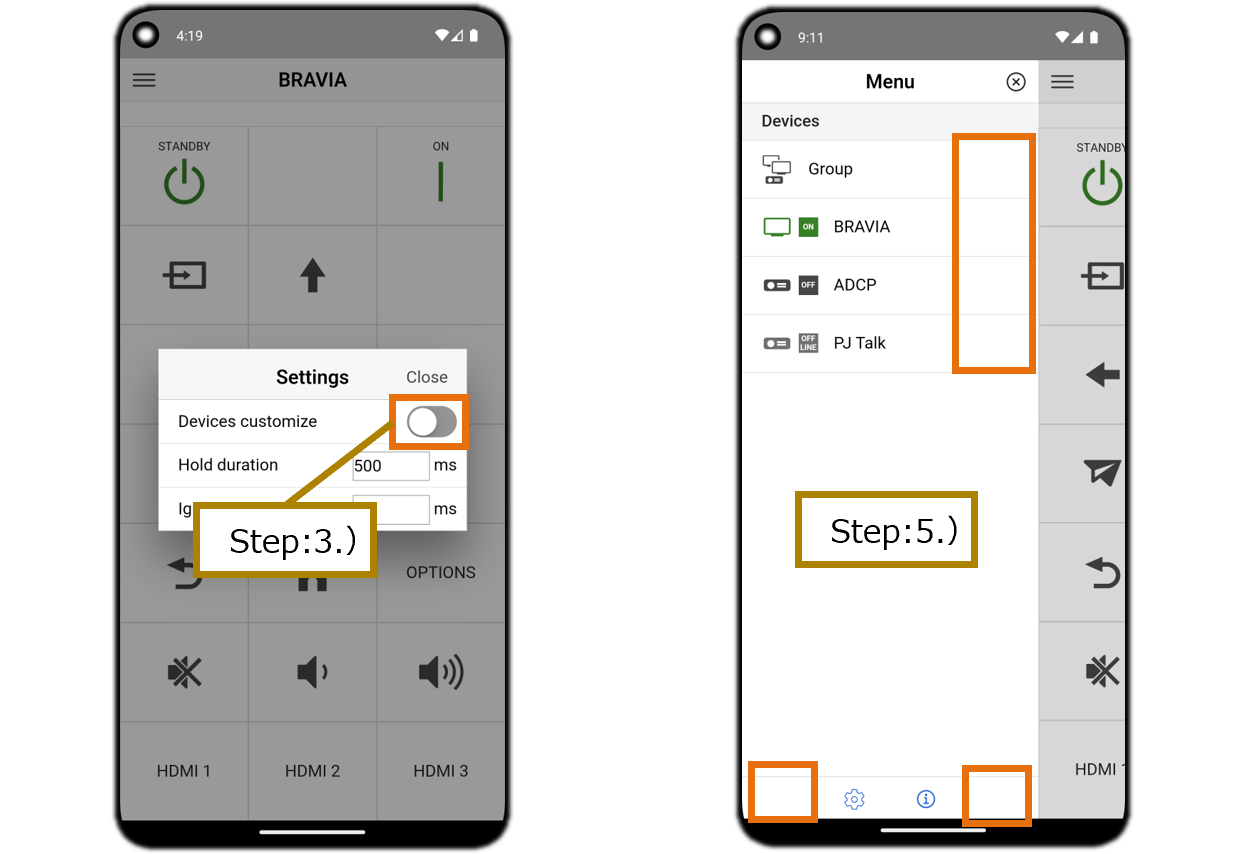
5.16. Disable the Customize Function
- Tap the Side Menu button on the Remote screen to display the Menu screen (side menu).
- Tap the App Settings button on the Menu screen (side menu) to display the App Settings dialog box.
- Tap the Devices Customize toggle button in the App Settings dialog box to disable the function.
- Tap the Close button on the App Settings dialog and close the App Settings dialog.
- Tap the Side Menu button on the Remote screen to display the Menu screen (side menu).
Disabling the Customize function hides the icons for adding, deleting, setting, and reordering icons.
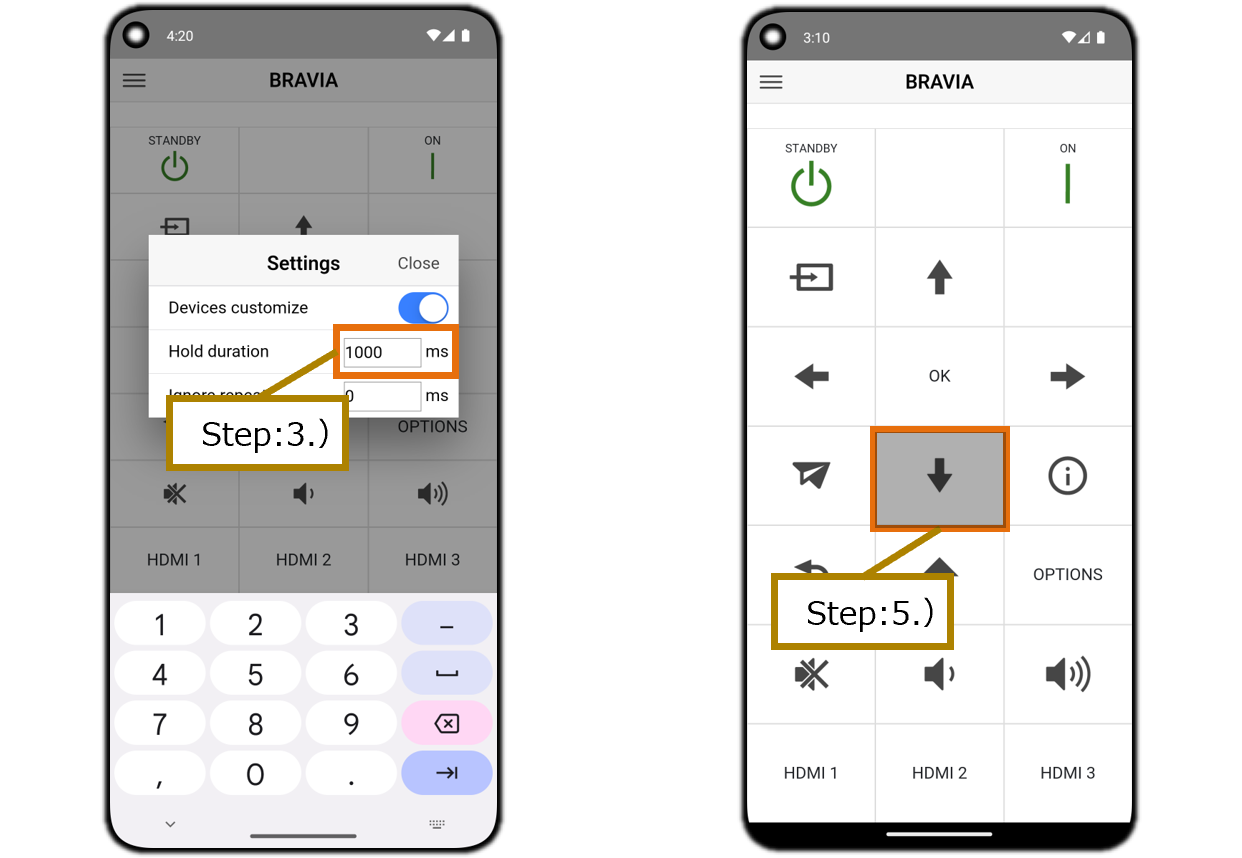
5.17. Change the amount of time required for the long-press to be acknowledged
- Tap the Side Menu button on the Remote screen to display the Menu screen (side menu).
- Tap the App Settings button on the Menu screen (side menu) to display the App Settings dialog box.
- Change the Hold Duration value on the App Settings dialog.
- Tap the Close button on the App Settings dialog and close the App Settings dialog.
- Long-pressing the applicable buttons on the Remote screen starts the long-press input after the set time has passed.
5.18. Change the time interval between continuous taps
- Tap the Side Menu button on the Remote screen to display the Menu screen (side menu).
- Tap the App Settings button on the Menu screen (side menu) to display the App Settings dialog box.
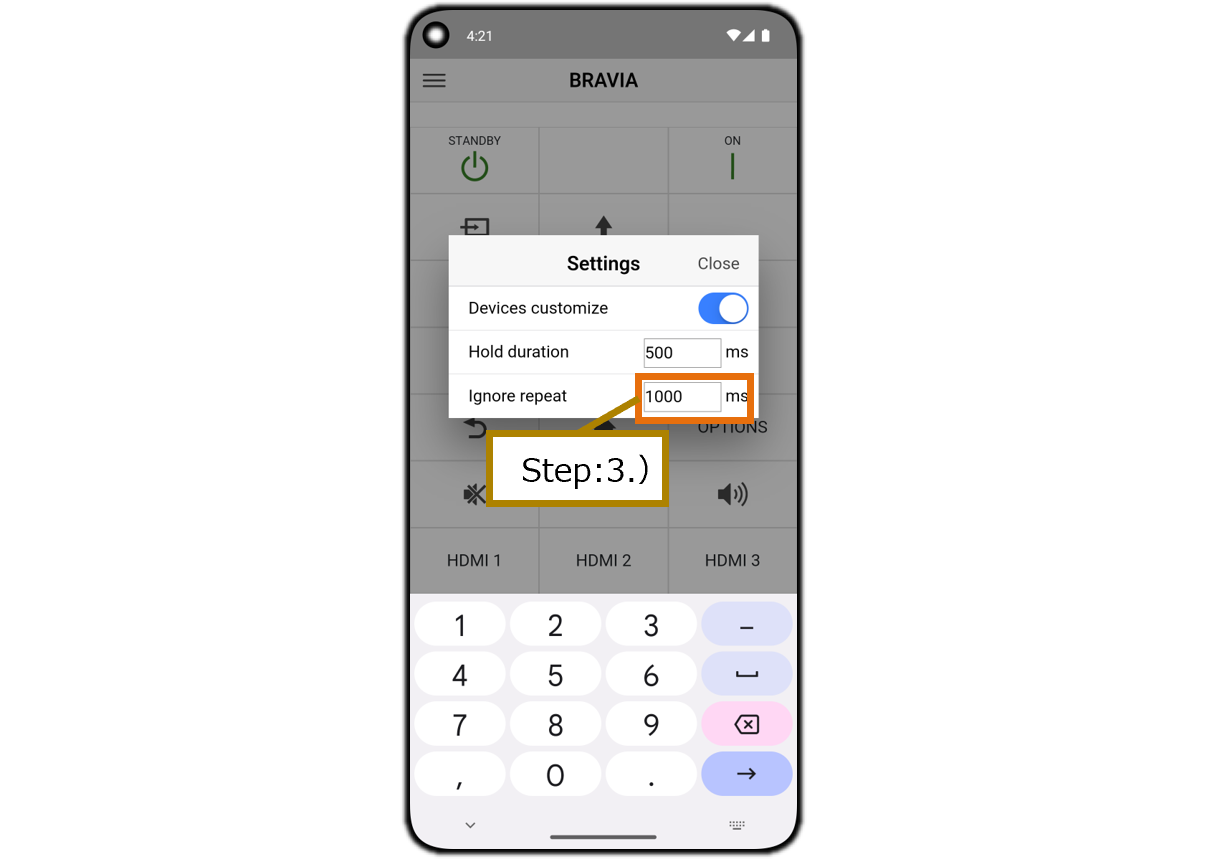
- Change the Ignore Repeat value on the App Settings dialog.
- Tap the Close button on the App Settings dialog and close the App Settings dialog.
- No input is accepted if a button is tapped continuously on the Remote screen unless the set time has passed since the first tap.
