Pro settings (BZ40P / BZ35P / BZ30P)
“Pro settings” is a range of features that allow you to customize monitor behavior according to the installation environment and usage.
It mainly includes power control, startup state, and security-related settings.
Add the features you need to suit you.
Settings can be copied
You can use a USB drive to export and import “Monitor settings” and “Pro settings,” allowing you to apply the same settings to multiple monitors.
Pro Settings List
In “Normal mode” environment, select the [Pro setting] icon to see the list.
*The GUI is subject to change without prior notice.
*Depending on the Android TV OS, the displayed items and procedures may vary.
Change and Initialize Operating Environment
[Start Pro mode] Corporate Education Signage Hospitality
Transition from “Normal mode” to “Pro mode”
Procedure: [Pro settings]→[Start Pro mode]
Operation Method
Select [Start pro mode] to display a confirmation screen.
If you select [OK], the monitor automatically restarts and enters “Pro mode” environment.
Tips
If you use Pro mode, we recommend enabling PIN code protection in [Pro mode lock] under Pro settings.
[Initialize Pro setting] Corporate Education Signage Hospitality
Reset “Pro settings”
Procedure: [Pro settings]→[Initialize Pro setting]
All “Pro settings” return to their default values.
Select [Initialize Pro settings] to display a confirmation screen. Select [OK] to reset only the Pro settings to default values.
[Current settings] Corporate Education Signage Hospitality
Check “Pro settings” values at a glance
Procedure: [Pro settings]→[Current settings]
You can view a list of the current values for each Pro settings item.
Copy Settings & Install Applications
[Export Pro settings] Corporate Education Signage Hospitality
Copy settings using a USB drive
Procedure: [Pro settings]→[Export Pro settings]
Note:
- This feature can only be used between monitors with the same region, model, and firmware version.
- There are limitations on items that can be copied. For copyable items, see here.
- To use this feature, enable [Import settings] in [USB drive auto run]on the destination monitor.
Export Method
- Insert the USB flash drive into the monitor.
- Select [Copy pro settings].
- When copying is complete, the “Pro settings” list screen appears with the message “Copy complete.”
- Disconnect the USB flash drive.
Import Method
- Insert the USB flash drive containing the exported settings file into the monitor.
- When prompted, select [Start import].
- The import completes automatically.
Tips
If a network connection is available, you can also copy settings using BRAVIA Web Control UI.
[Startup services] Corporate Education Signage Hospitality
Installing Startup-services (Built-in apps)
Procedure: [Pro settings]→[Startup services]
Startup services (built-in apps) for Bravia Professional Displays can be installed as needed. Since the apps are stored locally on the display, an Internet connection is not required for installation.
Installation method
- Select the app from the list and enable Use.
- Click [Enable] and [Install] to start the installation.
- When the installation is complete, the display restarts automatically.
[Install APK] Corporate Education Signage Hospitality
Installing an Android application (.apk)
Procedure: [Pro settings]→[Install APK]
You can install Android apps (.apk) on the monitor using a USB drive.
Installation method

- Insert the USB drive containing the APK file into the monitor.
- When you select [Install APK], the APK file name will be displayed.
- Select a file and run the installation.
Initial Display and Operation Setting at Startup
[AC power on] Corporate Education Signage Hospitality
Setting the monitor’s behavior when powered on
Procedure: [Pro settings]→[AC power on]
Configure the startup state when the monitor’s main power is turned on in conjunction with a linked system such as a hotel room key or store system. Select from the following options:
- [Standard]
If you turn off the connected external power while the monitor screen is on, the monitor screen will automatically turn on the next time you turn on the monitor main power. On the other hand, if the external power is turned off after the monitor is turned off, the monitor screen will automatically remain off the next time you turn on the monitor main power. - [Always on]
Whenever the monitor main power is turned on, the monitor screen will automatically turn on. - [Off]
Whenever the monitor main power is turned on, the monitor screen will stay off.
[Wake-up on signal] Corporate Education
HDMI-linked power control and input switching
Procedure: [Pro settings]→[Wake-up on signal]
This function automatically turns on the monitor and switches the input source when HDMI is connected. You can also configure the monitor to turn off the power when you disconnect HDMI.
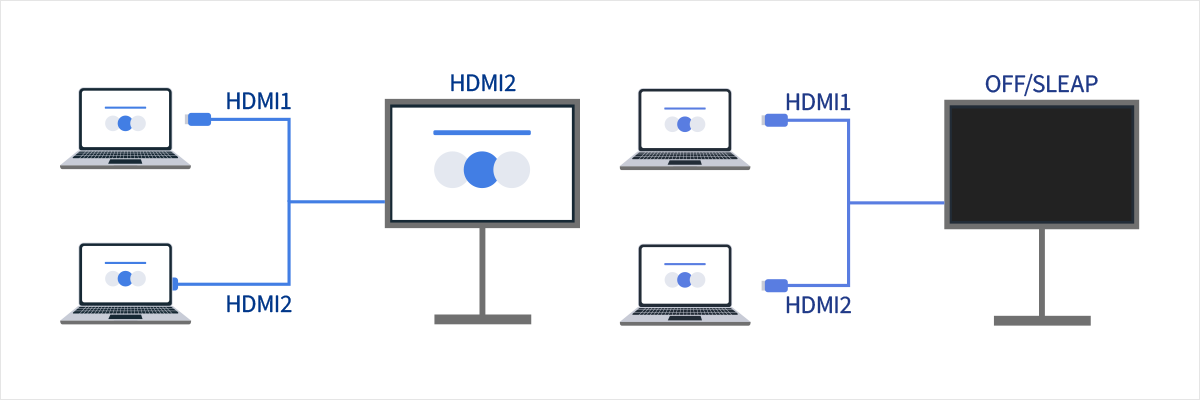
Option
- External input
If one of the HDMI ports is set to [Enable], that port will detect HDMI signals and it will be included in the function. - Auto power-on
If set to [Enable], the display will be turned on automatically when an HDMI input is detected. - Auto power-off
If set to [Enable], the display will be turned off automatically when all the HDMI inputs are disconnected.
[Home key behavior] Education Signage Hospitality For Developer
Assigning a background image/app to [Home] button
Procedure: [Pro settings]→[Home key behavior]
You can assign a specific background image or application to the [Home] button on the remote control.
Option
- [Home menu]
Displays the default home screen. - [Web app]
You can assign a specific background image or web app to the [Home] button. The web app can be hosted on an external server or installed on the monitor. - [Web app/Home menu]
Alternately switches between the monitor’s [Home] screen and the specified HTML5 application. - [Android home app]
You can assign an installed Android home app or Android home-compatible app to the [Home] button.
Operation Control Function
[NTP server] Corporate Signage For Developer
NTP Server Sync Settings
Procedure: [Pro settings]→[NTP server]
You can configure the NTP server’s IP address or hostname on the monitor to synchronize the system and apps with the display’s clock.
[Pro mode lock] Corporate Education Signage Hospitality For Developer
PIN code setting for “Pro mode” to “Nomal mode”
Procedure: [Pro settings]→[Pro mode lock]
When enabled, you can specify a 4-digit PIN code. Once set, you will be prompted to enter the PIN code when switching from “Pro mode” to “Nomal mode”. If you forget the PIN code, you will not be able to change the operating mode. Please keep the PIN code in a safe place.
[Charge USB during Standby mode / Networked standby mode] Corporate Education Signage Hospitality
Charging connected devices while the monitor is turned off
Procedure: [Pro settings]→[Charge USB during Standby mode / Networked standby mode]
Enables charging of USB-connected devices even when the display is turned off.
Enabling this setting disables the suspended state of the display.
[Restore picture and sound adjustments] Hospitality
Reset Picture and Sound settings adjusted by hotel guests to Pro settings defaults
Procedure: [Pro settings]→[Restore picture & sound adjustments]
This setting restores picture and sound adjustments made by hotel guests in “Pro mode” to their original values by power cycling the display.
It is disabled by default. Change this setting as needed.
Option
- [ON]
Restores picture and sound settings to their original values when the display is turned off and back on. - [OFF]
Disables this feature.
[Developer options] Corporate Education Signage Hospitality For Developer
Android application settings, etc.
Procedure: [Pro settings]→[Developer options]
The following settings are available for Android apps.
[Power state control by apps]
You can configure monitor power control via Android app broadcast intents.
Available Controls
- Restart
- Power OFF (Screen OFF)
- Power ON (Screen ON)
Example: Restart
“com.sony.dtv.b2b.intent.action.REBOOT”
Intent intent = new Intent(“com.sony.dtv.b2b.intent.action.REBOOT”); sendBroadcast(intent):Example: Power OFF (Screen OFF)
“com.sony.dtv.b2b.intent.action.POWER_OFF”
Intent intent = new Intent("com.sony.dtv.b2b.intent.action.POWER_OFF"); sendBroadcast(intent):Example: Power ON (Screen ON)
“com.sony.dtv.b2b.intent.action.POWER_ON”
Intent intent = new Intent("com.sony.dtv.b2b.intent.action.POWER_ON"); sendBroadcast(intent);[Custom button URL]
Assigns a URL of your choice to the [Custom] button on a remote control with a custom button. Press this button to display the specified URL. If you set a URL that enables power-on control of the display, you can also turn on the display with the [Custom] button.
Extended Settings and System Integration
[Wi-Fi access point] Hospitality For Developer
Configuring the Wi-Fi access point
Procedure: [Pro settings]→[Wi-Fi access point]
You can configure the following Wi-Fi access point settings.
Options
- [Wi-Fi access point] Set whether to use Wi-Fi.
- [SSID] Set the SSID.
- [Security] Select either [WPA2-PSK (AES)] or [Open network].
- [Password (WPA key)] Specifies the WPA Key. The maximum length is 8 to 63 characters.
[Admin password] Corporate Education Signage Hospitality For Developer
Configuring authentication passwords for remote management features
Procedure: [Pro settings]→[Admin password]
Sets the authentication password for Web Control UI and Sony remote management features.
Must be 8-32 characters and include both letters and numbers.
[USB drive auto run] Corporate Education Signage Hospitality For Developer
Allow auto execute when USB drive is inserted
Procedure: [Pro settings]→[USB drive auto run]menu
You can set installation and auto execution permission when a USB drive is inserted in the monitor.
It can be used as a security measure to prevent unintended operations and unauthorized content execution.
Items
- [Import settings]
Allows import via USB drive of “Monitor settings” and “Pro settings” exported with [Export Pro settings].
Please refer to the [Export settins] section for the export/import procedure. - [Install BPK]
When a USB drive containing a BPK (BRAVIA Professional Displays package) is inserted, allows the monitor to execute the installation.
Used for monitor firmware updates via USB drive. - [Launch web app]
When the monitor power is turned on, allows HTML5 applications to launch.
This setting needs to be enabled when installing developed HTML5 applications to the monitor’s internal storage or when running them via USB drive. - [Install web app]
Allows installation of HTML5 applications to the monitor via USB drive.
This setting needs to be enabled when installing developed HTML5 applications to the monitor’s internal storage or when running them via USB drive.
[Energy modes] Corporate Education Signage Hospitality
Procedure: [Pro settings]→[Energy modes]
Setting this option to [Disabled] disables [Energy modes] in “Monitor settings”.
[HTML5 platform] Corporate Education Signage Hospitality For Developer
Configure HTML5 platform
Procedure: [Pro settings]→[HTML5 platform]
Certificate registration and execution control settings for developed HTML5 applications are configured on the BRAVIA Professional Displays’ proprietary HTML5 platform (Web App Runtime).
Tips
HTML5 app configuration varies by installation environment.Refer to the following.
see here.
Certificate
- [Root certificates] Register the root certificate for SSL/TLS communication.
- [Client certificates] Configure the certificate for client authentication.
- [Confirm server certificates] Configure whether to verify server certificates.
Permissions
- [Web permissions]
Manages permissions for each web app, as well as for USB cameras and microphones.
Related Functions
- [Auto recovery]
Enable automatic recovery when a web app encounters an error. - [Require PIN to launch a web app when using Pro mode lock]
With the [Pro mode lock] enabled and a PIN code configured, inserting a USB device and launching or installing a web application will trigger the PIN entry dialogue. - [Web app orientation]
Configure web app display orientation. Can be set to prioritize manifest settings or fixed orientation.
[DHCP hostname] Corporate Education Signage Hospitality For Developer
Procedure: [Pro settings]→[DHCP hostname]
The function notifies the DHCP server of the hostname. When enabled, you can edit the hostname to be notified.
Default and scheduled operation settings
[Initial input source] Corporate Education Signage Hospitality
Default Screen Settings
Procedure: [Pro settings]→[Initial input source]
Set the screen displayed when the monitor is powered on. Select the primary source from the following.
The number of available terminals and default settings may vary by firmware version.
Available initial input options vary by model and region.
Option
- [Default]
Displays [Home] when the monitor’s main power is turned on. - [External input]
To display an external input, select the desired input (e.g., HDMI 1). - [Startup app]
If you specify an HTML5 app URL, that URL is displayed when the monitor is turned on. - [Android app]
Displays the specified Android app.
Note:
- When launching HTML5 applications via USB drive, the settings are different from this. Specify in
auidof manifest.json. Also, insert the USB drive containing the HTML5 application while the monitor power is OFF. For details, see here. - For both HTML5 applications and Android apps, additional settings are required to launch specified apps in sync with the monitor power in “Pro mode”. Select [Apps] in [Pro settings] and enable the app to be used in “Pro mode” from the list. Please configure both settings together.
Procedure: [Pro settings] → [Apps]
[Initial and maximum volume] Signage Hospitality
Procedure: [Pro settings]→[Initial and maximum volume]
You can set the initial and maximum volume when the monitor is turned on. Regardless of the user’s final settings, the specified volume is always set when the power is turned on.
[Timers] Signage Hospitality
Procedure: [Pro settings]→[Timers]
Sets the time to automatically turn on, turn off, or restart. You can specify the schedule by day of the week and time, allowing you to set a regular operation schedule. This feature helps ensure stable operation even during long-term use.
Restriction settings in Pro mode
[Display/Remote controls] Hospitality
Procedure: [Pro settings]→[Display/Remote controls]
You can disable monitor keys and remote control operations individually in “Pro mode” . This helps prevent unexpected operations from unspecified users.
[External input] Corporate Education Signage
Procedure: [Pro settings]→[External inputs]
In “Pro mode” environment, you can restrict the posting and entry of information related to [External inputs] in “Monitor settings”. Configure each HDMI input individually by selecting from the following options while the input is connected.
Option
- [Use with label]
All input information specified in [External inputs] under “Monitor Settings” is displayed and available in “Pro mode”. - [Use without labels]
In “Pro mode”, the input information is no longer displayed, but the input is still available.. - [Not use]
In “Pro mode”, both input information display and the use of external input are unavailable.
[Apps] Corporate Education Signage Hospitality
Procedure: [Pro settings]→[Apps]
Select the apps to use in “Pro mode”. Note that apps with this setting disabled cannot be used in “Pro mode” .
Note:
Depending on the settings, Android apps can be installed in “Pro mode”. However, to use them, you need to return to “Normal mode” and enable them in this setting.
[Input] Corporate Education Signage Hospitality
[Input]
Procedure: [Pro settings]→[Input]
You can configure the input switching menu display in “Pro mode”. To edit the display content, press the [Input] button on the remote control to display the input list, then select [Edit] on the right side.
[Default view]
When you press the Input button on the remote control in “Pro mode”, the standard input selection menu is displayed.
[Basic view]
When you press the Input button on the remote control in “Pro mode”, a simplified input selection menu is displayed.
Note
- If you want to control input switching from a web app, select [Basic view].
- The input selection menu can only be edited in [Default view]. Note that [Basic view] cannot be edited.
[Inputs menu customization]
Customize what is displayed when you press the Input button on the remote control in “Pro mode”. You can enable or disable external inputs, AirPlay, apps, and more.
[Quick Settings] Corporate Education Signage
Procedure: [Pro settings]→[Quick Settings]
Settings that can be changed in “Pro mode” environment by using the [Quick settings] menu. Users will be able to change image quality and other settings while watching content.
[Default view]
When you press the [Settings] key on the remote control in “Pro mode”, the same [Quick Settings] menu as in “Normal mode” is displayed, and you can change the contents.
[OFF]
The [Settings] key on the remote control does not function in “Pro mode”.
[Basic view]
When you press the [Settings] key on the remote control in “Pro mode” , a simplified version of the [Quick Settings] menu is displayed. This setting does not have an edit button, and settings cannot be changed in “Pro Mode” .
Note:
Some Quick settings features may not work correctly in “Pro mode” environment. When operating in “Pro mode”, we recommend using [Basic view].
Features
Operation Automation through Behavior Settings
Automate frequently used daily operations and reduce manual effort.
- [Wake-up on signal]
The monitor automatically powers on when an HDMI cable is connected. - [Timers]
Fixed settings to automatically turn the monitor power ON/OFF at specified times.
Security Enhancement through Feature Restrictions
Prevent tampering or accidental operations by employees and disable non-business functions to focus on work.
- [Display/Remote controls]
Operation restrictions that disable some functions of the remote control and monitor buttons. - [Initial and maximum volume]
Volume restrictions that set maximum or minimum volume to fix an appropriate volume range. - [External input]
Input source restrictions that disable unused input terminals (HDMI, USB, etc.).
Efficient Monitor Management through Integration
Easily manage settings in bulk and deploy apps.
- Install HTML5 applications directly on the monitor.
- [Initial input source]
- Specify apps or content to automatically launch when the power is turned on.
- [NTP server]
Synchronize the monitor’s time through NTP server settings.