

Monitor Settings (BZ Series: L / J / H / F)

In “Monitor Settings,” you can configure settings for basic monitor operation. This covers picture quality, video and audio input/output, network connection, Google account management, and more.
Settings can be copied
You can use a USB flash drive to export and import “Monitor settings” and “Pro settings,” allowing you to apply the same settings to multiple displays.
- How to export/import settings with a USB flash drive: here
- Download the default values and exportable settings: here
Screen Mode
Models with Pro mode have three distinct modes.
*The GUI is subject to change without prior notice.
Normal Mode
Day-to-day operation

- Pro settings: Not available
- Monitor Settings: Standard items only
*The “Monitor settings” in Normal Mode: displays different items than in Pro Setting Mode.
Pro Settings Mode
Pro Configuration

- Pro settings: Fully customizable
- Monitor Settings: Displays Pro mode items
- Supports app and system integration setup
Pro Mode
Commercial operation

- Operates based on configured Pro settings
- Settings are locked for enhanced security
Accessing the Settings Menu
All settings are recommended to be configured in the “Pro settings mode” environment. Select the settings icon in the upper right corner of the [Home] screen to display the menu.
Monitor Settings List
The available options differ between “Pro Settings Mode” and “Normal Mode” environments. This list is based on the “Pro Settings Mode” environment.
*Setting items and procedures may vary depending on the Android TV OS version and firmware version.
1. Picture & Display Settings
[External inputs] HDMI input information settings
Procedure: [Settings]→[External inputs]menu
HDMI-related settings such as input information display, name changes, and signal format selection can be configured.
*The number of terminals may vary depending on the model. For details, please refer to the Reference Guide for each model.

Settings Items
[Info banner]
When switching HDMI inputs, the input information is temporarily displayed on the screen. After a connection is made, the information will be shown for about 3 seconds.
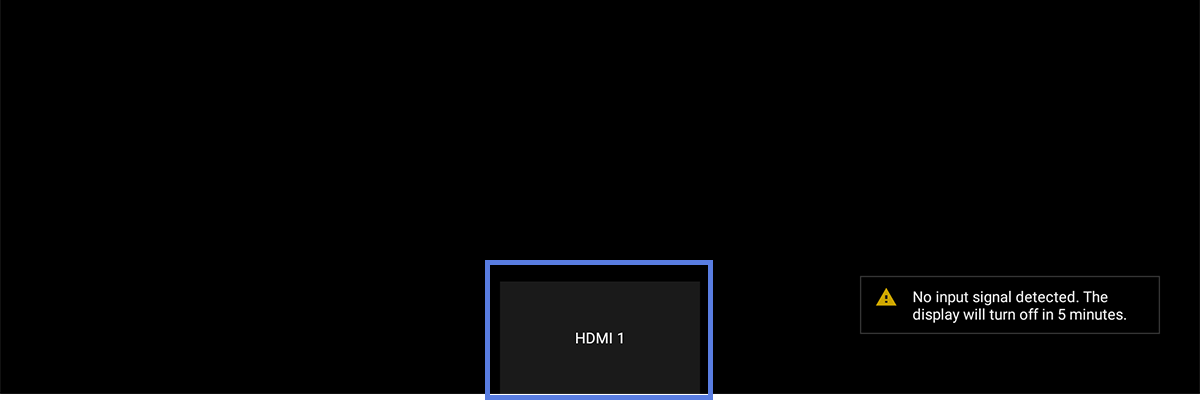
[External inputs]
This is a list of settings for each HDMI terminal, including supported input signals and video formats.
External inputs settings
You can customize the HDMI input names that appear on the monitor when using [Input switching] on the remote control. You can also choose to show or hide specific inputs. If a device is permanently connected and you want to prevent users from switching to that input, set it to [Hide].
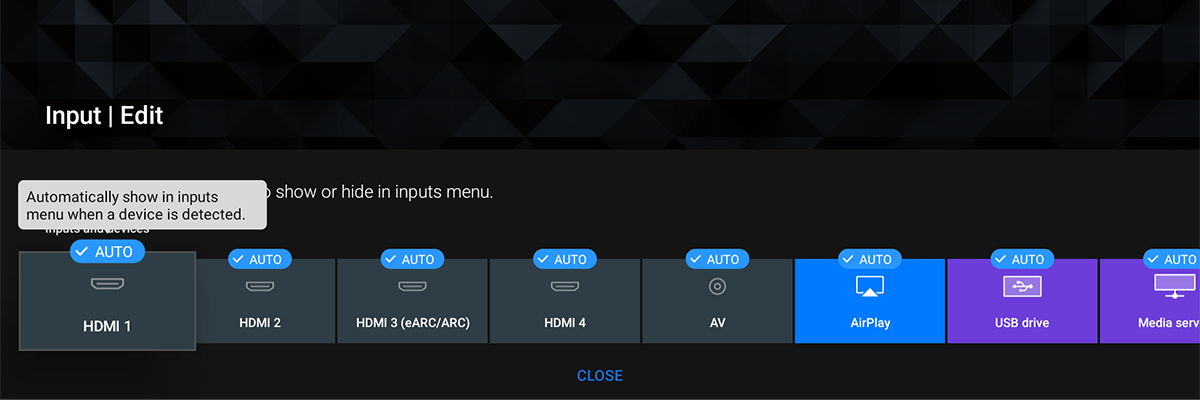
[BRAVIA Sync settings] *Compatible with Sony devices only
When you turn the monitor on or off with the remote control, BRAVIA Link devices connected via HDMI will automatically turn on or off as well.

What is BRAVIA Sync
BRAVIA Link is Sony’s interlinking feature that allows you to control compatible devices connected via HDMI cable using the monitor’s remote control. Supported devices include Blu-ray recorders and audio systems bearing the BRAVIA Link logo.
Tips:
To sync the monitor power with STB, connect via HDMI and use CEC commands.
For supported CEC commands, please refer to the HDMI Input Specs of each model.
[HDMI signal format]
The monitor has multiple HDMI input terminals. You can configure the video format for each one as described below.
Options
- [HDMI 1, HDMI 2]
You can select either [Compatibility priority] or [4K quality priority]. - [HDMI 3(eARC/ARC)、HDMI4(DVI-HDMI)]
You can select [Compatibility priority], [4K quality priority], or [Dolby Vision Compatible].
[HDMI 4 audio source]
You can select the audio input terminal for video connected via HDMI 4 (DVI-HDMI).
Options
- [Auto] Automatically detects and switches
- [HDMI 4] HDMI 4 port
- [HDMI 4 AUDIO IN] HDMI 4 AUDIO IN port
[Display & Sound]→[Picture] Picture settings
Procedure: [Settings]→[Display & Sound]→[Picture]menu
Picture quality settings are configured for each input. There are two ways to configure them. You can select settings from [Picture mode] and apply them to all inputs, or customize settings using advanced settings.
1. How to Apply in Bulk
[Picture mode]
Procedure: [Settings]→[Display & Sound]→[Picture]→[Picture mode]
Selecting a mode from the list based on your preference optimizes the picture quality accordingly.
Options
- [Vivid] High contrast image quality with sharp colors and contours. Brightness (luminance) is set to the maximum recommended value.
- [Standard] Standard quality suitable for general viewing.
- [Cinema] Cinema-like picture quality.
- [Game] Picture quality suitable for gaming. Also minimizes HDMI input lag.
- [Graphics] High-contrast image quality with sharp contours.
- [Photo] Picture quality suitable for photos.
- [Custom] Picture quality that faithfully reproduces the original video signal.
Tips
Using [Picture mode] may increase power consumption.
[Auto picture mode]
Automatically detects content from HDMI-connected devices and optimizes picture quality by switching to an appropriate mode in the [Picture mode] list. Set to [Off] to customize in advanced settings or keep [Picture mode] fixed.
[Light sensor]
Automatically adjusts monitor brightness according to ambient light. Set to [Off] to customize in advanced settings. In environments with constant brightness, this setting is often unnecessary, and setting to [Off] helps save energy.
2. How to Customize in Advanced Settings
- [Brightness] You can adjust brightness, contrast, gamma correction (gradation correction), detailed black level settings, black stretch (auto dark area correction), and auto contrast intensity.
- [Color] You can adjust color saturation, hue, color temperature, and Live Color (enhances vividness by adjusting each color’s intensity).
- [Clarity] You can set sharpness (contour enhancement) and Reality Creation (super resolution processing and noise reduction), and adjust the amount of correction for each type of video noise.
- [Motion] You can configure motionflow settings. This feature smoothly displays fast-moving images and settings can be adjusted based on content type and personal preference.
- [Video signal] You can configure HDR (High Dynamic Range, technology that expands light and dark expression in video) settings based on your environment. It is recommended to leave it set to [Auto] for normal use.
- [Adv.color adjustment] You can individually adjust gain (output adjustment), bias (reference value), and gamma (gradation) for each RGB component. Ideal for professional-level precise color adjustment.
[Display & Sound]→[Screen] Screen aspect ratio and display area settings
Procedure: [Settings]→[Display & Sound]→[Screen]menu
You can configure content size and aspect ratio settings. These settings are partially linked with the picture quality settings.
[Wide mode]
You can change the aspect ratio (display size) of the content. This feature can be disabled in [Pro settings]→ [Wide mode key].
See details see here .
Setting Examples
1. When Original Content is a 4:3 Aspect Ratio
- [Wide zoom]Displays contents in full screen while minimizing distortion.
- [Normal]Displays content in its original aspect ratio. Standard content is displayed with black bars on the sides (pillarboxed).
- [Full]Horizontally stretches content for fullscreen display.
- [Zoom]Maintains original aspect ratio and zooms in on letterboxed content (black bars at the top and bottom) to fill the screen.

2. When the Original Video Has a 16:9 Aspect Ratio
- [Wide zoom] Displays in full screen while minimizing distortion.
- [Normal] For 4:3 content that appears stretched horizontally due to being expanded to 16:9, this compresses it horizontally to display at the correct aspect ratio.
- [Zoom]Maintains original aspect ratio and zooms in on letterboxed content (black bars at the top and bottom) to fill the screen.
- [Full] Displays content in its original aspect ratio.
Note:
The display result may differ from your settings even when content has a 16:9 aspect ratio. Adjust settings as needed.

[4:3 default]
This feature is enabled only when [Wide switch] is set to [Auto]. When the input signal is 4:3, it is automatically detected and displayed with black bars on the sides.
Options
- [Normal] Displays content in its original aspect ratio. Standard content is displayed with black bars on the sides.
- [Wide zoom] Displays content in full screen while minimizing distortion.
[Auto display area]
When enabled, the monitor automatically switches to the appropriate display area based on the video signal. [Display area], [Screen position], and [Vertical size] are disabled when this is enabled.
[Display area]
You can change the video display area.
Options
- [Full pixel] Displays content in its original format.
- [+1] Displays content in the maximum display area.
- [Normal] Displays content in the recommended display area.
- [-1] Zooms in on content.
Note
Availability of this feature depends on the selected [Picture mode].
Procedure: [Settings]→[Display & Sound]→[Picture]→[Picture mode]
- Available when selecting [Picture mode]:[Vivid][Standard][Cinema][Custom]
- Not available when selecting [Picture mode]:[Photo][Graphics][Game]
[Screen position]
This feature is enabled only when [Wide switch] is set to [Zoom]. You can adjust the vertical position of the zoomed-in image without stretching it.
[Vertical size]
This feature is enabled only when [Wide switch] is set to [Wide Zoom]. You can adjust the vertical position of the zoomed-in image without changing its vertical size.
2. Audio Settings
[Display & Sound]→[Sound] Monitor Speaker audio and output level settings
Procedure: [Settings]→[Display & Sound]→[Sound]menu
You can configure the monitor’s built-in speaker output and audio quality. There are two types of settings: settings for each audio output and overall speaker balance adjustment.
1. Adjust Output Level and Audio Quality for Each Audio Output
Procedure: [Settings]→[Display & Sound]→[Sound]→[Sound customization]menu
[Surround]
Virtually reproduces 5.1 channel surround sound for an immersive audio experience. The setting automatically detects the input signal type and can be selected from [Auto], [On], or [Off]. When connected to a Dolby Digital Plus-compatible device via HDMI ARC cable, set to [On] and enable [Dolby Digital Plus].
- [Surround effect] When “Surround” is set to [Auto] or [On], the surround effect is automatically adjusted according to the viewing environment.
- [Equalizer] Fine-time audio quality by adjusting individual frequency bands.
- [Dialogue enhancer] Enhances voices that tend to be drowned out by background music and sound effects, making dialogue easier to hear.
[Volume level]
Settings Items in [Volume level]
- [Volume offset] You can adjust the output level for each connected external device. This is useful when volume varies between devices such as disc recorders, game consoles, and PCs. Adjust using the remote control’s volume buttons [+] and [-].
- [Dolby Dynamic Range] Corrects volume differences that commonly occur between Dolby Digital audio and streaming services or mobile devices (HE-AAC audio).
Overall Monitor Speaker Balance Adjustment
[Advanced auto volume]
Automatically adjusts audio input to maintain consistent volume levels based on changes in the audio input.
Settings Items in [Advanced auto volume]
- [Balance] Adjusts left/right speaker output balance to correct sound imbalance caused by room layout or installation environment.
- [Display position] Select based on monitor installation method to optimize speaker output balance.
Options
[Table-Top Stand]
![図:[テーブルトップ]](/wp-content/uploads/2025/11/03-008-3.png)
If the monitor is placed on a table or a stand
[Wall Mount]
![図:[壁掛け]](/wp-content/uploads/2025/11/03-009-2.png)
When monitor is wall-mounted or placed on a floor stand
[Display & Sound]→[Audio output] Audio system integration and audio output settings
Procedure: [Settings]→[Display & Sound]→[Audio output]menu
Configure the audio output destination and integration with external devices.
[Speakers]
You can switch audio output between the monitor’s built-in speakers and an external audio system. Select [Audio system] when integrating with an audio system.
[Audio system prioritization] *Compatible with Sony devices only
When set to [On], audio output automatically switches to a BRAVIA Link-compatible Sony audio system when the monitor is turned on with the remote control, and [Speaker output] is also changed to [Audio system].
What is BRAVIA Sync
BRAVIA Link is Sony’s interlinking feature that allows you to control compatible devices connected via HDMI cable using the monitor’s remote control. Supported devices include Blu-ray recorders and audio systems bearing the BRAVIA Link logo.
[Home theater control]
The connected audio system automatically powers on when you turn on the monitor with the remote control.
Tips
Automatic power-off is not supported.
[A/V sync] *Compatible with Sony devices only
Corrects audio delays that may occur when using Sony audio systems connected via Bluetooth (A2DP) or HDMI by adjusting audio output timing.
[eARC mode]
Provides high-quality audio output from devices connected to HDMI 3 (eARC/ARC).

[Digital audio out]
Adjusts PCM output level to compensate for volume differences between PCM and compressed audio sources (such as Dolby Digital).
[Dolby Digital Plus output]
When using a Dolby Digital Plus-compatible audio system via HDMI ARC, select [Dolby digital] if using both ARC and optical output simultaneously.
Note:
Since optical digital output (S/PDIF) does not support Dolby Digital Plus, select [Dolby digital] when using both HDMI ARC and optical output.
[Display & Sound]→[Audio output]→[Pass through mode] Output audio in original format
[Pass through mode]
Procedure: [Settings]→[Display & Sound]→[Audio output]→[Pass through mode]
Outputs audio signals directly to the audio system, bypassing the monitor. Audio output continues even when the monitor is turned off with the remote control, and audio is transmitted in its original format without decoding.
3. Network & Internet
[Network & Internet] Network & internet connection settings For Developer
Procedure: [Settings]→[Network & Internet]menu
You can configure internet connection, network settings (wired/wireless LAN), IP address assignment (manual/automatic), and integration with external systems via IP control.
[Wi-Fi]
You can turn Wi-Fi on or off and select the Wi-Fi network to connect to.
[Add new network]
Select this when connecting to a Wi-Fi network.
[Scanning always available]
Configure whether Google Location Services and other apps can scan for networks when Wi-Fi is off.
[Wired LAN]
Displays “Connected” and the MAC address when successfully connected, or “Not Connected” if no connection has been made.
[Proxy settings]
When using a proxy server, configure proxy settings by manually entering server name and port number.
Note:
HTTP proxy applies only to the web browser and does not apply to other apps.
[IP settings]
Configure IP address acquisition method. Select [Static] for manual configuration and enter a valid IP address (DNS server settings can also be configured). Select [DHCP] for automatic configuration.
[Network status]
Displays current network status. While the status is visible on screen, press [OK] on the remote control to run a connection diagnostic.
[Wi-Fi Direct] Android TV OS 10 or earlier
Used to display content from Wi-Fi-enabled smartphones or tablets (screen mirroring). Devices connect directly to the monitor without requiring an access point.
[Remote start]
Available only when the monitor is in sleep or suspend mode. Allows external devices to remotely control monitor power.
Options
- [Off] :The setting becomes disabled.
- [On] Home Network Devices: The monitor automatically turns on or off only in sync with the power on/off status of devices on the local network.
- [On] Various Devices and Apps: The monitor automatically powers on or off with the power on/off status of devices on the local network, as well as that of mobile devices and smart speakers.
[Remote device settings] For Developer
Enables remote control of the monitor from smartphones, PlayStation®4, and similar devices. Register and enable the devices you want to use for remote control.
Accessing the monitor from your device displays a prompt asking for connection permission. Select [OK] to connect, then register and enable the device from this setting.
Settings Items in [Remote device settings]
- [Control remotely] Register the device to use for remote control.
- [Deregister remote device] Unregisters the device to disable remote control access.
[Server diagnostics]
Tests connectivity to servers on the local network.
[Renderer]
Set access controls for playing media content (photos, music, etc.) from external devices on the monitor.
[Network & Internet]→[Local network] Settings for access authentication and API usage For Developer
Procedure: [Settings]→[Network & Internet]→[Local network]menu
Set up connections for controlling the monitor from external devices over the local network.
[IP control] For Developer
You can configure settings that allow applications on the display or devices on the local network to control the display using APIs and protocols provided by BRAVIA Professional Displays.
*EU models have different specifications.
Settings Items in [IP control]
[Authentication]
You can select an authentication method for API access. It can prevent unauthorized access and enhance security. Typically, use [Pre-Shared Key] for commercial displays and [None] for managed networks. The following methods are available.
Option (authentication method)
- [None]
APIs are available regardless of authentication level (None / Generic / Private) without authentication method. - [Normal]
Pre-shared key (a user-defined secret key for authentication method) is not required, but only authentication level None APIs are available. - [Pre-Shared Key]
Authentication method uses a Pre-shared key. APIs of authentication level Generic / Private are available. APIs of authentication level None are also available without authentication method. - [Normal and Pre-Shared Key]
Either [Normal] or [Pre-Shared Key] authentication method can be used.
Tips:
When the client does not support authentication method selection, Pre-Shared Key is commonly used. In this case, configure the key from the [Pre-Shared Key] settings.
[Pre-Shared Key] For Developer
When [Authentication] is set to either [Pre-shared key] or [Normal and Pre-shared key], you can configure the key.
[Simple IP control] For Developer
Simple IP Control is a TCP-based SSIP (BRAVIA Professional Displays proprietary protocol). Used to remotely control the monitor over the local network.
For details, here.
Tips
To use REST API or IRCC-IP and prevent the monitor from entering suspend mode, enable [Simple IP control].
- For details, see REST API suspend mode.
- For details, see IRCC-IP suspend mode.
[Control4®]
BRAVIA Professional Displays are compatible with the integrated control platform “Control4®,” enabling monitor operation from the system and integration with other smart home devices. Enable this setting when using.
[Accounts & sign-in] [Privacy] [Apps] Google account & HTML5/Android app privacy For Developer
Configure various Google-related services, including Google Play, app login, voice assistant, and privacy management. By registering an account on the monitor, you can access Google cloud services and app features.
[Accounts & sign-in]
Procedure: [Settings]→[Accounts & sign-in]
You can register and log in to your Google account.
Tips
When BRAVIA Professional Displays are used in hotels or similar settings, Google accounts entered by guests and other users are stored here.
To automatically delete these accounts, enable [Account expiration] in “Pro settings”.
[Privacy]
Procedure: [Settings]→[Privacy]
You can set your Google privacy settings.
Settings Items in [Privacy]
- [Location]
You can set to obtain your current location by Wi-Fi or scan constantly. - [Usage & diagnostics]
You can set whether to enable or disable sending device usage and diagnostic data to Google to help improve Android. - [Ads]
You can set the acquisition or deletion of ID for advertising. - [Google Assistant]
You can set up Google’s voice assistant feature to interact with the monitor using covoice commands. By speaking to the monitor, you can search for content, control smart home devices, and perform other actions. - [Apps]
You can set access permissions to monitor functions and information for each Android app installed via Google Play. - [Special app access] For Developer
Android apps can configure the following permission settings related to monitor functions and information. - Settings Items in [Special app access]
- [Energy optimization] Android TV OS 12
Optimizes the battery usage of Android apps. - [Usage access]
Allows specified Android apps to track information such as the usage status and frequency of other apps, carrier, language settings, etc. - [Notification access]
This function allows specified Android apps to read, modify, and delete all files within the monitor and connected storage. This setting allows apps to access all files without user action, so please only grant permission to trusted apps. - [All files access] Android TV OS 12
Allows specified Android apps to read, modify, and delete all files within the monitor or connected storage. With this setting, apps may access files without explicit user action. - [Display over other apps]
Allows other apps to overlay on top of the Android app in use. This may make it harder to see or change the display and behavior when using other apps. - [Modify system settings]
This function allows only specified Android apps to modify monitor system settings. For security protection, only explicitly approved apps can change settings. - [Picture-in-picture] Android TV OS 12
Allows picture-in-picture. You can continue displaying a video in a picture-in-picture window (small window) while using or after exiting an Android app, or overlay video on top of other apps. - [Alarms & reminders] Android TV OS 12
Allows you to specify Android apps and set alarms or time-based actions. This setting allows apps to run in the background, which may increase power consumption. Disabling this permission will also stop existing alarms and time-based events from functioning. - [Turn screen on]
Allows specified Android apps, such as alarm or calling apps, to turn on the monitor screen. When allowed, Android apps can wake the monitor from sleep mode without the user pressing the power button.
- [Energy optimization] Android TV OS 12
Tips
When the monitor is in suspend mode, the target Android app may also be stopped, and the screen may not turn on. For instructions on disabling suspend mode, see here.
- [Security & Restrictions] For Developer
You can configure installation permissions for Android apps not installed via Google Play (such as your own custom APKs). When an Android app is connected via USB drive or network, it will be displayed in the [Unknown apps] list, and can be installed when enabled. Use this setting when installation of BPK (BRAVIA Professional Displays package) such as BRAVIA Signage (Paid) is required. For security reasons, it is recommended to disable this setting after installation is complete.
Tips
When installing via USB drive, you need to configure the following additional settings to specify the behavior when a USB drive is inserted.
Procedure: [Pro settings] → [USB Drive Auto Run] → Enable [Install web app] and [Install BPK]
[Apps] For Developer
Procedure: [Settings]→[Apps]
In addition, it can also be configured from [App permissions], [Special app access], and [Security and restrictions] found under [Settings] → [Privacy].
4. Date, Time & Accessibility Settings
[System] Basic settings of the monitor For Developer
Procedure: [Settings]→[System]menu
In addition to configuring basic settings such as date and language, you can restart the monitor after making various settings and set energy saving options.
[Accessibility]
You can configure the settings such as subtitles, text-to-speech.
[About]
You can check the device name and operation status of the monitor and Android system information (OS version, security patches, etc.) You can also enable notifications for software updates and new version releases over the network.
[Date & Time]
You can set the time zone, date, and time.
[Language]
You can select the display language.
[Keyboard]
You can configure settings for both the software and physical keyboards.
[Storage]
You can check the current usage of the monitor’s internal storage.
[Home screen]
You can customize the Home screen.
[Screen saver]
To prevent screen burn-in, you can set the screen saver image and the inactivity time until startup.
[Power & Energy] For Developer
You can make detailed settings for energy saving or use the ECO menu for simplified settings. If 24/7 operation is required, some energy-saving options may need to be disabled.
[Cast]
You can configure a cast connection permission. If you connect a Cast-compatible smartphone or tablet to the same Wi-Fi as the monitor, you can play the content from that device.
[Sound]
You can turn the monitor’s operation sounds on or off, such as screen transition sound or power on/off tone.
[Parental controls]
You can configure usage restrictions for external inputs and apps.
[LED indicator]
You can configure the LED indicator to be always on or always off during monitor operation.
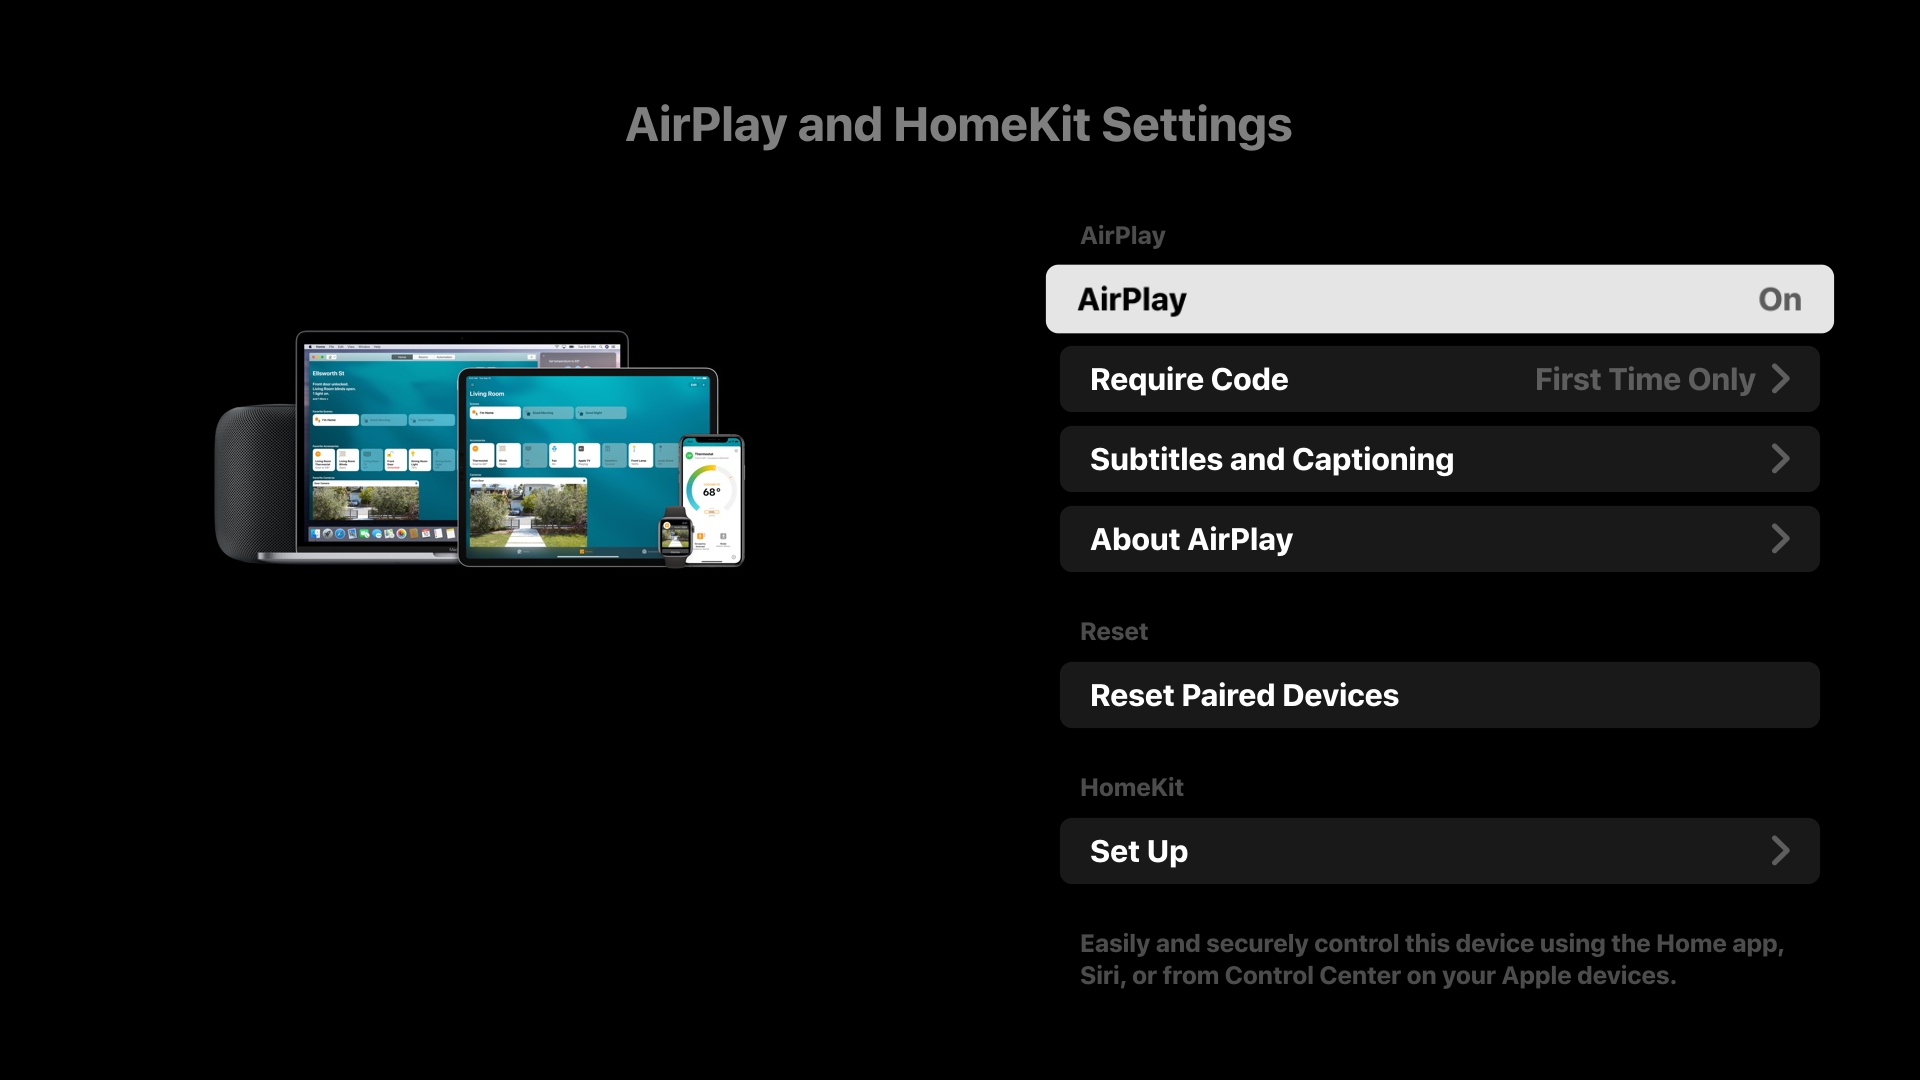
[Apple AirPlay & HomeKit] For Developer
You can configure AirPlay or HomeKit settings.
AirPlay Settings Items
- [Connection] You can select either [On](enabled) or [Off] (disabled).
- [Require Code] You can select how frequently a passcode prompt is required.
- [Subtitles and Captions] In addition to enabling or disabling the subtitles, you can set the size and color of the subtitles.
HomeKit Settings Items
You can set rooms, names, notifications, and more.
Tips
When operating AirPlay in the “Pro mode” environment, we recommend using Restore AirPlay Settings, one of the startup services.
[Initial setup]
You can perform the initial settings following the instructions that appear when you turn on the power for the first time after purchase.
[Restart]
Restart the monitor.
[Remotes & Accessories] Bluetooth, serial communication settings For Developer
Procedure: [Settings]→[Remotes & Accessories]menu
You can set Bluetooth pairing and serial communication.
[Bluetooth]
You can set Bluetooth pairing.
[Remote control] For Developer
Pair the Bluetooth remote control. Once paired, the remote control can control/operate the monitor without having to point directly at it.
[RS232C control] For Developer
Enable this setting when controlling the display via serial communication (RS-232C) .