BRAVIA Signage (Paid)

BRAVIA Signage (paid) is digital signage software that enables centralized management of multiple monitors across multiple locations. It supports schedule distribution via network and integration with external content servers, enabling efficient operations. The browser-based intuitive management interface allows remote monitoring of distribution status and configuration changes. Separate application required.
Features
Centralized Control
You can control multiple monitors collectively from the BRAVIA Signage Server web management screen. You can also set a playback schedule by day of the week and time slot, allowing for flexible content delivery management.
Flexible Content Handling
You can handle content such as still images, videos, and HTML5. You can also use the multi-zone function to display multiple contents simultaneously by dividing the screen, and ticker settings.
Efficient Operations
Content can be transferred via LAN without relying on USB flash drive. You can check playback logs and status check logs from the GUI, which is useful for understanding of the operating status and troubleshooting.
Network Configuration Diagram
BRAVIA Signage (paid version) can manage up to 600 monitors at once.
- Server (BRAVIA Signage Server): Content distribution, scheduling, device monitoring
- Client (monitor): Install local application (BRAVIA Signage Player) to receive/play content
- Optional (external content server): Separate web server or cloud storage(Amazon S3、Google Driveなど)

Preparation
In order to use BRAVIA Signage (paid version), an environment that complies with the specifications is required. Please check the contents.
Key Features
- Power Schedule Management
You can specify the date, day of the week and time to set the monitor power on/off schedule. - Playlist Management
You can create and manage playlists by combining URLs and contents stored in libraries. It supports video, still image, and HTML content codecs, and can be configured to display previews and download content to the monitor in advance. - Playback Schedule Management
You can set the content playback timing by date, day of the week, or time. - Interrupt Distribution
You can instantly deliver content in an emergency or ad hoc manner, independent of the regular schedule. - Content Library
You can upload and manage content using using a web server (such as IIS) installed on a Windows PC running BRAVIA Signage Server. - Content Creation
You can create original content by specifying a layout and combining multiple types of content assets, including external inputs. - Event Log
You can check various logs such as the power status of the monitor and content playback results. - Settings
You can make detailed settings related to each function, such as playback and download results, email notification when an error occurs, and scheduled restart.
How to Configure
To set up BRAVIA Signage Server, install the database management software, the Apache web server that provides content library functionality, and BRAVIA Signage Server in this order.
How to Install
Use of Synology NAS
Search for “BRAVIA Signage” in Package Center and install the displayed item. Then follow the wizard instructions to complete the entire BRAVIA Signage Server setup.
Use of a Windows server
1. Extract the Windows Folder Provided During Installation on the Client PC
Extract the windows folder from the deliverable’s setup to any directory on the client PC.
Note:
When you extract and place the installer, the folder name may contain single-byte symbols or spaces, which could prevent the software from starting correctly. In such a case, please change the directory name to one that contains only alphanumeric characters.
2.Check the Usage of Ports 80 and 8080
BRAVIA Signage Server utilizes ports 80 and 8080. Check the appport_list.txt generated in the Windows folder for apps using port 80 or 8080. If there are any applicable applications, change the [Startup setting] to [Manual] or [Disabled] according to the usage, and then press the [Stop] button.
Tips:
If you need alternative methods to check port usage or to change the port of BRAVIA Signage (paid version), please refer to the manual downloaded from here.
3. Database Software Installation
Install Method
The installation procedure differs depending on the version of BRAVIA Signage. You can determine the version by the name of the setup file provided at the time of installation.
| BRAVIA Signage Version | Database Management Software | Installation Procedure |
|---|---|---|
| v2.1.0 or later | PostgreSQL | 1. Run the setup file bravia-signage-setup.exe and follow the on-screen instructions, clicking “Next” until the command prompt opens. 2. When the command prompt opens, type “1” and press [ENTER] to start the setup. After setting the passwords, the installer will automatically launch, followed by the Apache setup. |
| 2.0.0~2.0.2 | PostgreSQL | 1. Right-click the setup file setup.exe and select [Run as administrator]. 2. When the command prompt opens, type “1” and press [ENTER] to start the setup. After setting the passwords, the installer will automatically launch, followed by the Apache setup. |
| v1.8.4 or earlier | MongoDB | 1. Right-click the setup file setup.bat and select [Run as administrator]. 2. When the command prompt opens, type “1” and press [ENTER] to start the setup. |
Example: Command Prompt
If [ERROR] is displayed, please check whether ports 80 and 8080 are in use, and try again.
WELCOME TO BRAVIA Signage Server SETUP**** SYSTEM Information ****ARCH: 64bitOS: Windows 10**** Select Setup Type ****Select setup type as follows:[1] Setup Type 1[2] Install BRAVIA Signage Server[3] Remove AllSelect Number: 1
(v1.8.5 or later): Command Prompt
For BRAVIA Signage v1.8.5 and later, you can set administrator passwords in PostgreSQL.Passwords can be any combination of letters and numbers and must be at least 8 characters long.
- PostgreSQL super user password
This account has full administrative privileges over the database.When prompted for the PostgreSQL super user password in the setup command prompt, enter your desired password. - PostgreSQL bs1 user password
This account is used by BRAVIA Signage to access the database. When prompted for the PostgreSQL bs1 user password in the setup command prompt, enter your desired password.
WELCOME TO BRAVIA Signage Server SETUP
**** SYSTEM Information ****
ARCH: 64bit
OS: Windows 10
**** Select Setup Type ****
Select setup type as follows:
[1] Setup Type 1
[2] Update BRAVIA Signage Server
[3] Remove All
Select Number: 1
**** PostgreSQL Setup ****
2025/03/26 15:50:58.206: Create C:\data\postgresql directory.
Please enter the PostgreSQL super user password:
Please re-enter the password to confirm:
Please enter the PostgreSQL bat user password:
Please re-enter the password to confirm:
2025/03/26 15:50:58.206: Start to install PostgreSQL.
2025/03/26 15:50:58.206: Installing...
2025/03/26 16:03:30.900: Complete to install PostgreSQL.
**** Waiting for 10 seconds. press CTRL+C to quit ****
**** Apache HTTP Server Setup ****
2025/03/26 16:10:44.012: Start to install Apache2.4
2025/03/26 16:10:44.012: Installing...
2025/03/26 16:11:13.559: Complete to install directory.
2025/03/26 16:11:13.591: It takes a time to initialize HTTP Server service. Please just a minute.
**** Waiting for 10 seconds. press CTRL+C to quit ****
2025/03/26 16:10:58.237: Start Apache HTTP Server
2025/03/26 16:11:04.212: Add rule name and allow port of Apache HTTP Server.
**** BRAVIA Signage Server Setup ****
Do you want to disable authentication for BRAVIA Signage ? (Y=Yes / N=No/Default):
4. Installing BRAVIA Signage Server
- Specify the following two items in “BRAVIA Signage Server Setup”. Sets the username and password for authenticating access to the management window.
BRAVIA Signage authentication: Optional (Default: SignageAdmin)
password: 8 or more characters including alphanumeric characters
Tips:
The authentication function is enabled by default, but can be disabled if necessary. Note, however, that disabling this setting poses a security risk.
Configuration: disable authentication for BRAVIA Signage?: Select Y = Yes
- When you press the [ENTER] key, the installer starts automatically. Follow the instructions in the wizard.
- Register the BRAVIA Signage Server service. Enter your Windows login username and password.
cd "C:\Program Files (x86)\SONY\BRAVIA Signage"braviasignageserver.exe install --username {Windows login username} --password {Windows login password}braviasignageserver.exe start
Tips
If an error occurs during service registration, you can manually register and start the service by following the procedure below.
・Close the command prompt and start the command prompt with administrator privileges.
・Run the following command:
2025/03/26 0:54:15.23: Start to install BRAVIA Signage Server2025/03/26 0:55:43.88: Complete to install2025/03/26 0:55:43.89: Update BRAVIA Signage Server XML2025/03/26 0:55:43.92: Complete to update BRAVIA Signage Server XMLPlease enter the password of the logged-in Windows user. Login username: ×××××××××××××× *Enter the login user's password
- If necessary, configure Windows Firewall and other settings.
- When service registration is complete, the following content will be displayed. Finally, press the ENTER key to close the command prompt.
2025/03/15  0:54:15.23: Start to install BRAVIA Signage Server
2025/03/15  0:55:43.88: Complete to install
2025/03/15  0:55:43.89: Update BRAVIA Signage Server XML
2025/03/15  0:55:43.92: Complete to update BRAVIA Signage Server XML
Please enter the password of the logged-in Windows user. "00040217": ××××××××××××××
2025/03/15  0:56:49.81: Register BRAVIA Signage Server Service
Installing service "BRAVIA Signage Server (braviasignageserver.exe)"...
Service "BRAVIA Signage Server (braviasignageserver.exe)" was installed successfully.
2025/03/15  0:57:00.65: It takes a time to register BRAVIA Signage Server service. Please just a minute:
Waiting for 0 seconds, press CTRL+C to quit ...
2025/03/15  0:57:02.13: Start BRAVIA Signage Server Service
Service "BRAVIA Signage Server (braviasignageserver.exe)" refreshed successfully.
Starting service "BRAVIA Signage Server (braviasignageserver.exe)"...
Service "BRAVIA Signage Server (braviasignageserver.exe)" started successfully.
2025/03/15  0:57:04.32: Add rule name and allow port of BRAVIA Signage Server:
OK
Please push ENTER key and close this window.- A shortcut icon is created on the desktop of your PC. Double-click it.
Tips:
The first time you open the Schedule Delivery screen of the management web application, a dialog box appears. It is recommended to select [Yes] to automatically turn off the monitor during times other than broadcasting.
BRAVIA Signage Player is a dedicated local application installed on your monitor for viewing and managing signage content.
* Displayed items and procedures may vary depending on the monitor’s firmware.
Required Monitor Settings
In addition to basic settings, configure proxy settings, network settings, enable IP control, and adjust other settings as appropriate for your environment.
Recommended: Pre-shared Key Configuration
This is recommended for remote operation/control and API integration. Based on your security requirements, configure the key for authentication with the monitor.
Procedure:[Settings]→[Network & Intetrnet]→[Local Network]→[IP control]
Enable [Install Unknown Apps]
Procedure: [Settings]→[Privacy]→[Security & Restrictions]
Note:
To prevent unknown apps from being installed by third parties, we recommend that you turn [Security & restrictions] back off after installation.
Enable USB Drive Auto Run
Enable [USB drive auto run]
Procedure: [Pro settings]→[USB drive auto run]
Installation method
The installation is a two-step process that is performed using the files in the deliverables’ setup and a USB flash drive.
1.First Time Installation
- Save the provided extapp_installer.pkg to the root folder of the USB flash drive and insert the USB drive into the monitor.
- The installer starts automatically. Follow the instructions in the wizard.
- After installation is complete, delete all contents of the USB flash drive.
2.Additional Components Installation
- Copy extapp_installer.pkg under the BRAVIASignageLauncher folder to the root folder of the USB flash drive.
- When the USB flash drive is inserted into the monitor, the installer starts automatically. Follow the instructions in the wizard.
Note:
Do not turn off the monitor or unplug its power cord during installation to avoid malfunction.
Initial Setup of BRAVIA Signage Player
Initial setup is done using the sample config.txt included with the deliverable.
1.Preparing the config.txt File
Copy the config.txt file in the manual folder of the deliverable to any PC that is not the server PC.
2.Editing the File
Use a text editor to edit the copied config.txt file.
In the “server” key below, replace “example” with the IP address of the server PC where you set up the BRAVIA Signage Server.
{
  "settings" : {
    "server" : "http://example:8080/",
    "tv-name" : "Signage-001",
    "connection-error" : {
      "timeout" : 300,
      "reboot" : false
    },
    "override" : true
  },
  "version" : "1"
}Tips
The IP address of the BRAVIA Signage Server can be found by hovering you mouse over the “i” symbol in the upper right corner of the management web app.
- If the server PC has multiple IP addresses, all IP addresses are displayed.
- Specify one of these IP addresses.
3.Copying to a USB Flash Drive
Copy the edited config.txt file to the root folder of the USB flash drive.
4.Inserting the USB Flash Drive into the Monitor
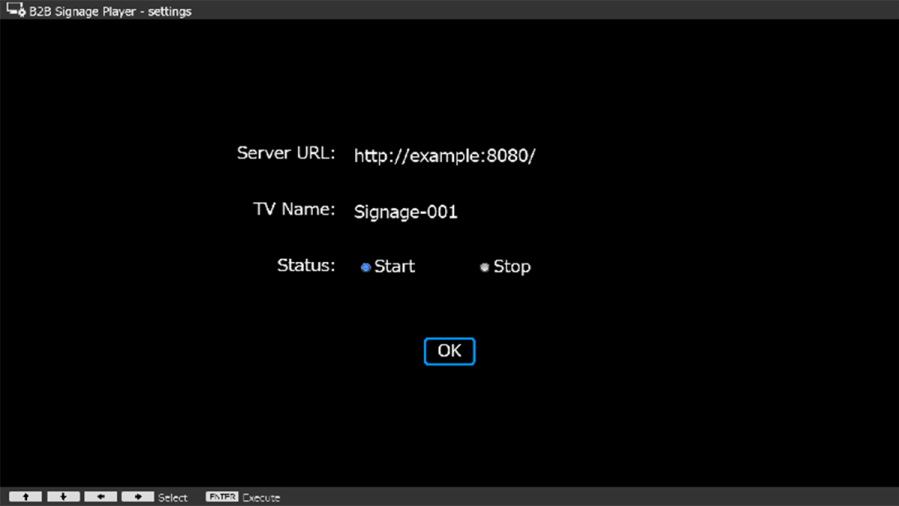
If you insert the USB flash drive into the monitor while the monitor is turned on, the setting confirmation screen appears.
After checking [Start] and selecting [Save] button, BRAVIA Signage Player connects to BRAVIA Signage Server according to the value of “xserver.”
Note:
- Perform this procedure when the extapp_installer.pkg file does not exist in the root folder of the USB flash drive.
- Even if the monitor and the server PC are on different network segments, BRAVIA Signage Player can connect to the server PC as long as the monitor can reach the server PC.
- The BRAVIA Signage Player cannot connect to the BRAVIA Signage Server (Server PC) through a proxy server.
5.Launch Management Web App on Server PC
Start the browser on the server PC and enter the value of the “server” key for the URL, or open the management web app from the shortcut icon on the desktop.
Setup is complete.
Management Web Application Select [Display management] on the left side of the screen, and check whether the BRAVIA Signage Player you set up is reflected in the monitor information list. If it is reflected in the list, the setup was successful.
